If you want your WordPress website to rank well in organic search results, you need to optimize it effectively for search engines.
In this comprehensive guide, we’ll go over 23 key WordPress SEO tips that will help your site get to the top search listings.
What Is SEO?
Search engine optimization (SEO) is a set of practices with the goal of increasing a website’s chances of ranking highly on search engine results pages (SERPs).
SEO can involve tweaking your site’s structure, fixing technical issues, and targeting specific keywords throughout your content.
Why Is SEO Important?
SEO is crucial for:
Improving a website’s visibility in search results: Optimizing a website increases its chances of ranking at the top of search results. Which boosts the site’s visibility—ensuring more people are exposed to its pages and content.
Generating organic traffic: The top three results on a Google SERP get the most clicks. With proper search engine optimization tactics, you can get your website in one of the top three spots and drive valuable organic traffic.
Driving conversions: On average, organic traffic tends to convert at a higher rate than other traffic sources. Which is why you should prioritize SEO in your marketing strategy.
Further reading: Conversion Rate Optimization: 9 Tactics That Work
What Is the Relationship Between WordPress and SEO?
WordPress (WP) is a popular content management system (CMS). It allows users to create both simple and complex websites with the help of thousands of website templates built by the WordPress community.
While WordPress offers built-in SEO functionality (such as custom titles and meta descriptions), there are also many plugins you can use to enhance the platform’s existing optimization capabilities. And give your website the best chance of winning the SERPs.
WordPress Posts vs. Pages
WordPress allows users to create two main types of content: posts and pages.
The post format is meant for blog posts, articles, and news-type content. By default, they appear in reverse chronological order—with your latest posts at the top.
Use the page format for static or evergreen pages on your site that will rarely change. Such as the “About Us” or “Contact Us” page.
Important: From an SEO standpoint, there’s no difference between a WP post and a WP page. Search engines see both as simply webpages.
The below tips apply to both WordPress posts and pages unless otherwise stated. We’ll mainly provide workflow examples of WP posts.
23 Top WordPress SEO Tips for 2024
Follow these tips to help you improve your SEO on WordPress:
1. Make Sure Your Website Is Indexable
Before being able to display your website in search results, search engines like Google first need to crawl and index your website pages. So you need to check that your site is indexable.
Crawling is the process by which Google finds pages on your website.
Once it discovers a page, Google’s crawler (a piece of software designed to uncover website pages) adds the site to the search engine’s index (a database where Google stores information about webpages).
By default, Google should be able to crawl and index your website without any issues.
You can check whether your site is indexable by clicking on “Settings” and then on “Reading” on the WP dashboard.
On the “Reading Settings” page, make sure the “Discourage search engines from indexing this site” option under the “Search engine visibility” section is unchecked.
If the option is checked, uncheck it and click “Save Changes.”
2. Set Up an SSL Certificate
You’ll need a Secure Sockets Layer (SSL) certificate. This helps to authenticate a website and the individual or organization behind it.
An SSL certificate includes information such as:
The domain name (and any associated subdomains) requiring the certificate
The individual or organization who earned the certificate
The name and digital signature of the certification authority
The certificate’s issue and expiration date
The public key associated with the certificate
SSL enables websites to use Hypertext Transfer Protocol Secure (HTTPS), a protocol that allows the secure transfer of data between a website and a user’s web browser.
Ensuring a secure web browsing experience has been a priority for Google for years. It recommends that all websites use SSL and HTTPS.
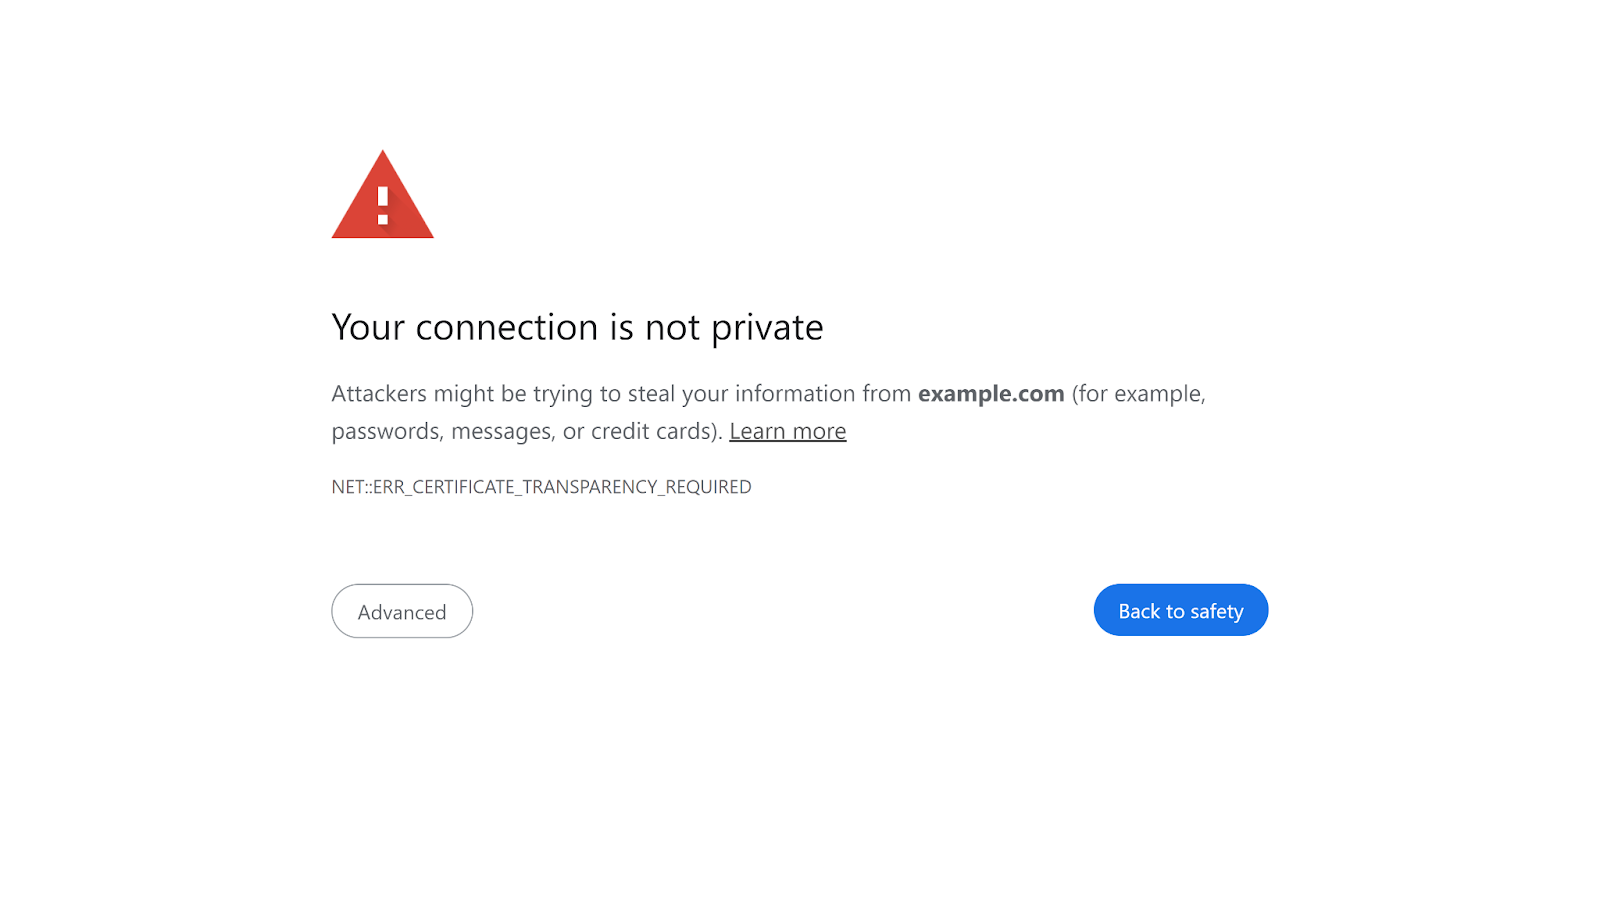
In fact, Google’s web browser, Google Chrome, will warn you before loading a website that doesn’t use SSL.
To set up an SSL certificate for your WordPress site, you first need to purchase it from a certificate provider such as SSLs or ComodoCA.
Once you’ve purchased an SSL certificate, add it to your WordPress website by using a plugin like Really Simple SSL.
Here’s how:
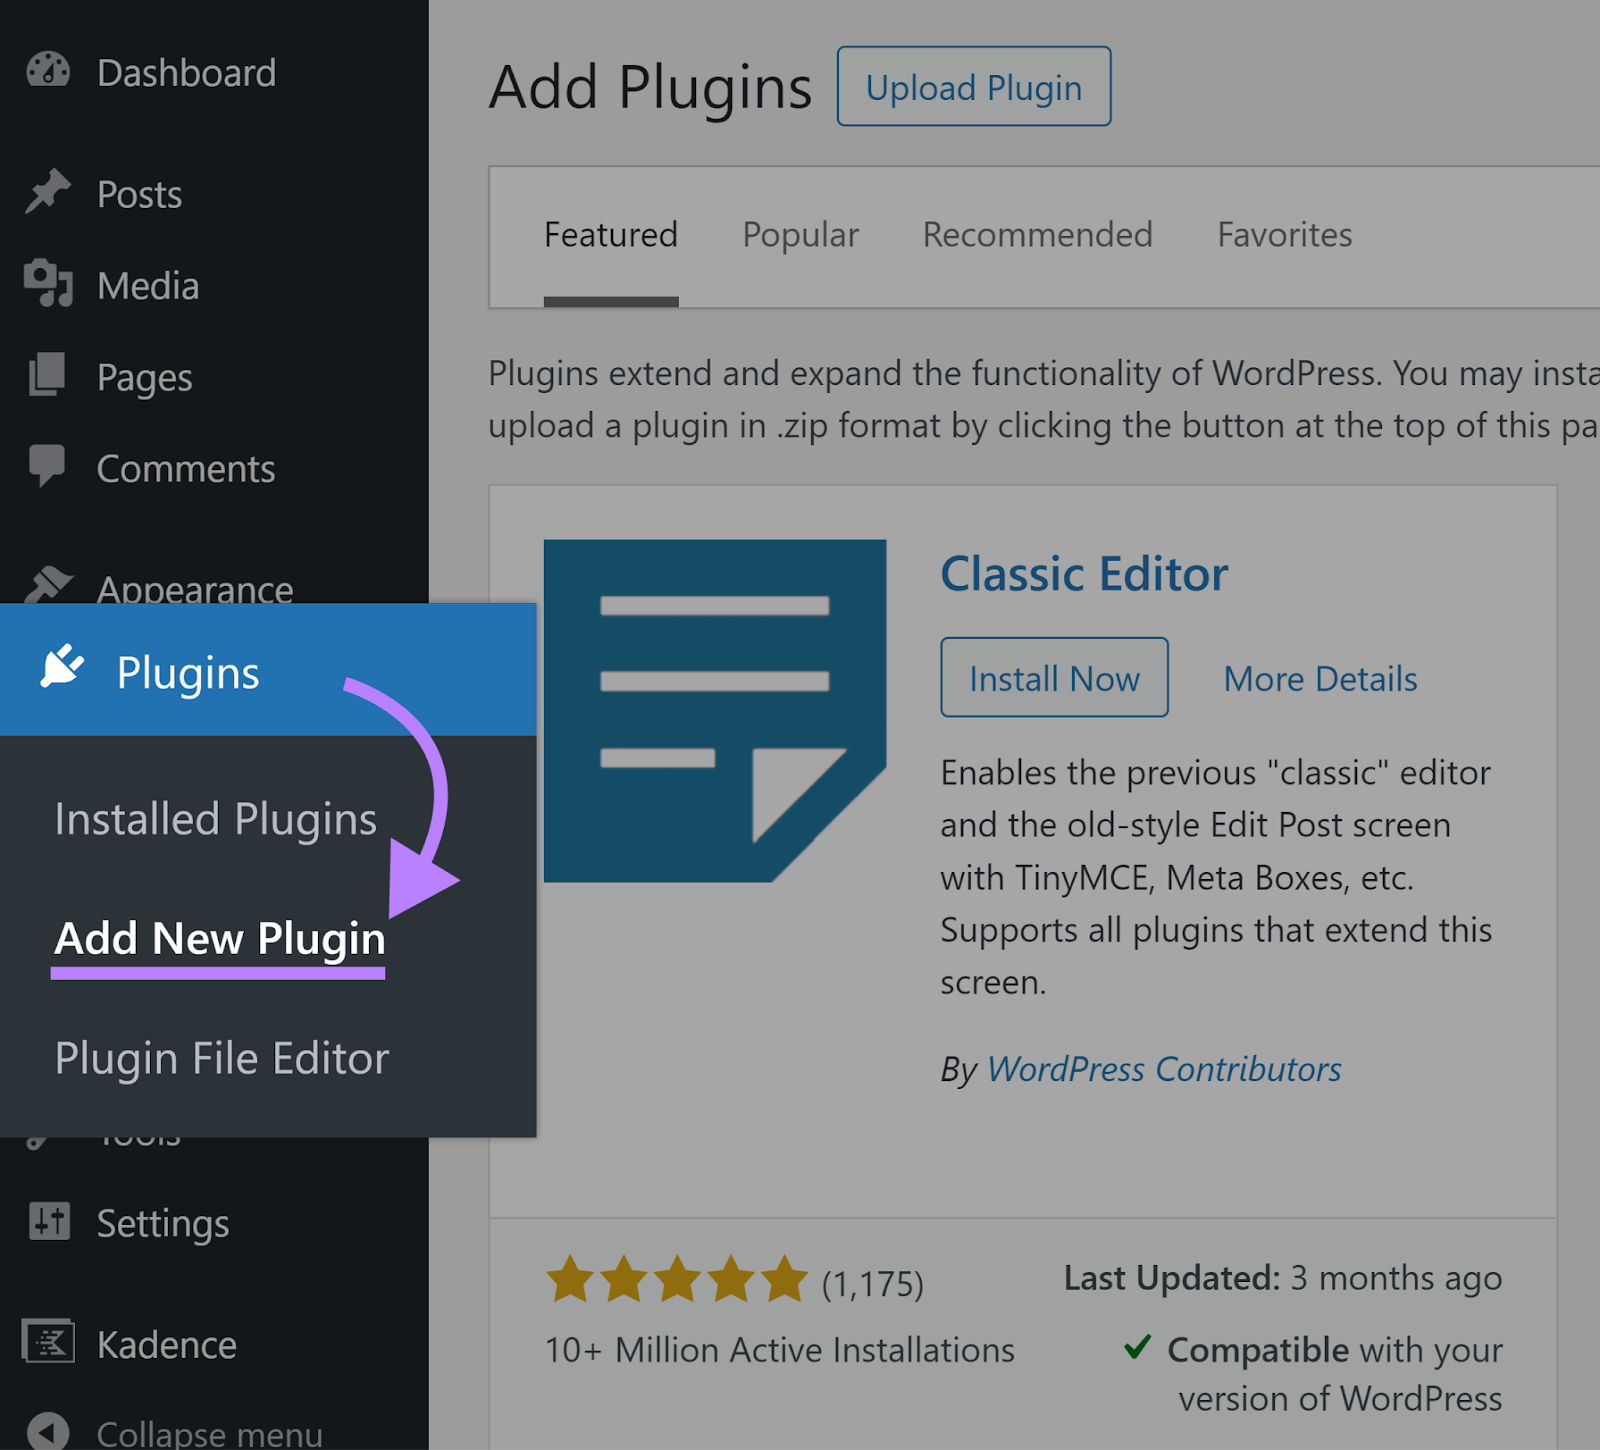
From the WordPress dashboard, go to “Plugins” > “Add New Plugin.”
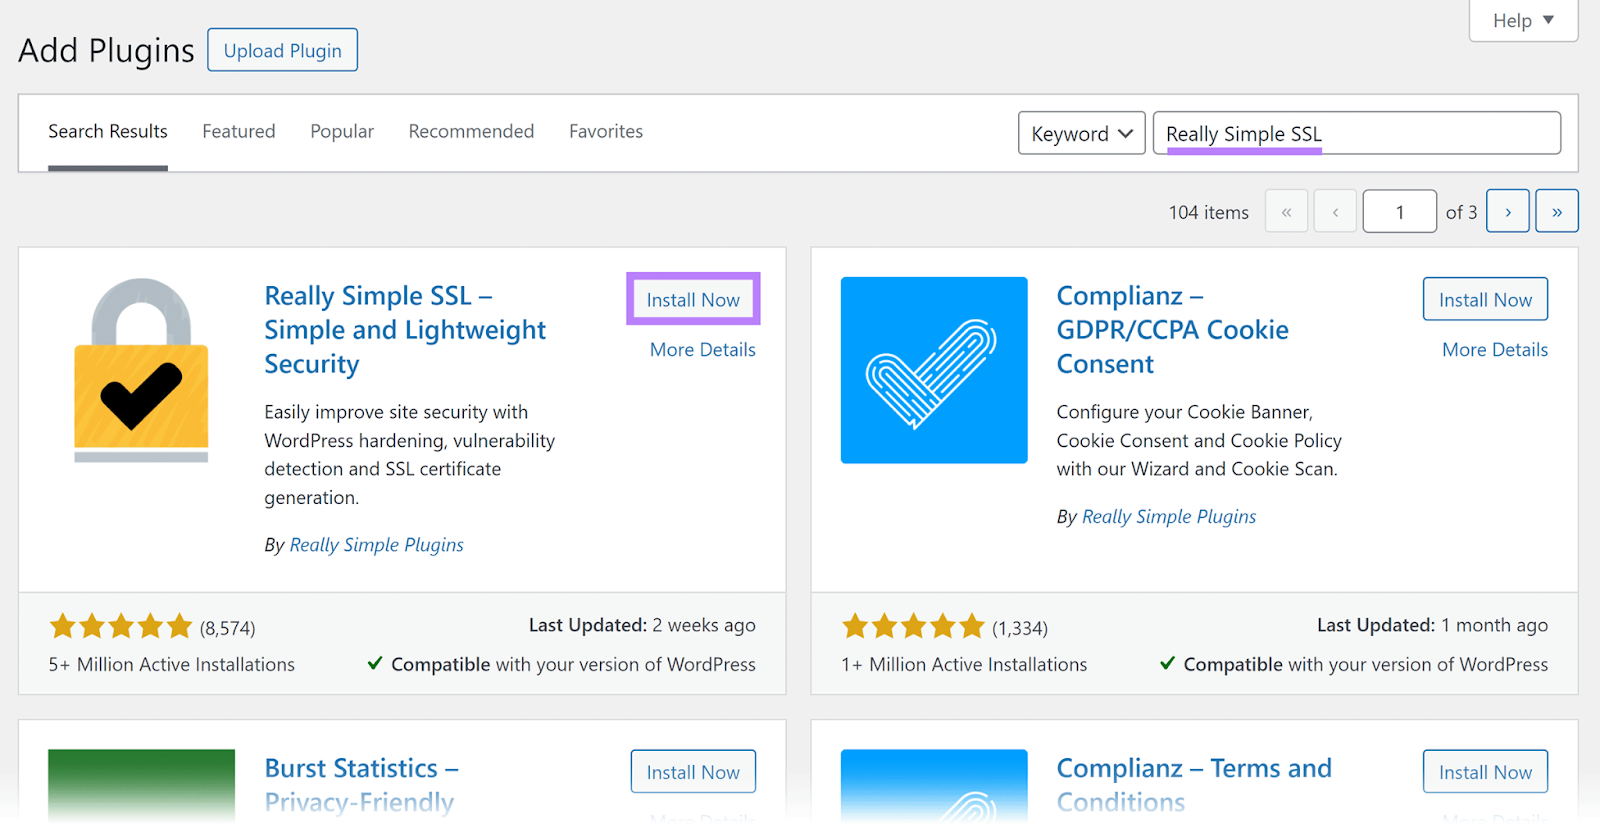
Type in “Really Simple SSL” in the search box and hit “Enter.” Click the “Install Now” button next to the first result.
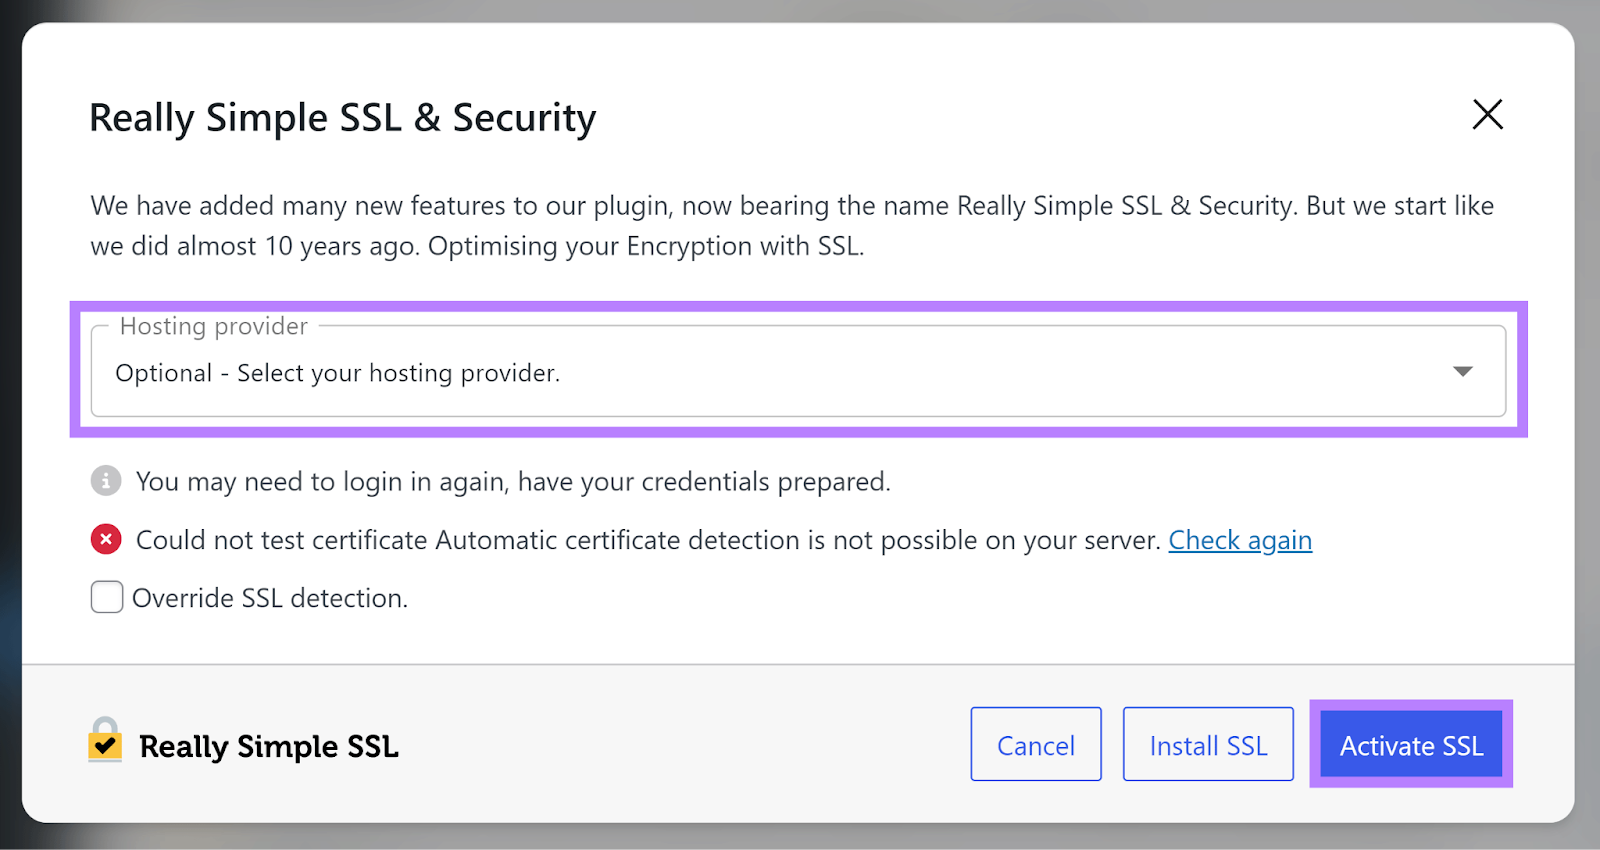
Once the plugin installs, click “Activate.”
You’ll then be directed to the plugin’s main page, where you’ll select your hosting provider. Find it in the drop-down list and click “Activate SSL.”
The plugin will then ask if you’d like to activate additional features. You can click “Skip” for now, and then on “Install” to finally install the SSL certificate.
That’s it—your domain now has an active SSL certificate.
3. Pick Your Preferred Site Address Format
It’s important to stick to a consistent site address format throughout your entire website.
For example, choose between:
From an SEO perspective, either www or non-www is fine. But it’s important to decide on one or the other.
First, you’ll have pages from both versions of your website competing for SERP positions. Which might make it harder for either page to rank.
This is known as keyword cannibalization.
Another problem is you’ll dilute your website’s authority and link value.
How?
By having some websites link to one version of your site, and others to the second version.
So, instead of having one highly authoritative site with plenty of quality backlinks, you’ll have two sites splitting domain authority and backlinks between them. This makes it harder for both versions to rank in organic search results.
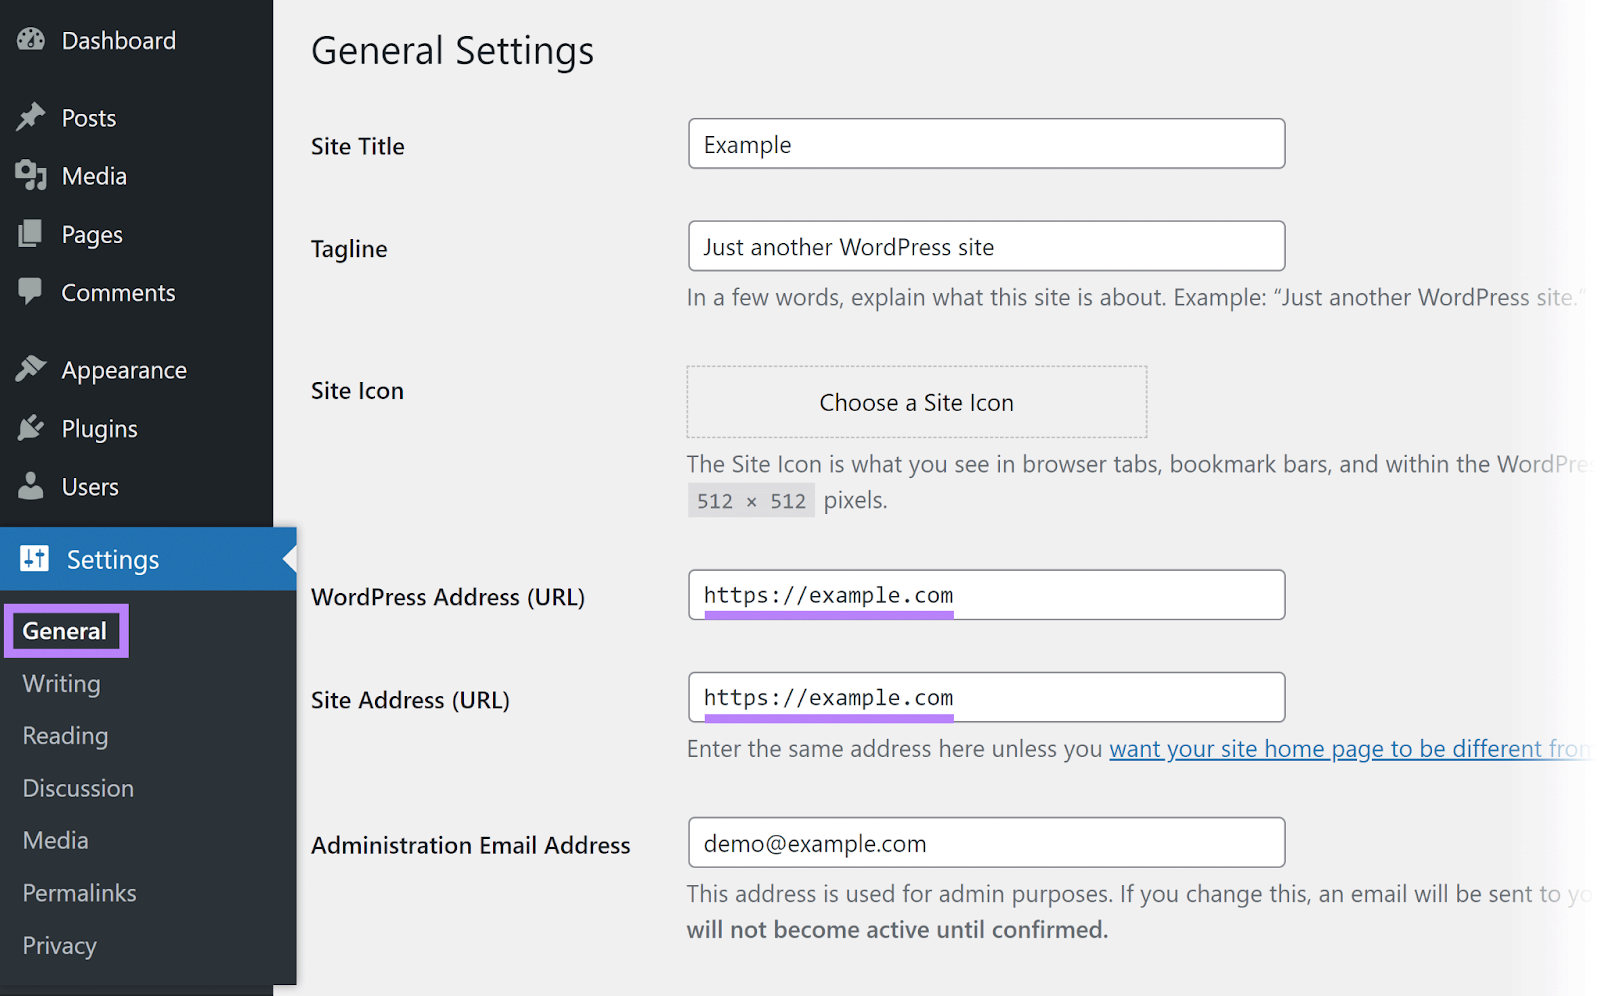
Thankfully, WordPress makes it easy to show search engines which site address you’d like considered as the “official” version of your website.
Go to “Settings” > “General.” Add your preferred website address in the “WordPress Address (URL)” and “Site Address (URL)” fields.
Doing this will ensure that search engines crawl and index the right version of your site. And that users will land on the appropriate version—regardless of what they type into their web browser’s address bar.
4. Enable SEO-Friendly Permalinks
Permalinks are permanent URLs for pages on your WordPress website. They serve to create a logical URL structure that’s easy to understand and navigate for both users and search engines.
By default, WordPress uses a less-than-ideal permalink structure for posts. Depending on your WordPress installation, your URL might look like this:
https://domain.com/?p=462465
or:
https://domain.com/post-title-june-15-2024
The first example makes it very hard to understand what the page is about.
The second can be problematic if you ever decide to update the post—since the URL would include the old date.
A much cleaner, easier-to-understand URL structure would simply include the post name. Like this:
https://domain.com/post-name
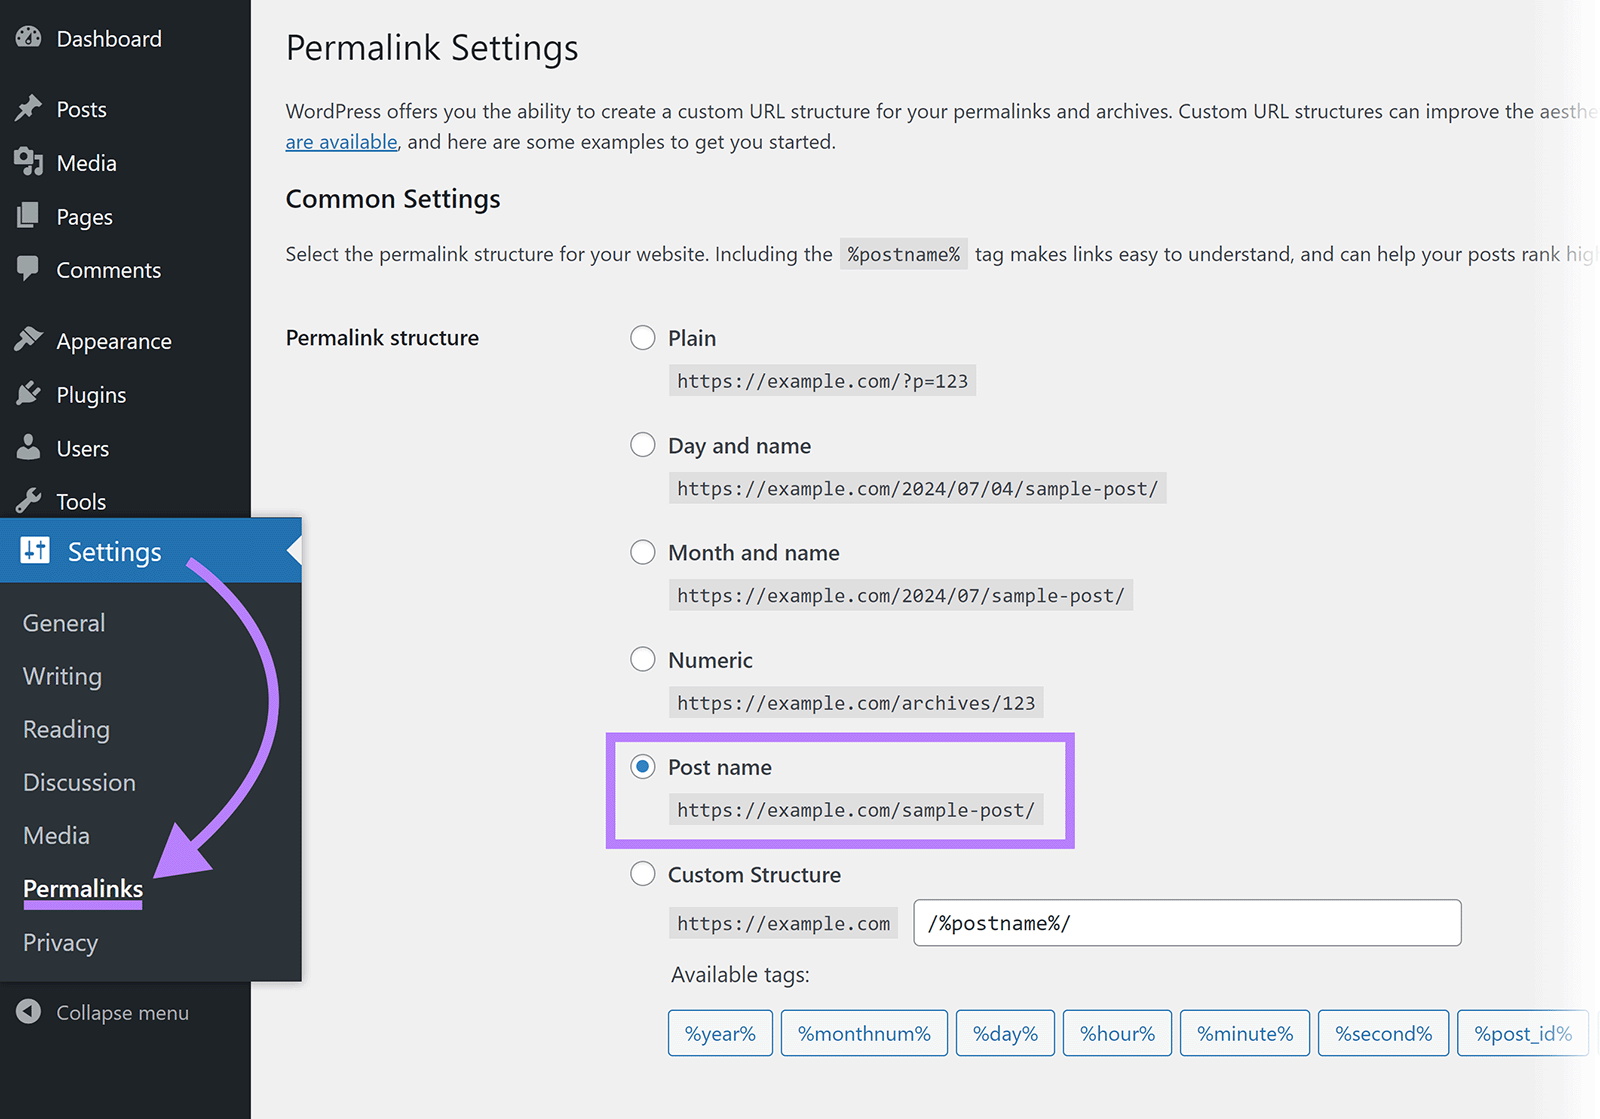
You can instruct WordPress to use the above structure by going to “Settings” > “Permalinks.”
Here, select the “Post name” option in the “Permalink structure” section.
Then click “Save Changes.” Now, all your existing and new posts will use the above URL structure.
5. Install and Configure a WordPress SEO Plugin
While WordPress does offer some SEO-friendly features out of the box, WordPress SEO plugins like Yoast SEO can help you improve your website’s search engine visibility even further.
Here’s how to boost and streamline SEO for WP sites using Yoast:
Install Yoast SEO
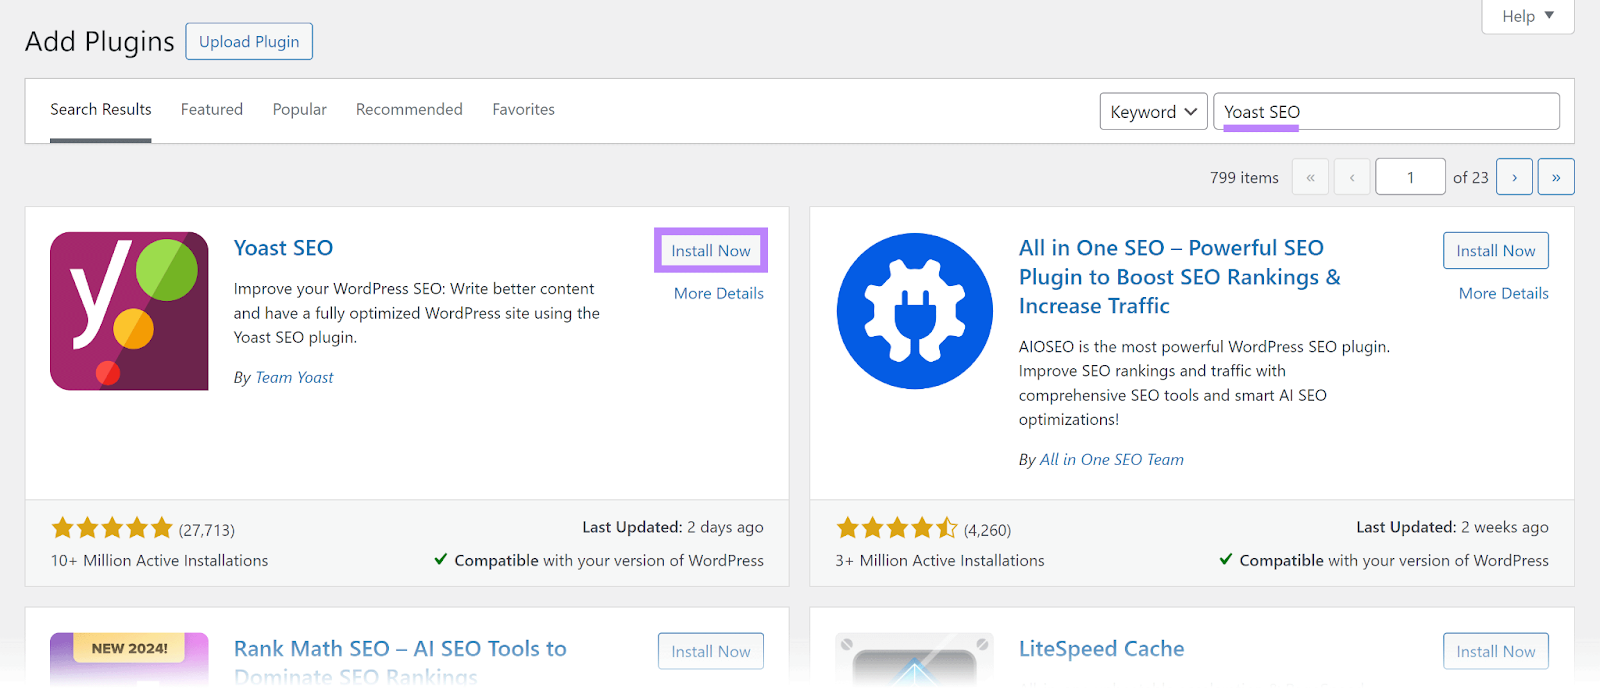
To install Yoast SEO, go to “Plugins” > “Add New Plugin.” Type “Yoast SEO” in the search box and hit “Enter.”
Hit the “Install Now” button next to the first result.
Once the plugin finishes installing, click “Activate.”
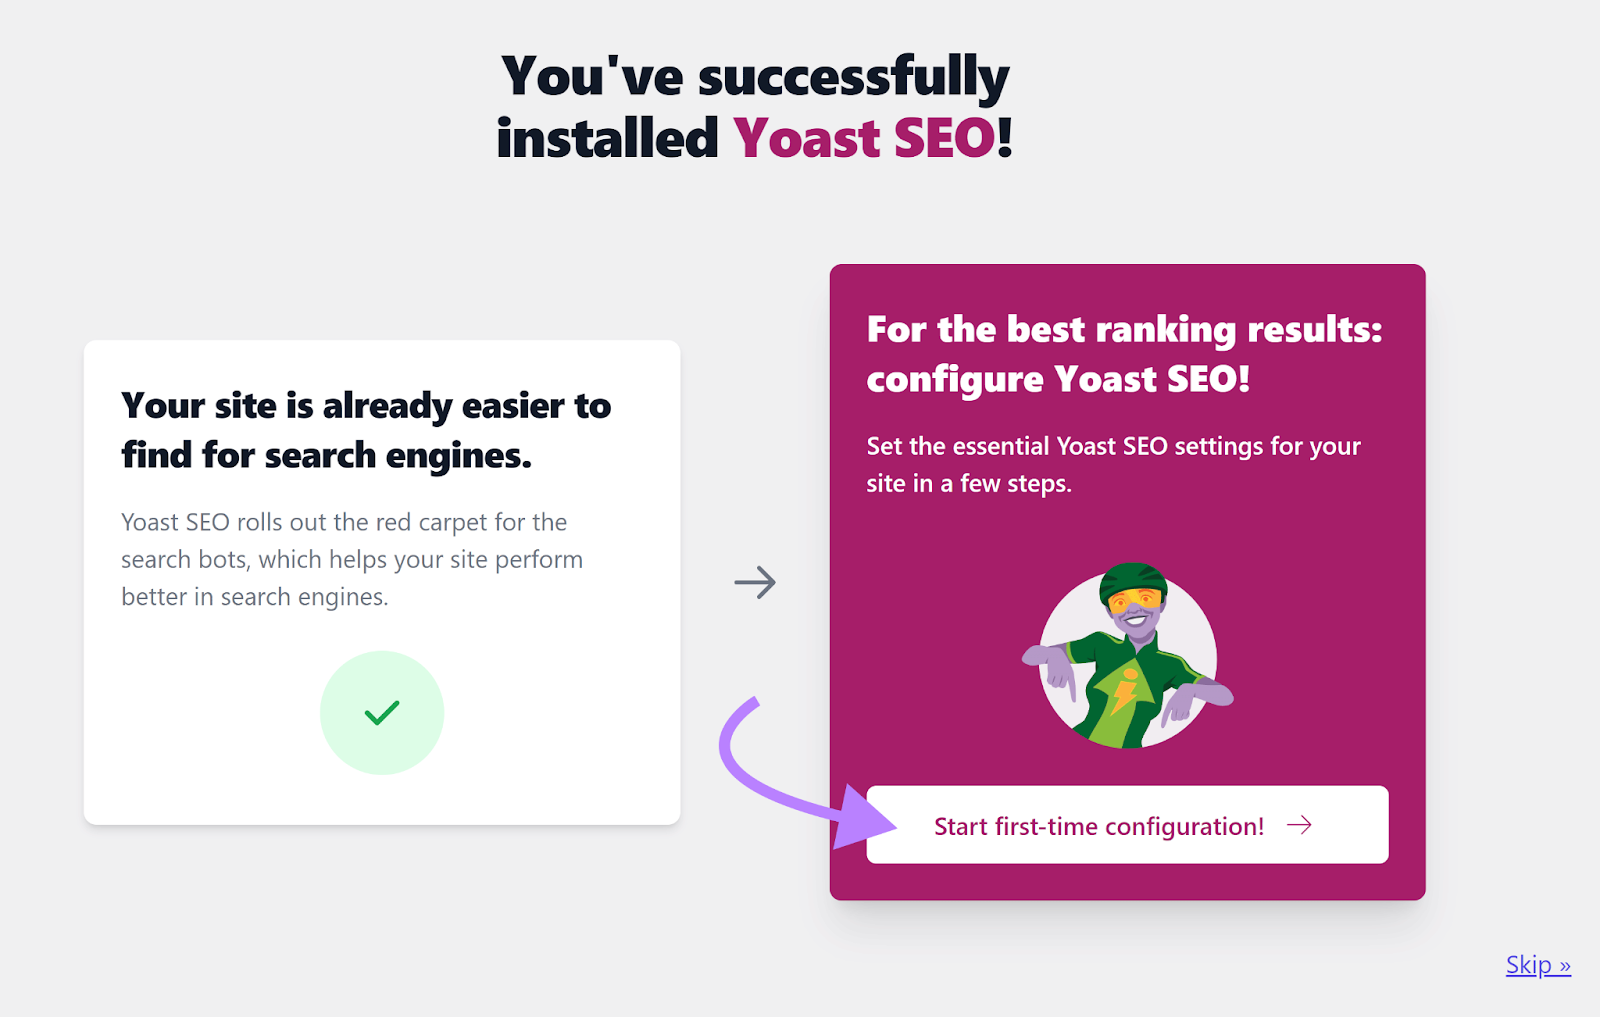
Configure Yoast SEO
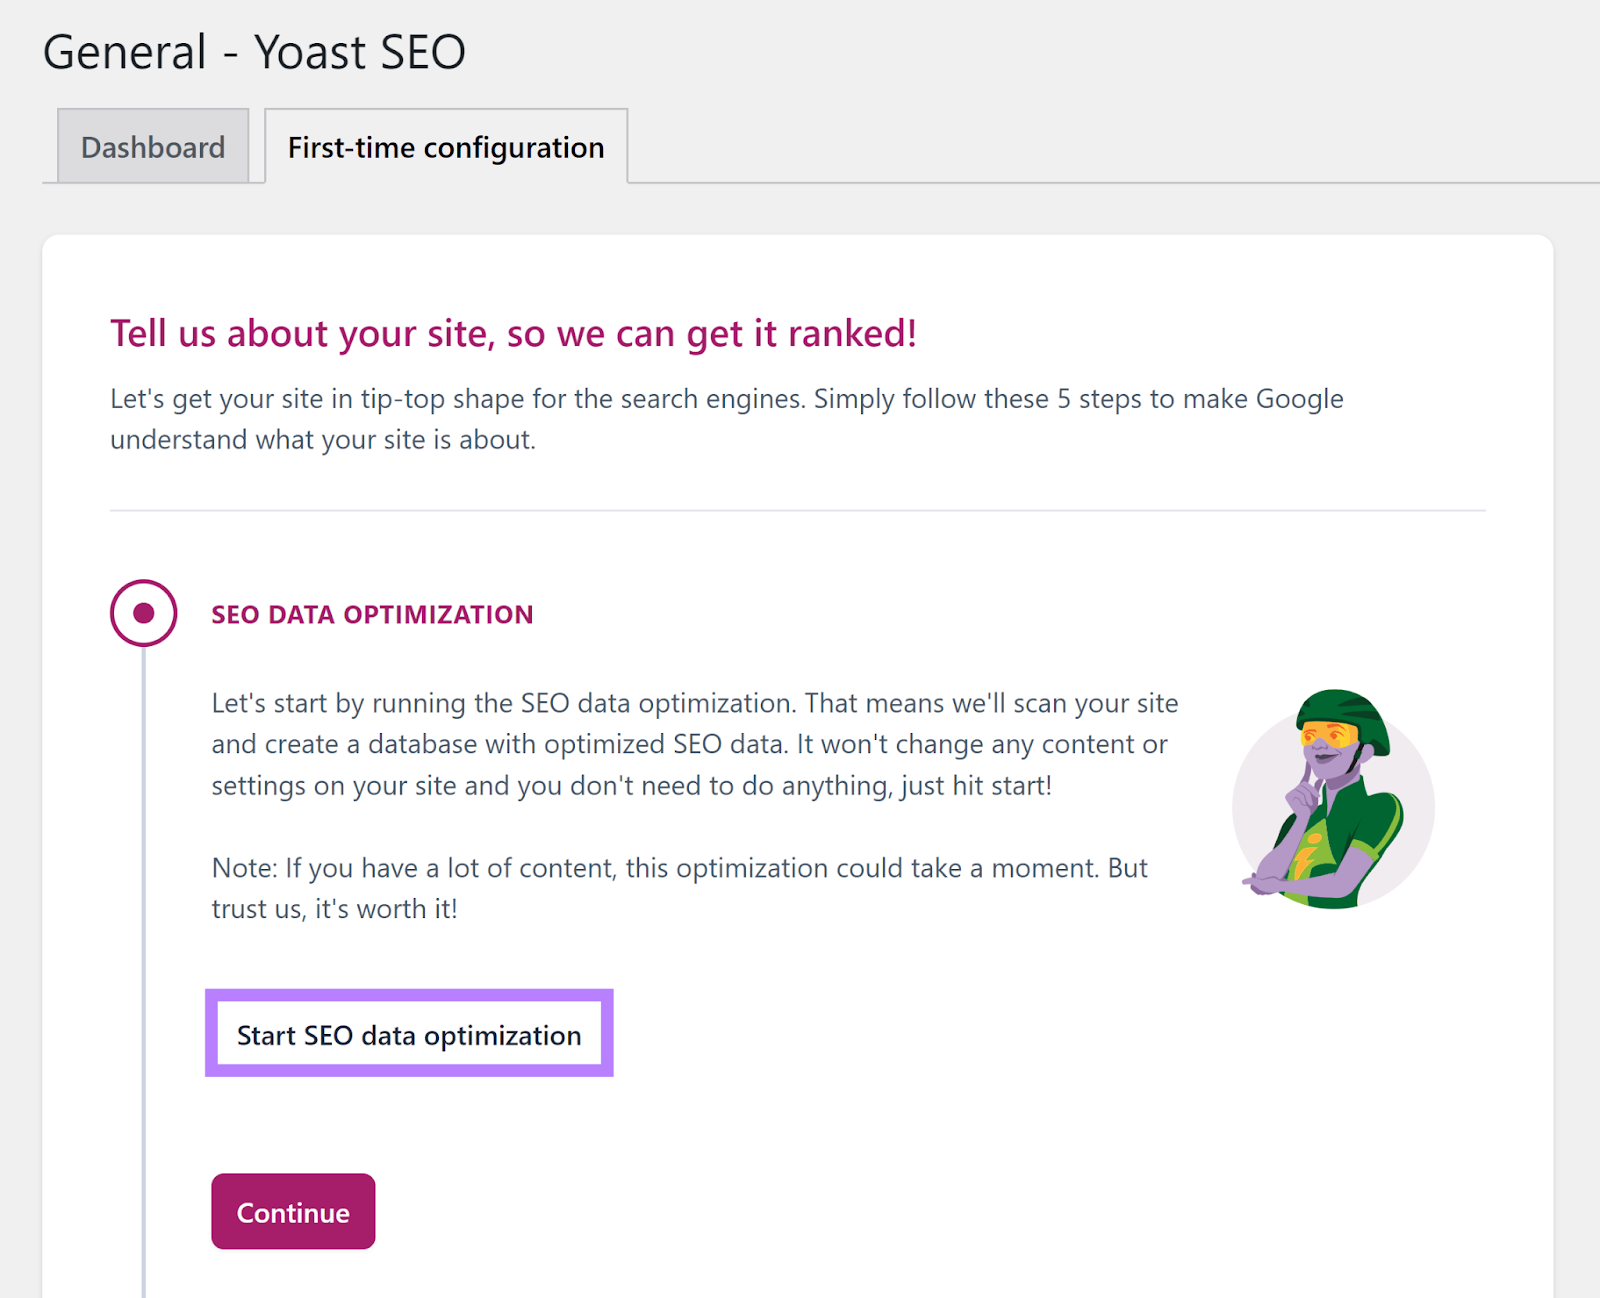
Following installation, you’ll be redirected to the confirmation page. From here, click the “Start first-time configuration” button.
On the next page, click “Start SEO data optimization” to have Yoast scan your website and create a database.
Now, click “Continue.”
Move on to the “Site representation” section. Here, you’ll need to add more information about your website as follows:
Select whether your website represents an organization or a person
Enter the name of your website and organization
Upload the logo of your organization (if any)
Once done, click “Save and continue.”
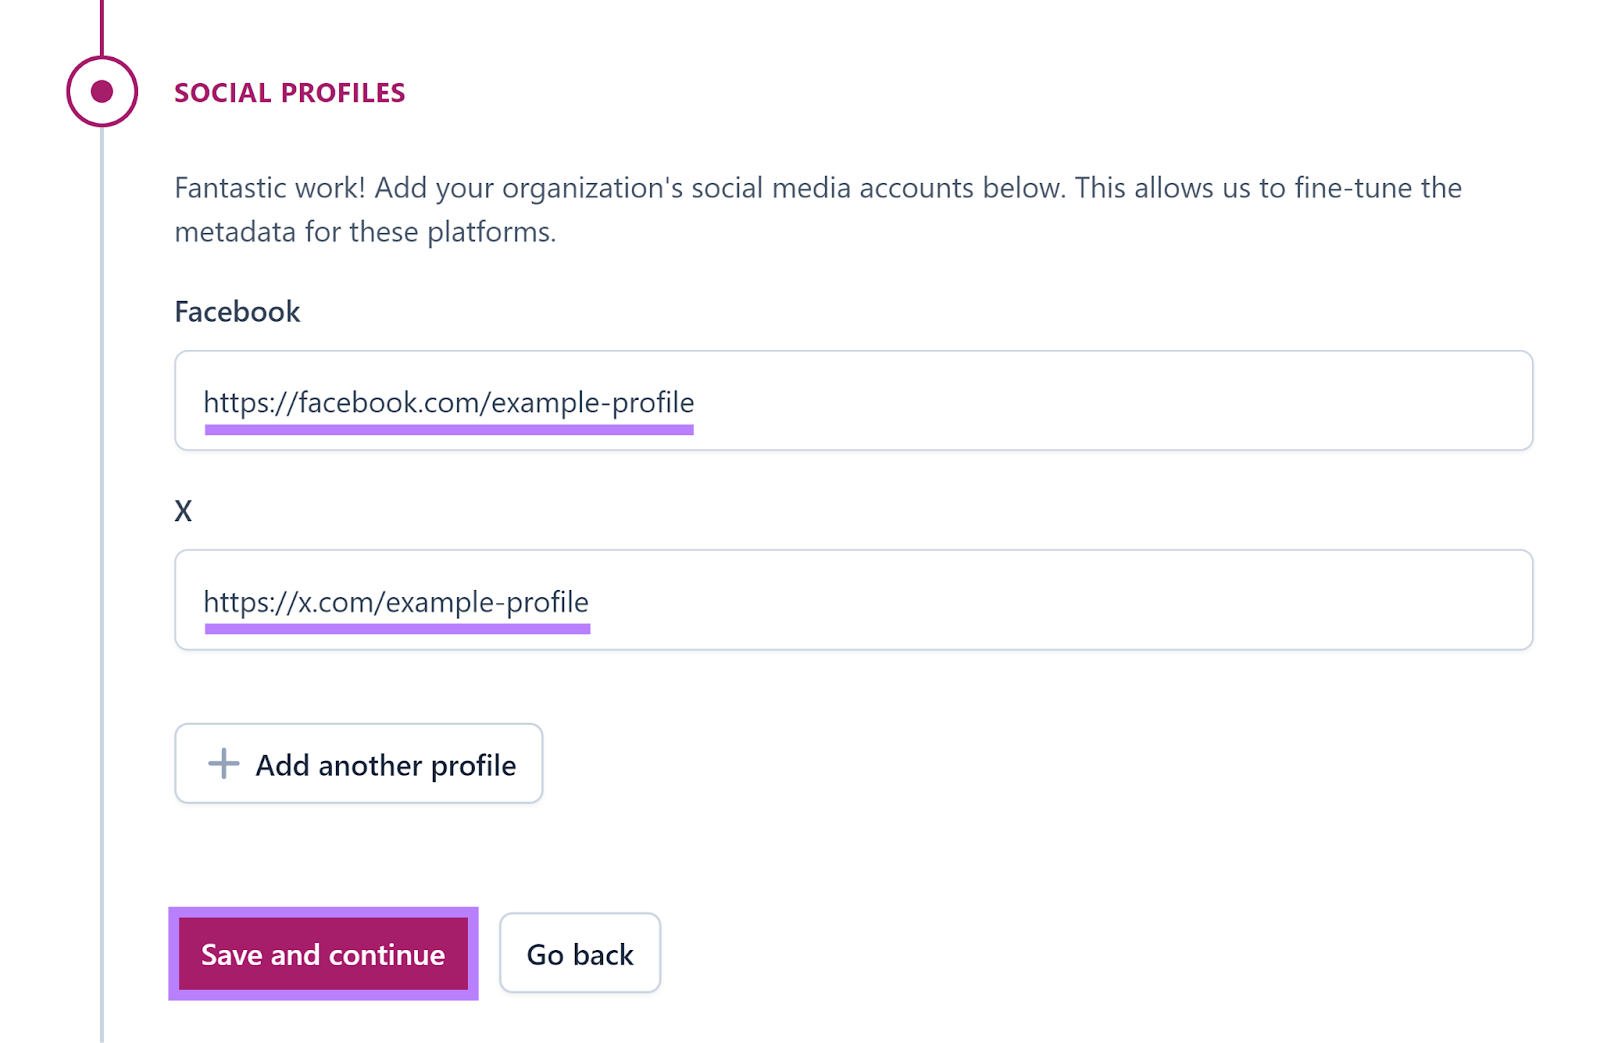
In the “Social Profiles” section, add links to your website’s social media profiles (if any). Click the “Save and continue” button.
You can skip the “Personal preferences” section.
That’s it—you’ve completed the first-time configuration.
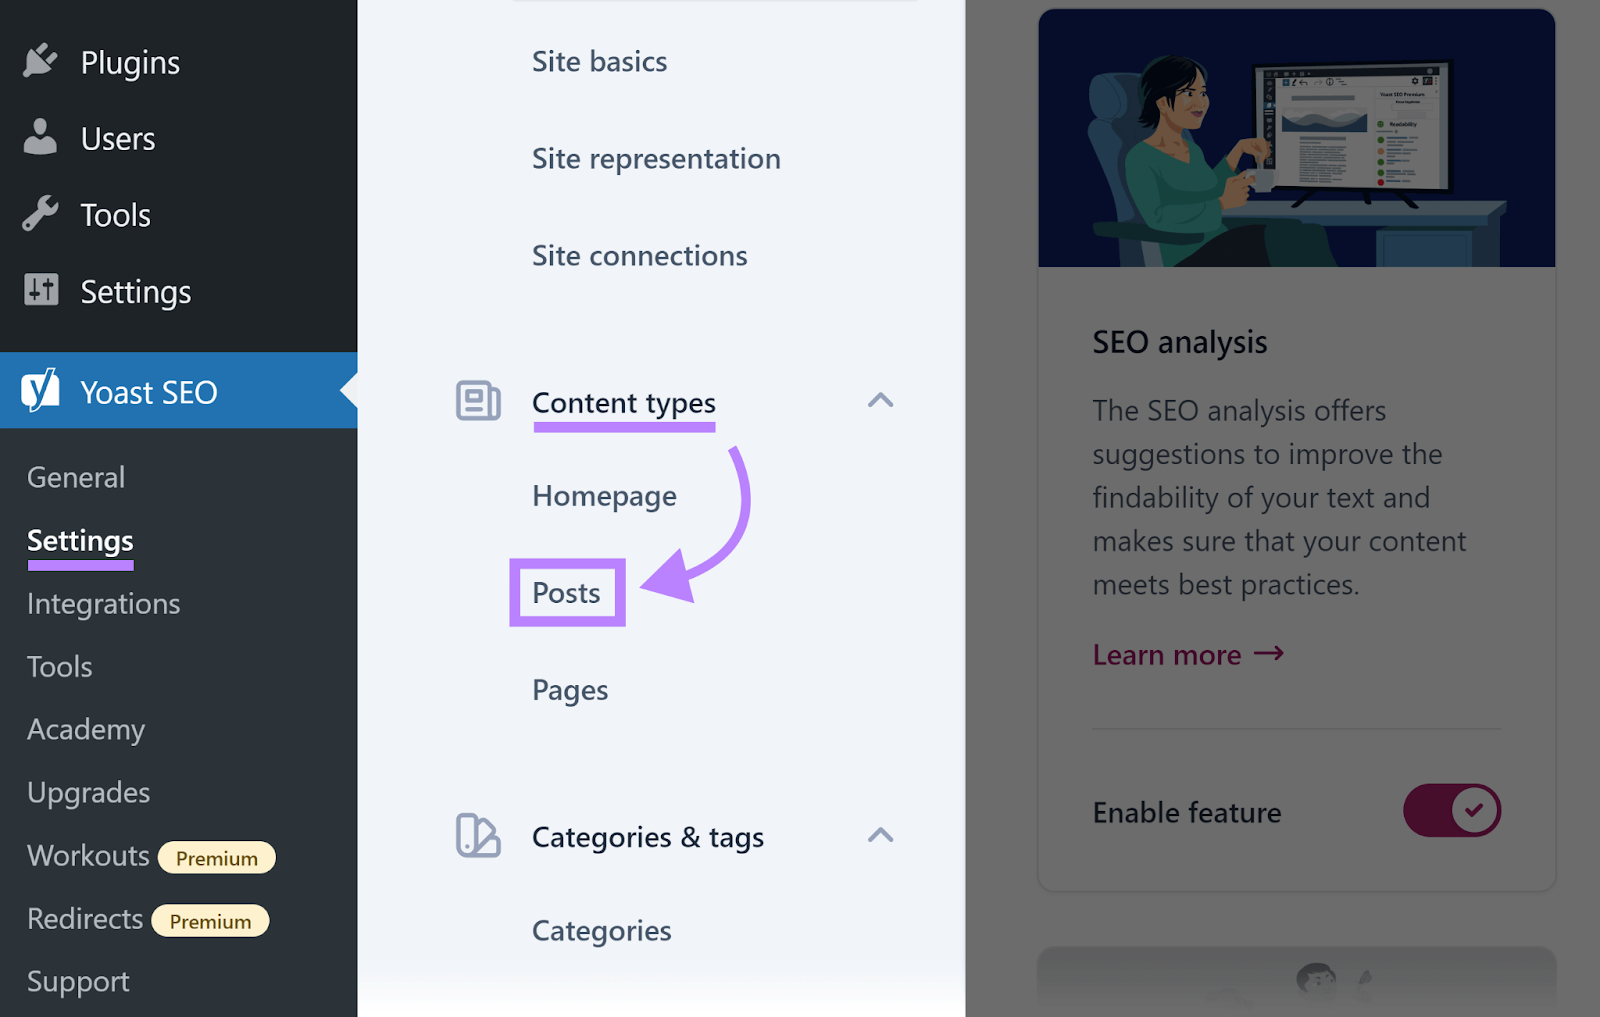
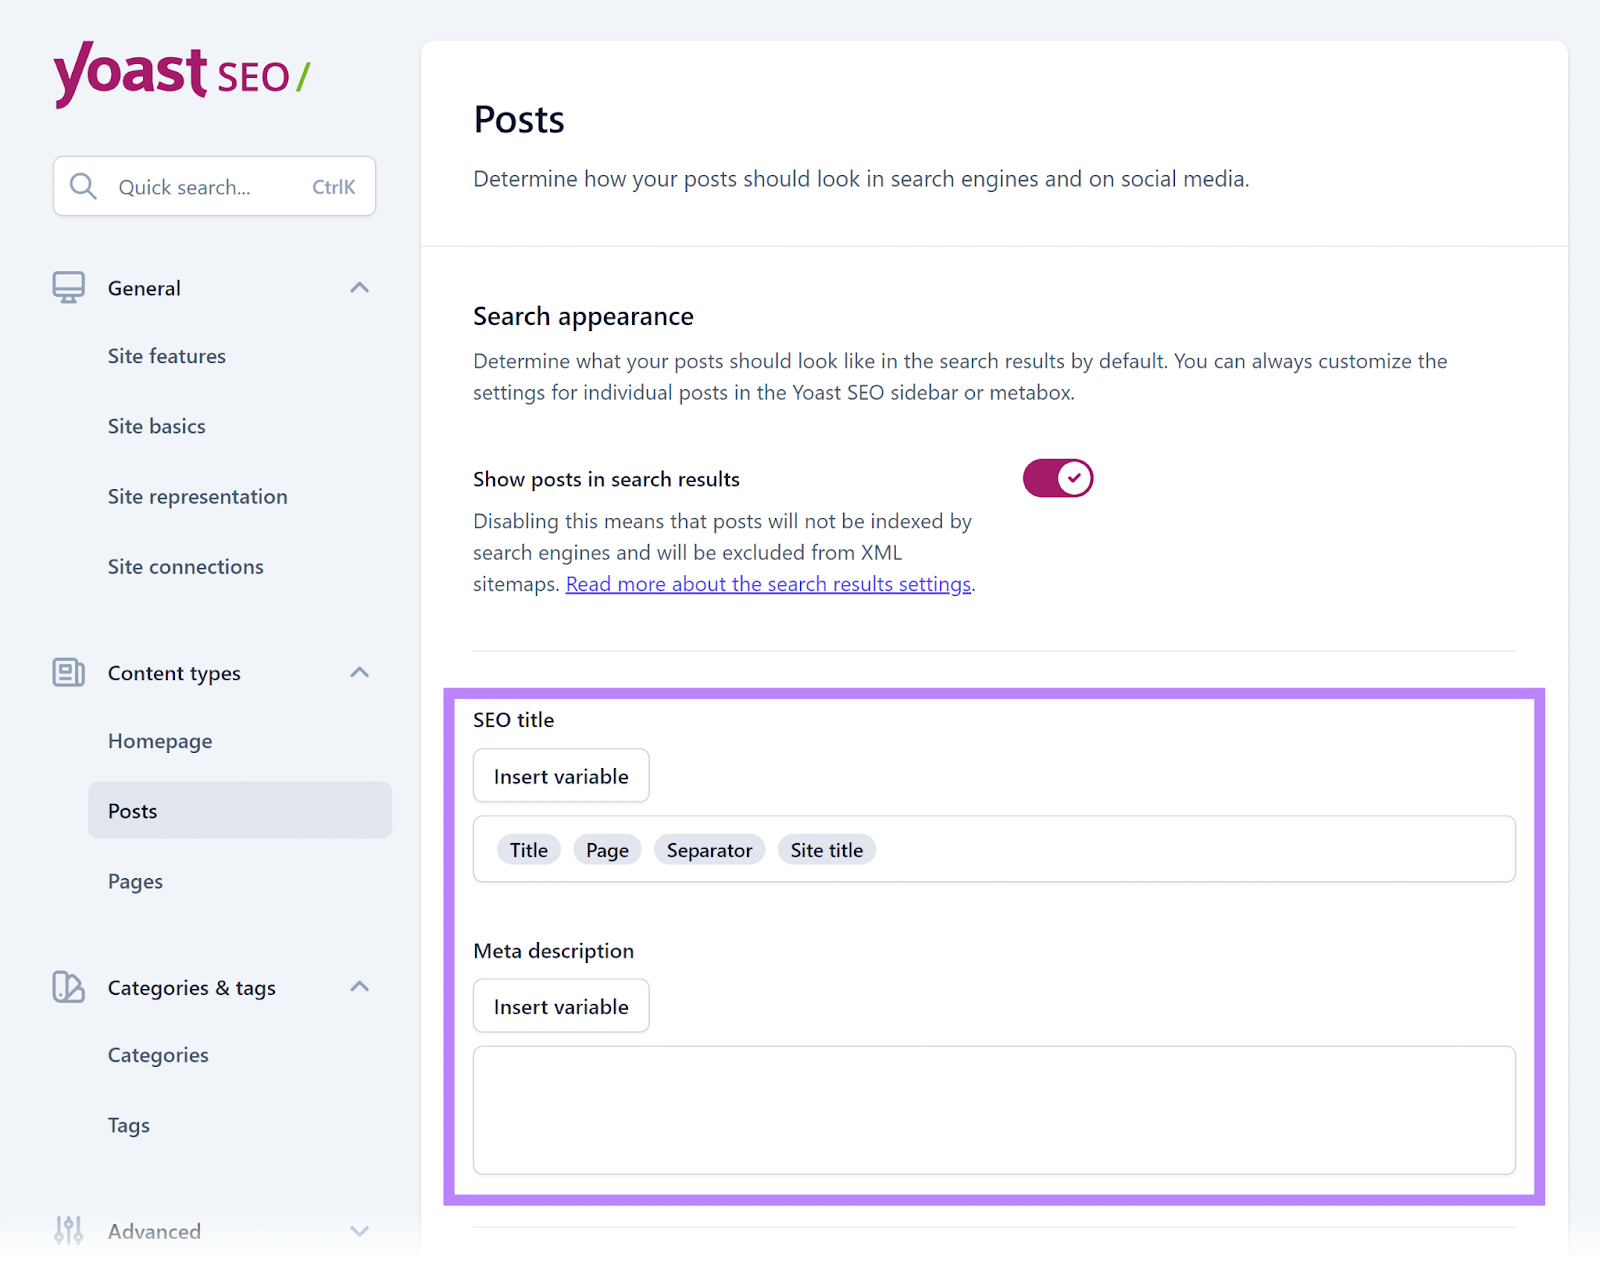
Now, go to “Yoast SEO” > “Settings.” Select the “Posts” menu item under the “Content types” section.
Here, you can set up a template you’d like Yoast to use for your posts’ title tags and meta descriptions.
Do the same for your homepage and category and tag pages.
Use Yoast SEO
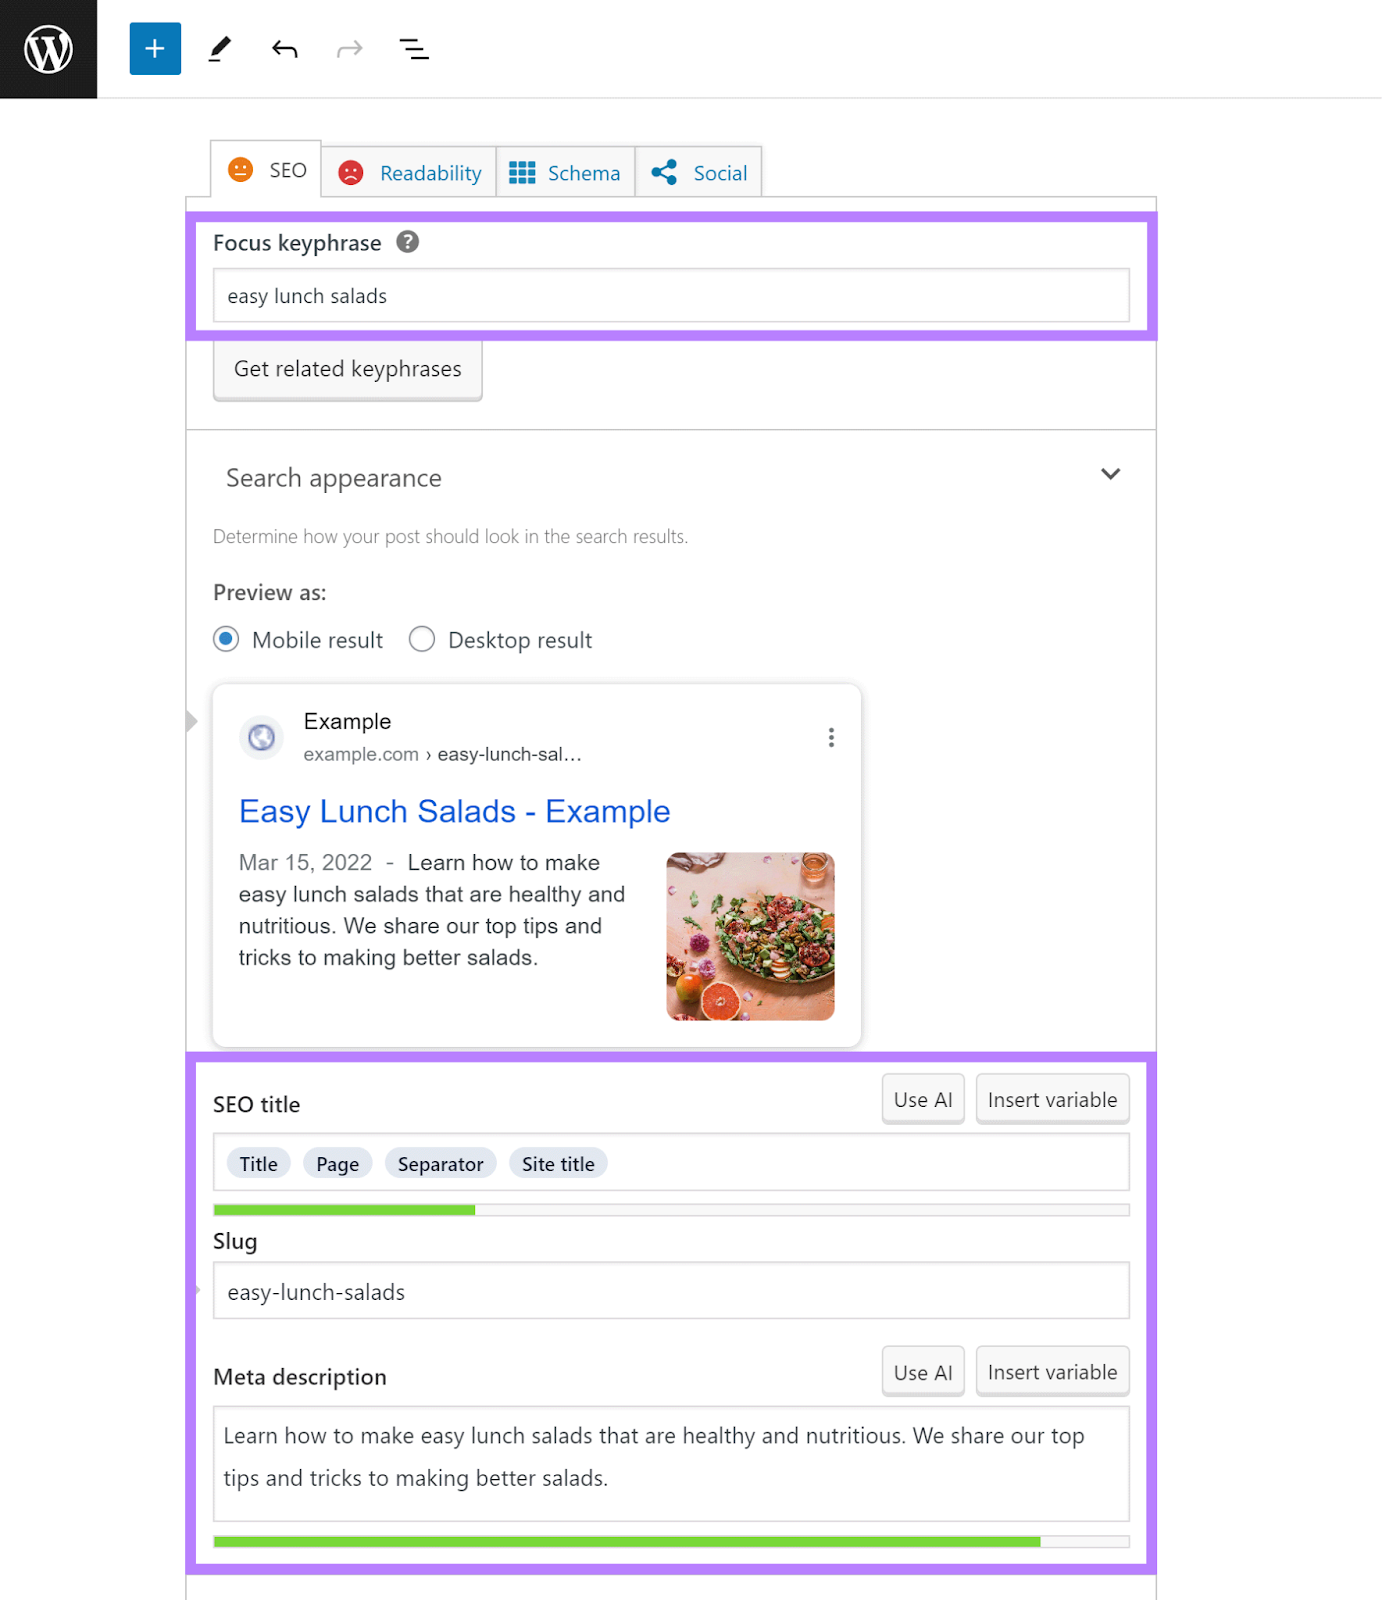
Apart from creating templates for title tags and meta descriptions, you can use Yoast to add both of these manually to individual posts and pages.
Here’s how.
Create a new post or edit an existing one. Next, scroll down to the “Yoast SEO” section.
Add a focus keyphrase (your target keyword for the post). And enter a custom title, URL slug, and meta description.
6. Submit Your Sitemap to Google Search Console
A sitemap is a file that contains information about all your website’s pages and content. Search engines use it to crawl and understand your site.
WordPress will create an XML sitemap for your website automatically. You’lll usually locate it in your website’s root folder as “sitemap.xml.” For a hypothetical “example.com” domain, the sitemap would be:
https://example.com/sitemap.xml
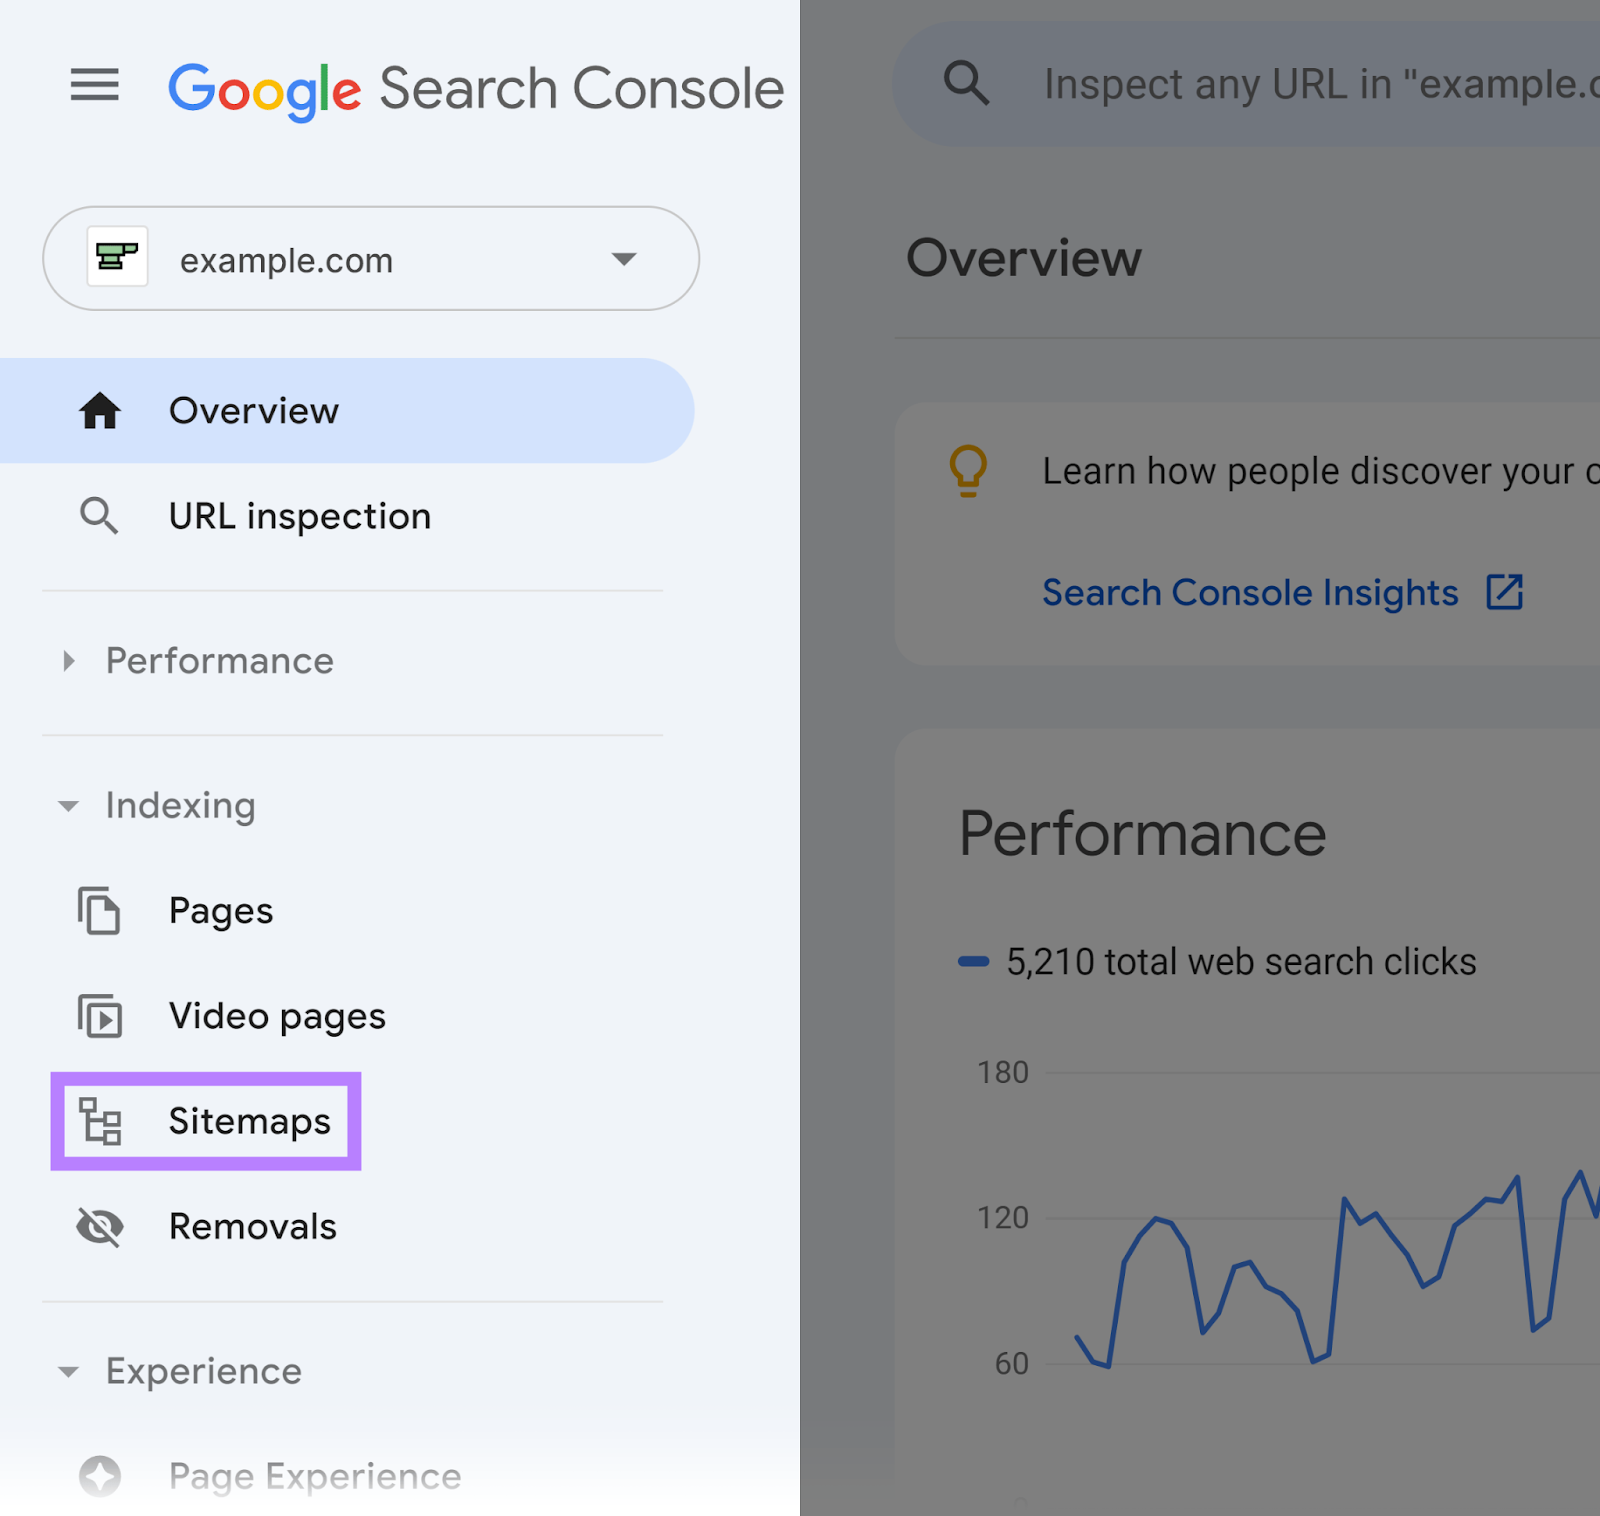
Once you’ve found your sitemap URL, submit it to Google Search Console (GSC) to help Google crawl and index your website more efficiently.
Log in to your GSC account and click “Sitemaps” in the left-hand menu.
Paste your sitemap URL into the “Add a new sitemap” box and hit “Submit.”
Google will then fetch your sitemap. It might not necessarily crawl your pages immediately—they’ll most likely be in a crawl queue.
7. Optimize Indexing Protocols
By default, WordPress generates quite a few additional pages on your website that you might not want search engines to index.
For example, it will create separate pages for every blog category and tag. Plus an archive of your posts, with separate pages for specific dates and post formats.
Having these types of pages displayed in search results isn’t very useful to users. So we recommend that you prevent search engines from indexing them.
This is fairly easy to do with the Yoast SEO plugin.
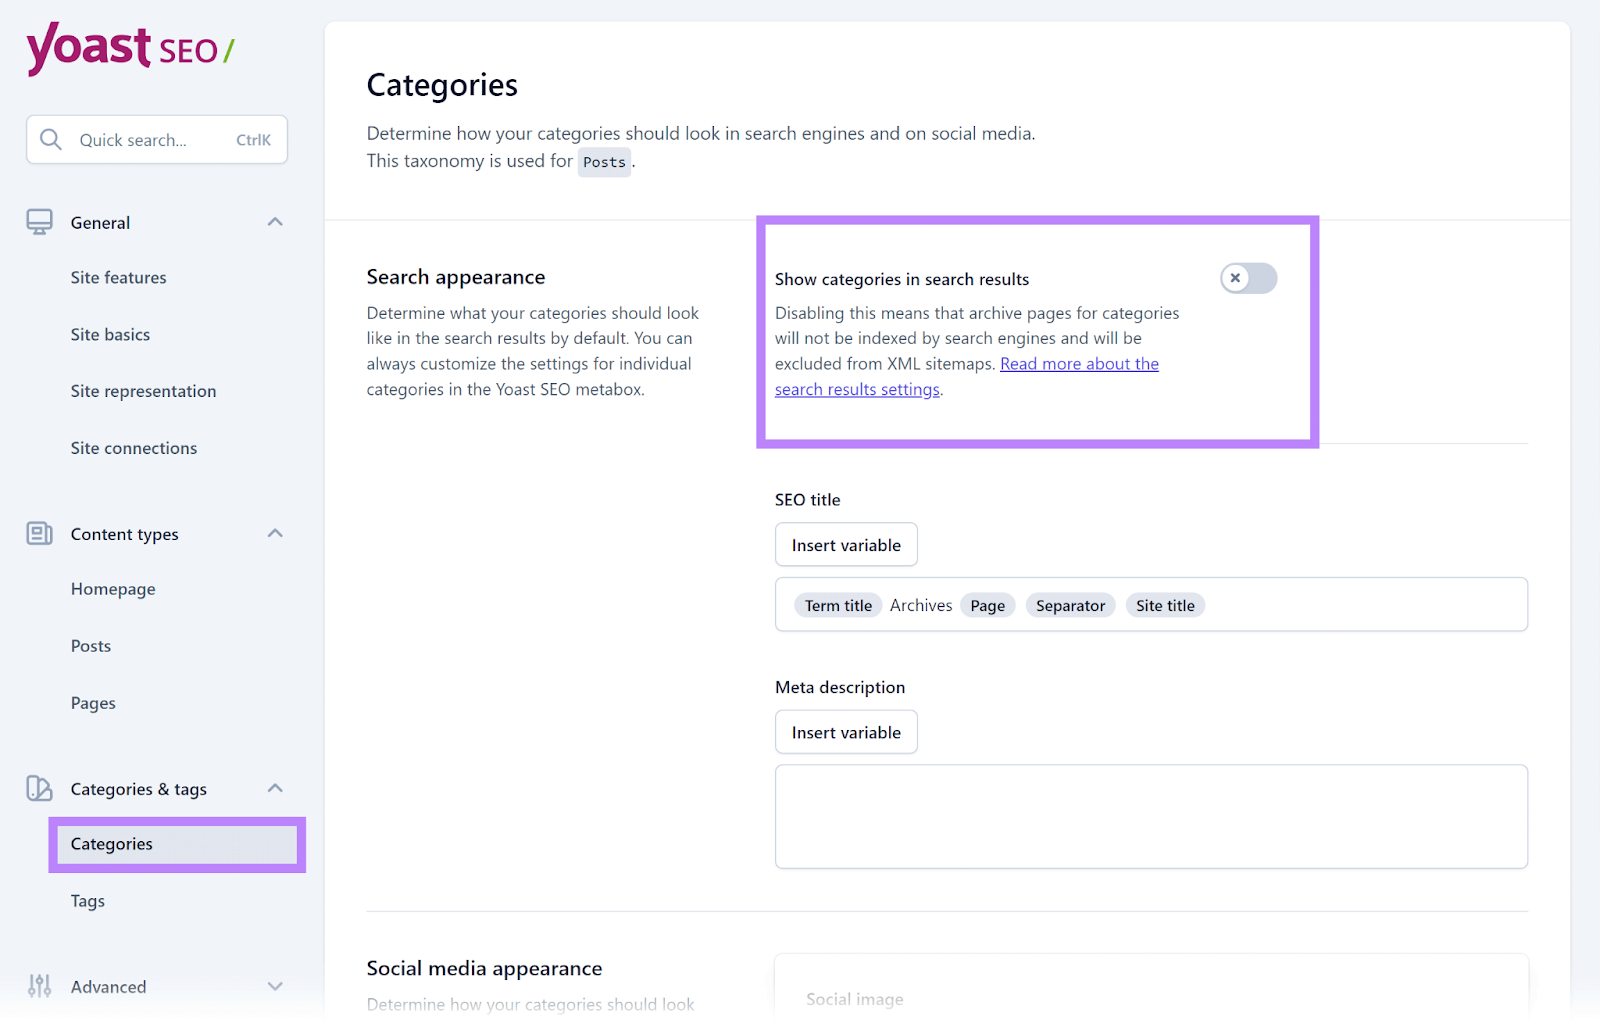
Let’s say you want to prevent the indexing of category pages. Go to “Yoast SEO” > “Settings” and select the “Categories” menu item.
Make sure the “Show categories in search results” option is disabled.
Repeat the process for all the other page types you don’t want indexed.
8. Plan Your Site Structure
Having a logical and intuitive website structure will help search engines crawl and index your website more efficiently.
And allow them to understand the relationships between different pages on your website.
It will also help users navigate your site more easily. And find what they’re looking for more quickly.
Here’s what to keep in mind when planning your site structure:
Your website’s top-level menu will be the main way most users will navigate your website. Build a menu that’s simple to use and understand.
Think about the most important sections of your website you’d like visitors to be able to access at all times. Then, make sure to create menu items for each of those sections.
Use short, descriptive phrases for individual menu items to ensure visitors understand which part of your website each menu item represents.
Have a look at the top-level menu on the Semrush website for inspiration.
The menu includes links to all the most important information visitors might be interested in. Including software features, pricing, and company information.
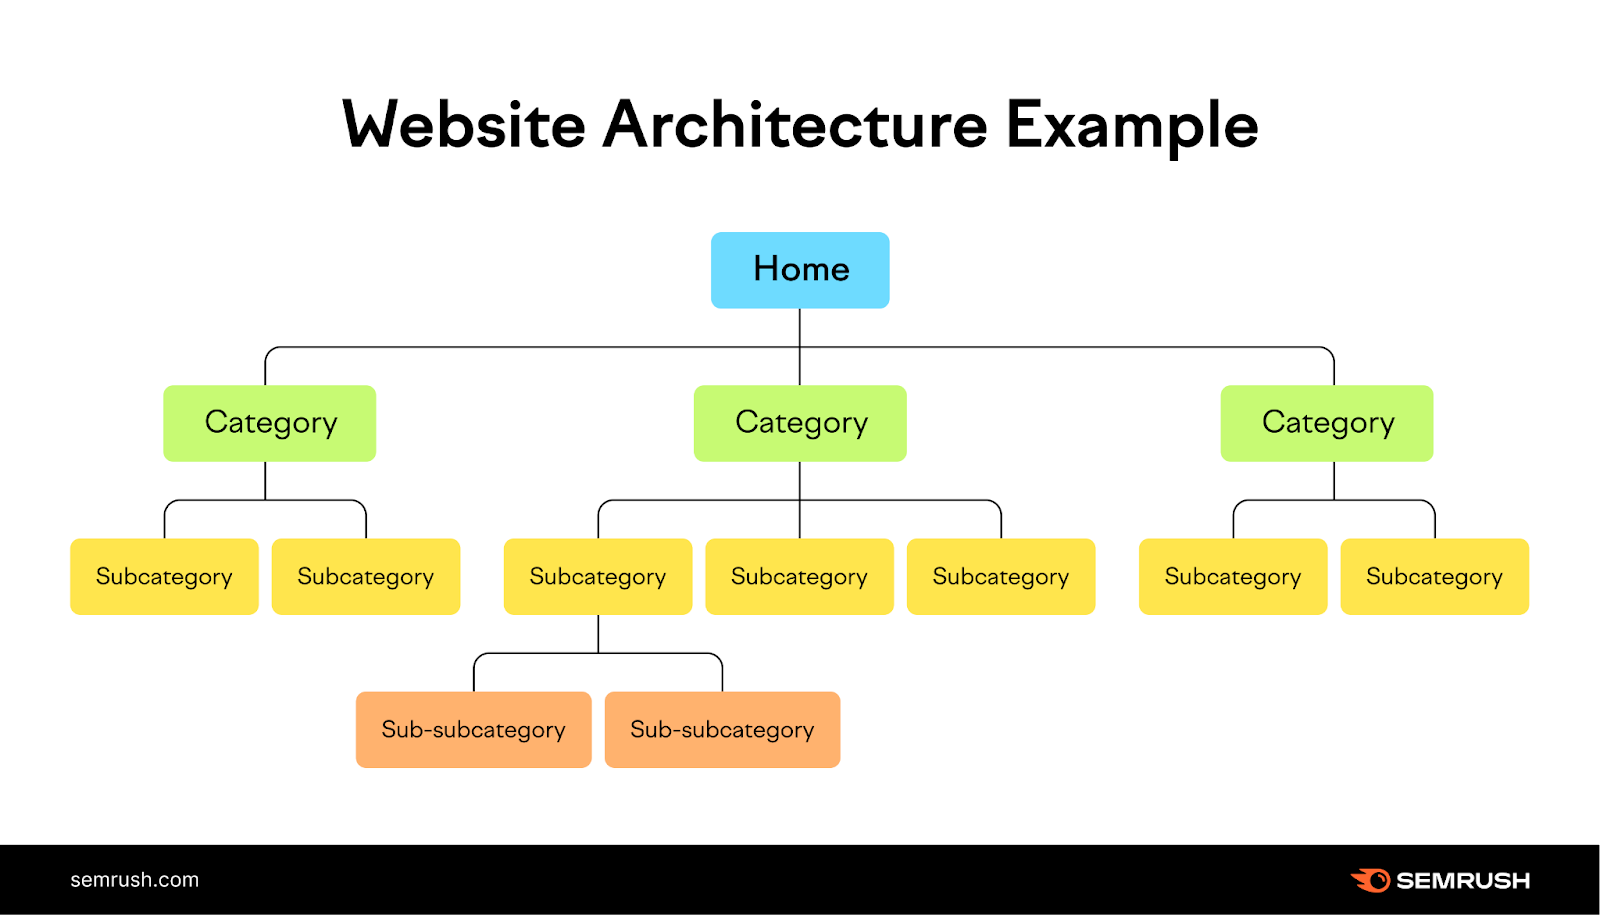
Use a Hierarchical Website Structure
A hierarchical website structure consists of a parent page (i.e., the homepage) and its child pages (category and subcategory pages).
Here’s a visual representation:
Using a hierarchical structure offers two main benefits:
It makes it easy for search engines to crawl, index, and understand your website
It simplifies navigation, making it easier for users to find the content they need on your site
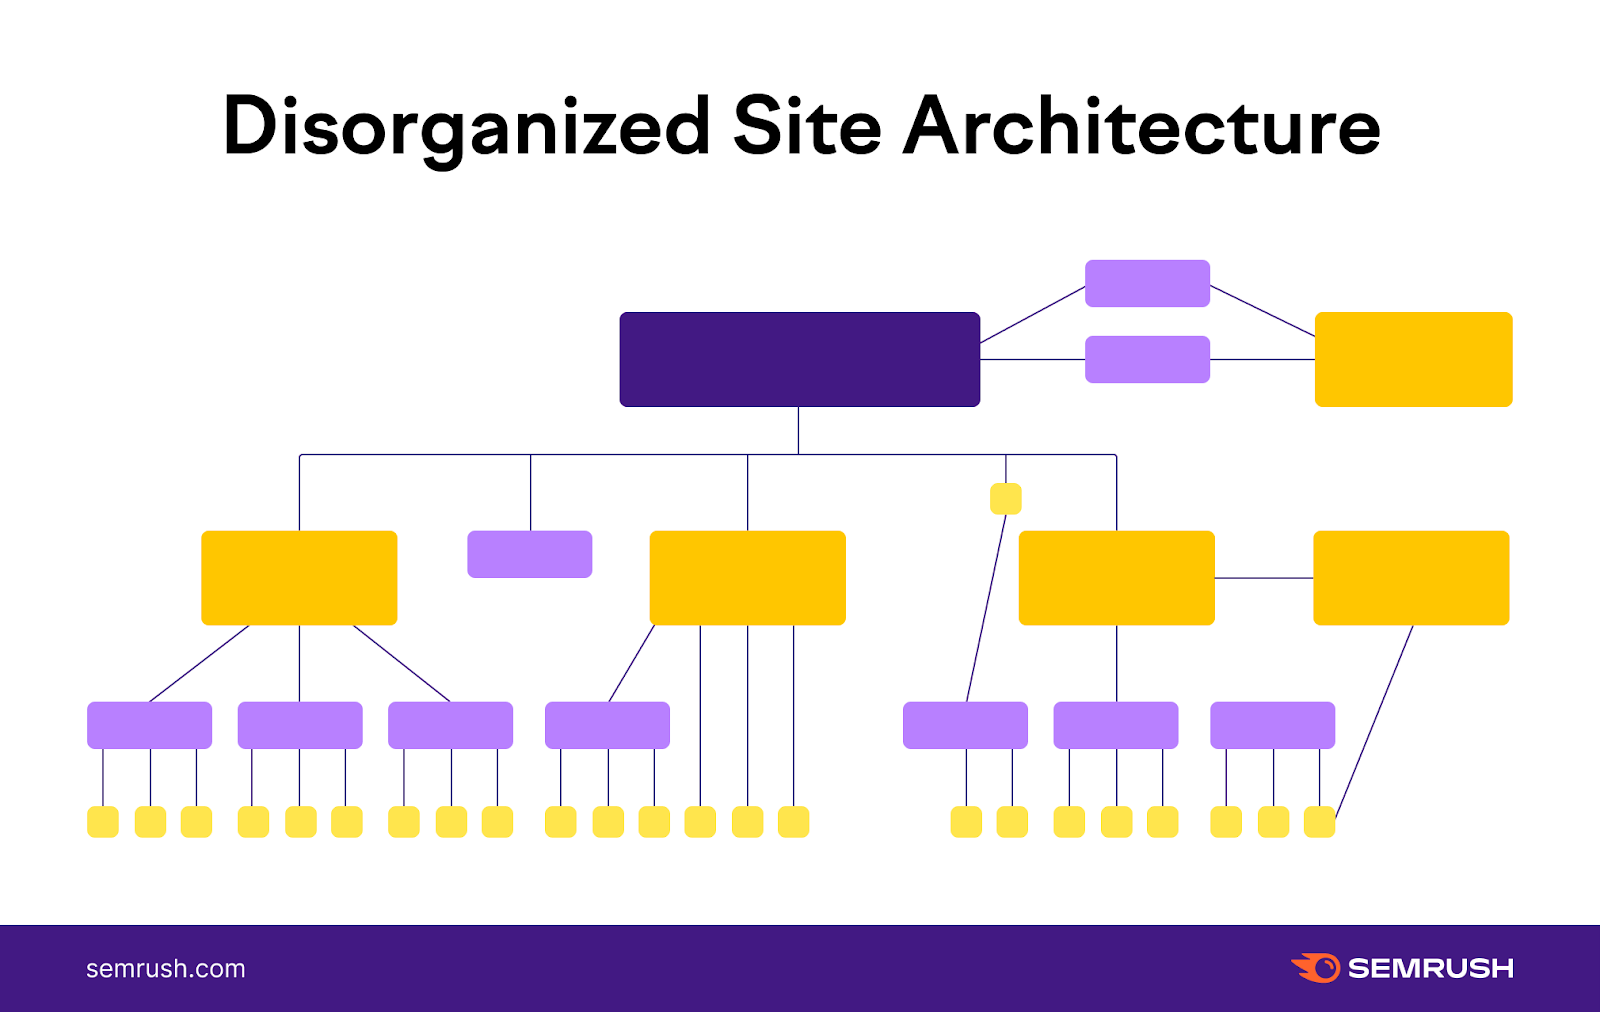
Contrast this with a more disorganized website structure, where the connection between individual pages and topics is less clear. Making it harder for users to navigate your site.
Implement Topic Clusters
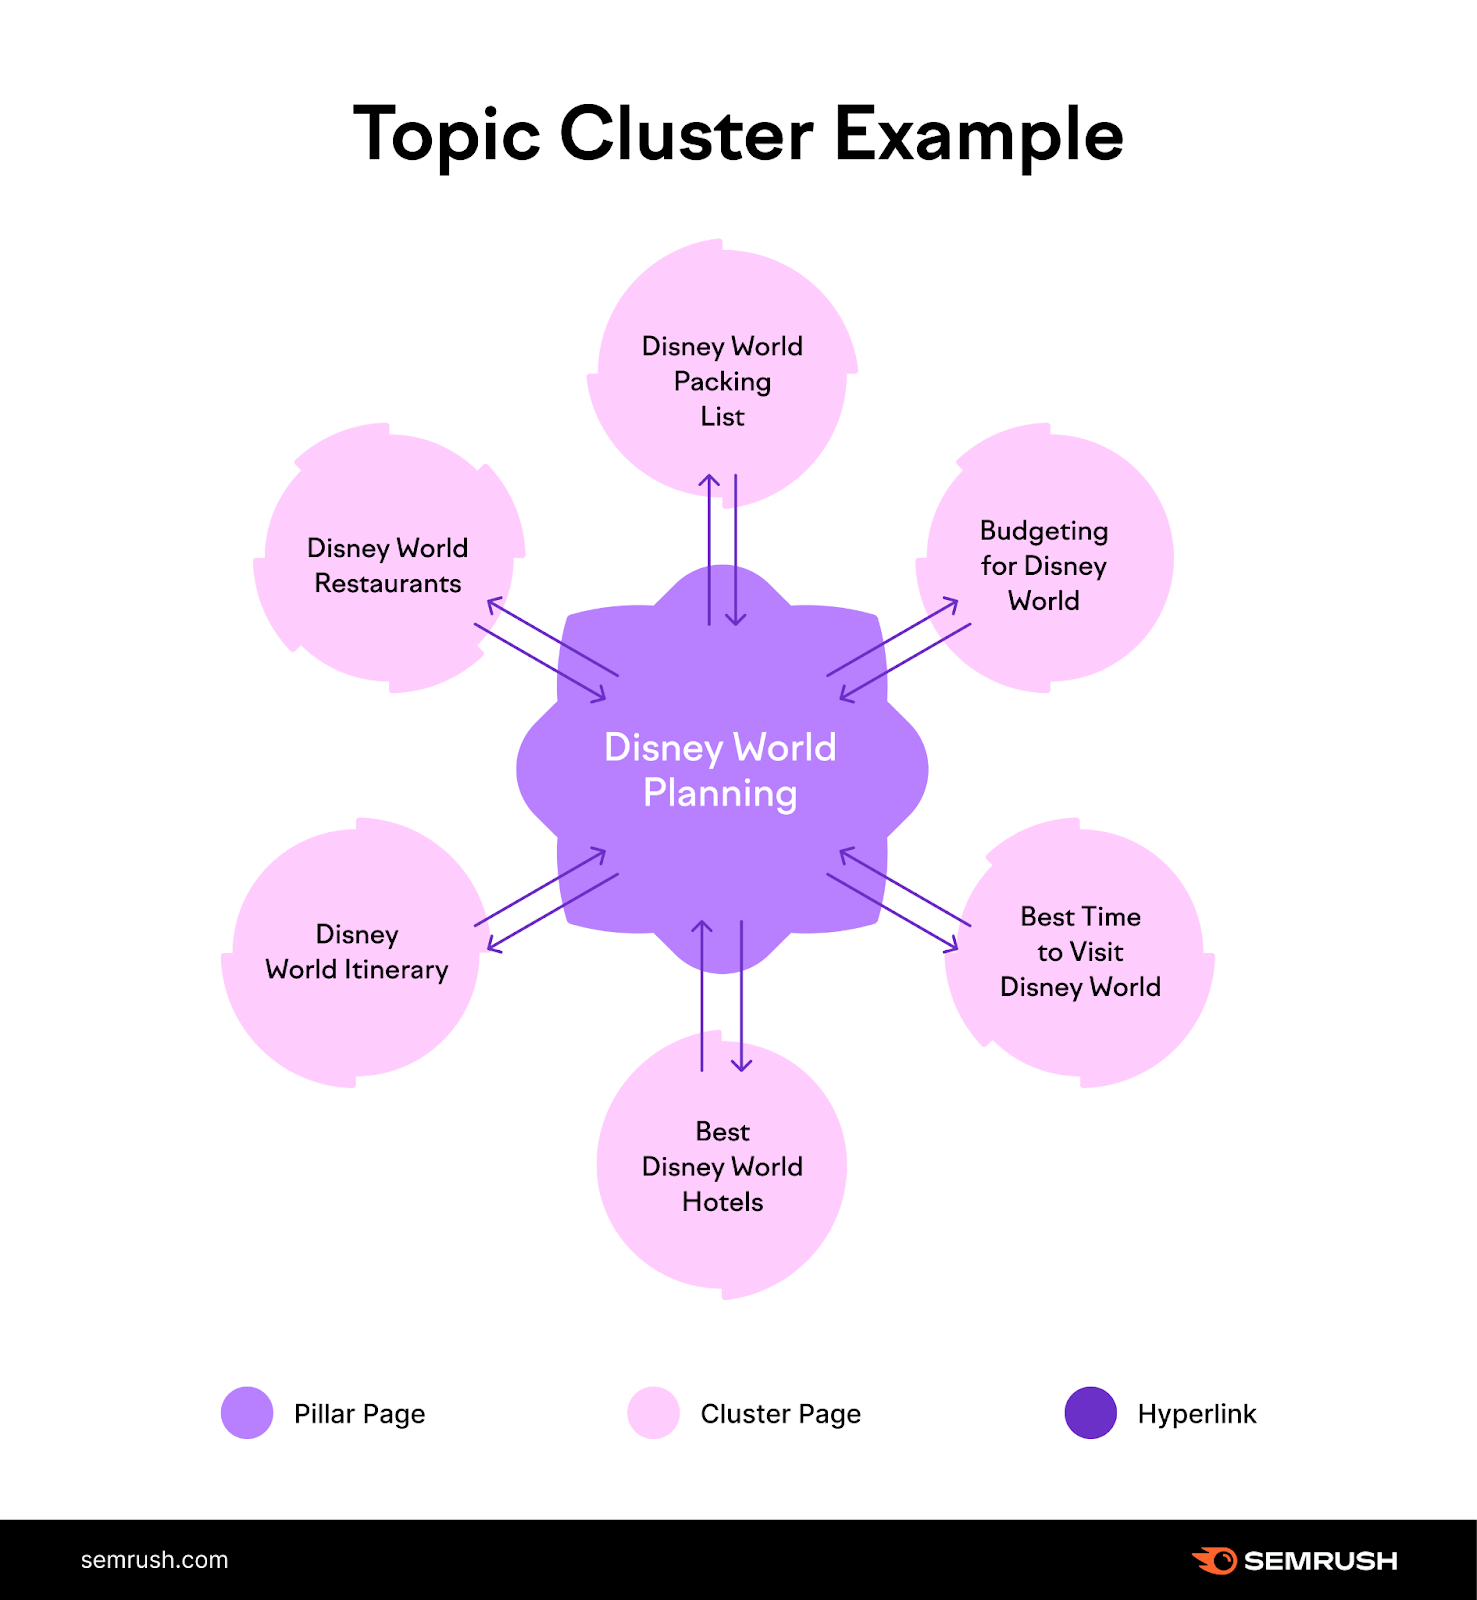
Topic clusters are groups of pages related to one overarching topic. They consist of a pillar page (a page covering the topic in extensive detail) and cluster pages (individual pages covering one subtopic each). Ideal for structuring your blog content.
Here’s an example:
In the above example, the overarching topic (covered by the pillar page) is planning a trip to Disney World. The cluster pages each focus on one specific aspect of Disney World trip planning.
In a topic cluster, the pillar page links to each individual cluster page. And the cluster pages all link back to the pillar page.
This makes it very clear to search engines that the pages are related to each other. And signals that the website contains extensive information about the topic. Which also indicates the site as an authority on the topic.
Topic clusters also help you create content with minimal risk of keyword cannibalization. So you avoid targeting the same keyword across multiple pages.
Further reading: What Is Topical Authority? (+ How to Build It)
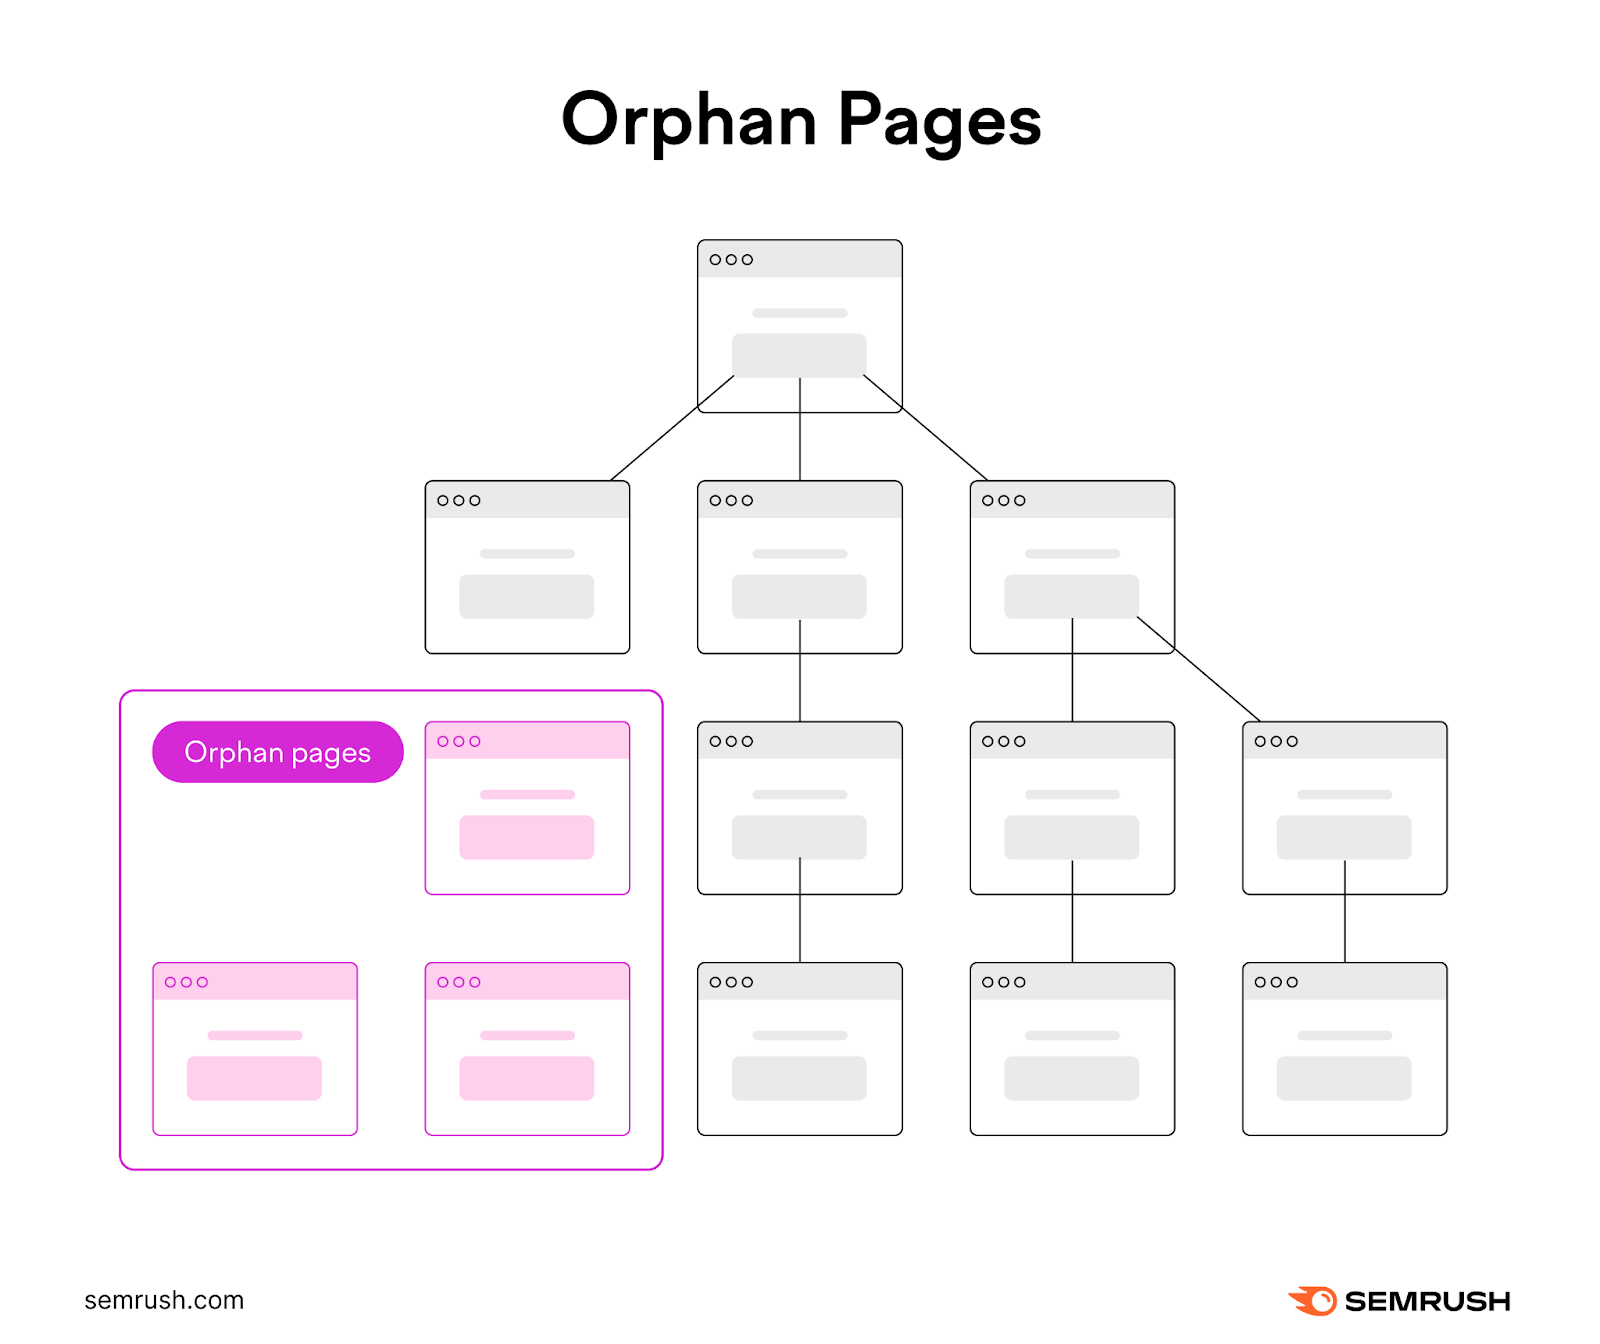
Avoid Orphan Pages
Orphan pages are pages that aren’t linked to from any other page on your website.
You should avoid having any orphan pages on your website for three main reasons:
They might not get indexed. Search engines discover pages on your website by following links from previously indexed pages. If none of your indexed pages link to a specific page, it’s possible that it won’t get indexed at all.
It’s harder to rank them. Internal links pass link equity—or link authority. The more link authority a page has, the higher its ranking potential in search results. Since orphan pages get no links, they don’t get any link equity. Which makes it more difficult to rank.
Visitors might never discover them. If you don’t link to a page from anywhere on your site, the only way visitors can reach it is by typing in the page’s URL directly into their browser’s address bar. So they’ll likely never find it.
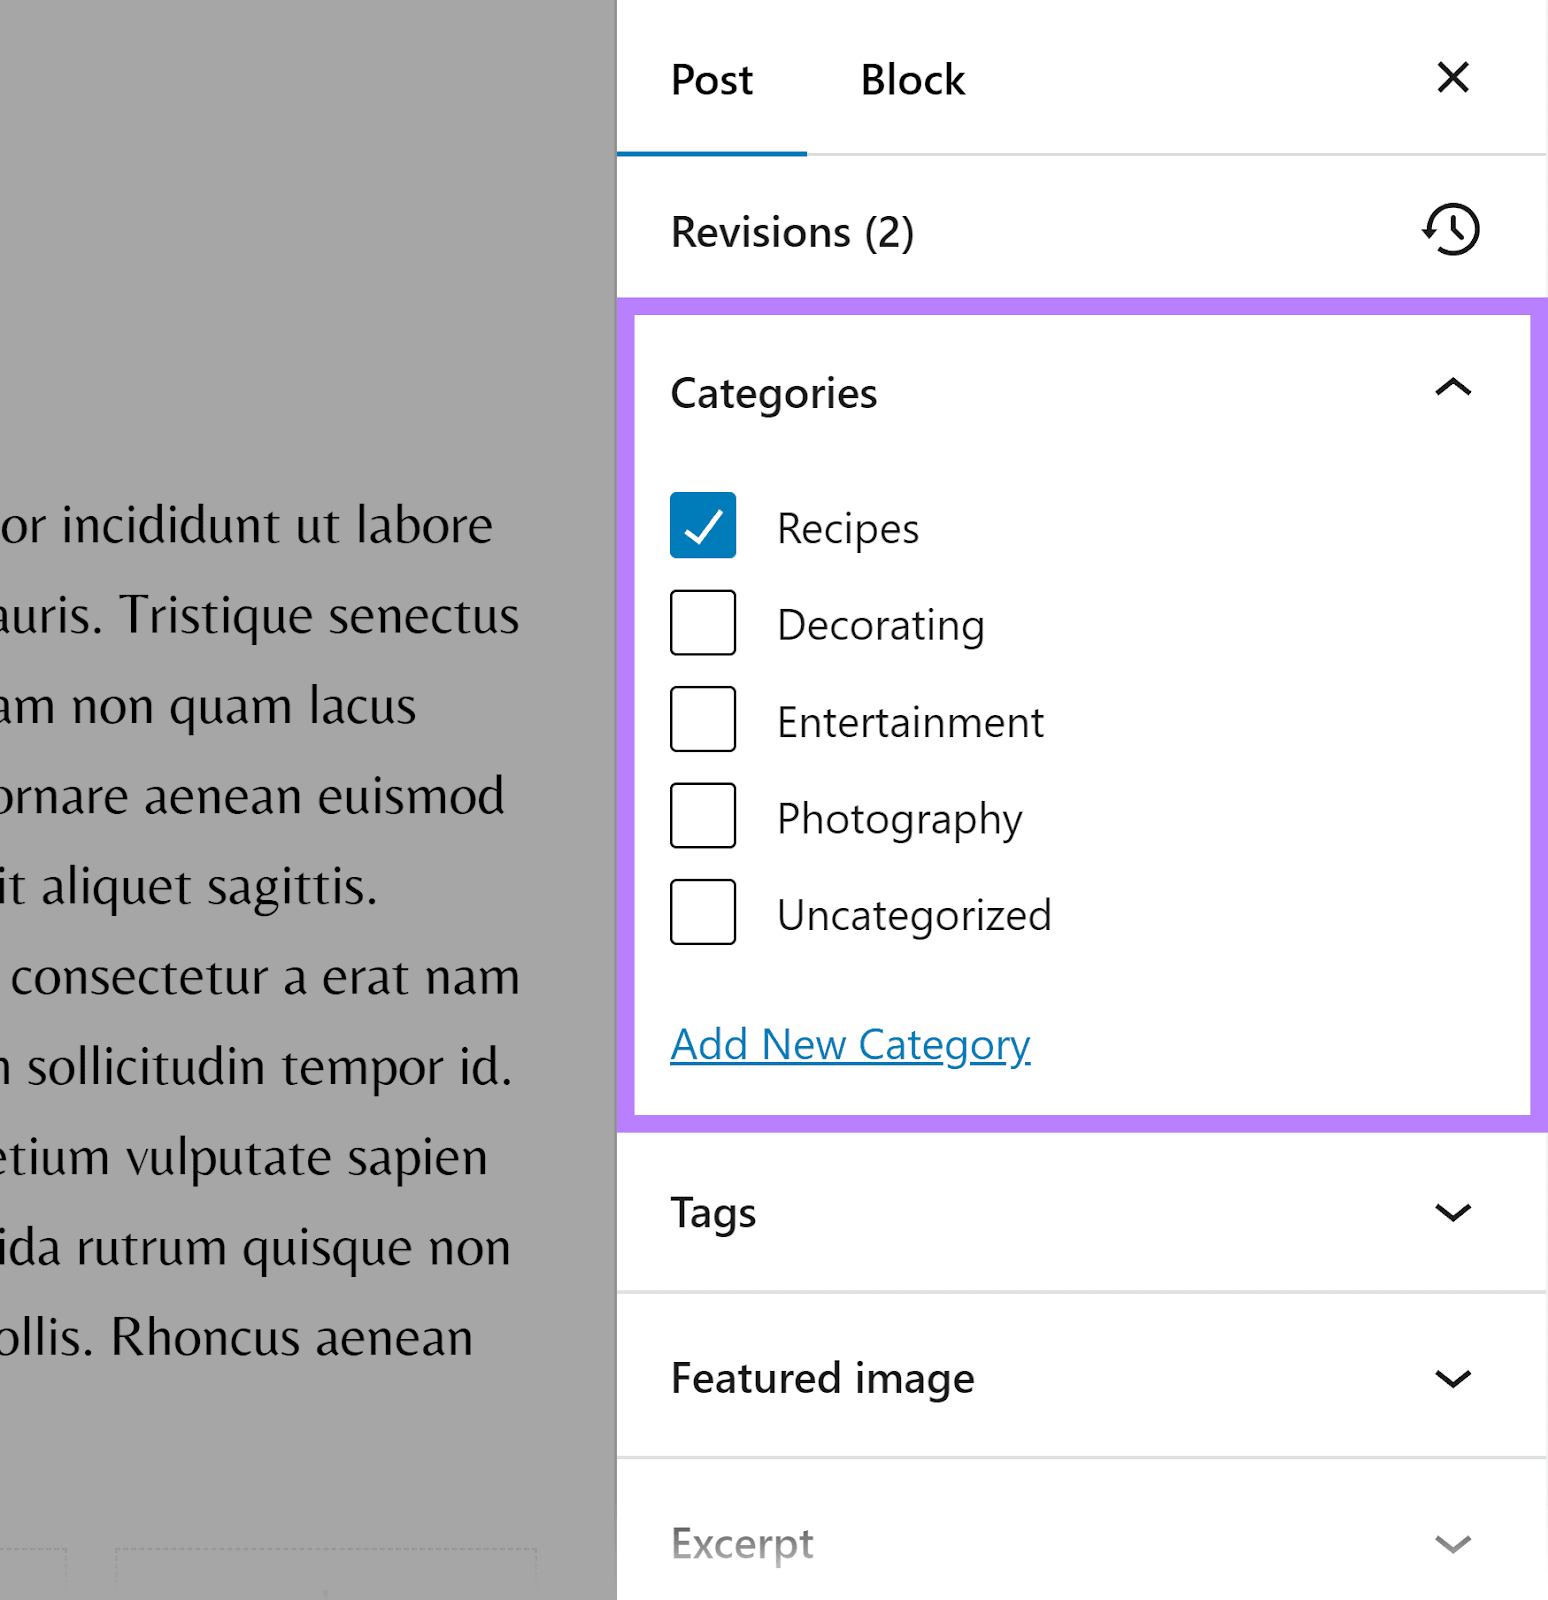
9. Use Post Categories Correctly
WordPress categories provide a way to organize your blog posts. They help visitors navigate your website and discover related content they might be interested in.
The default category in WordPress is called “Uncategorized.” If you don’t assign a category to a post, WordPress will automatically mark it as “Uncategorized.”
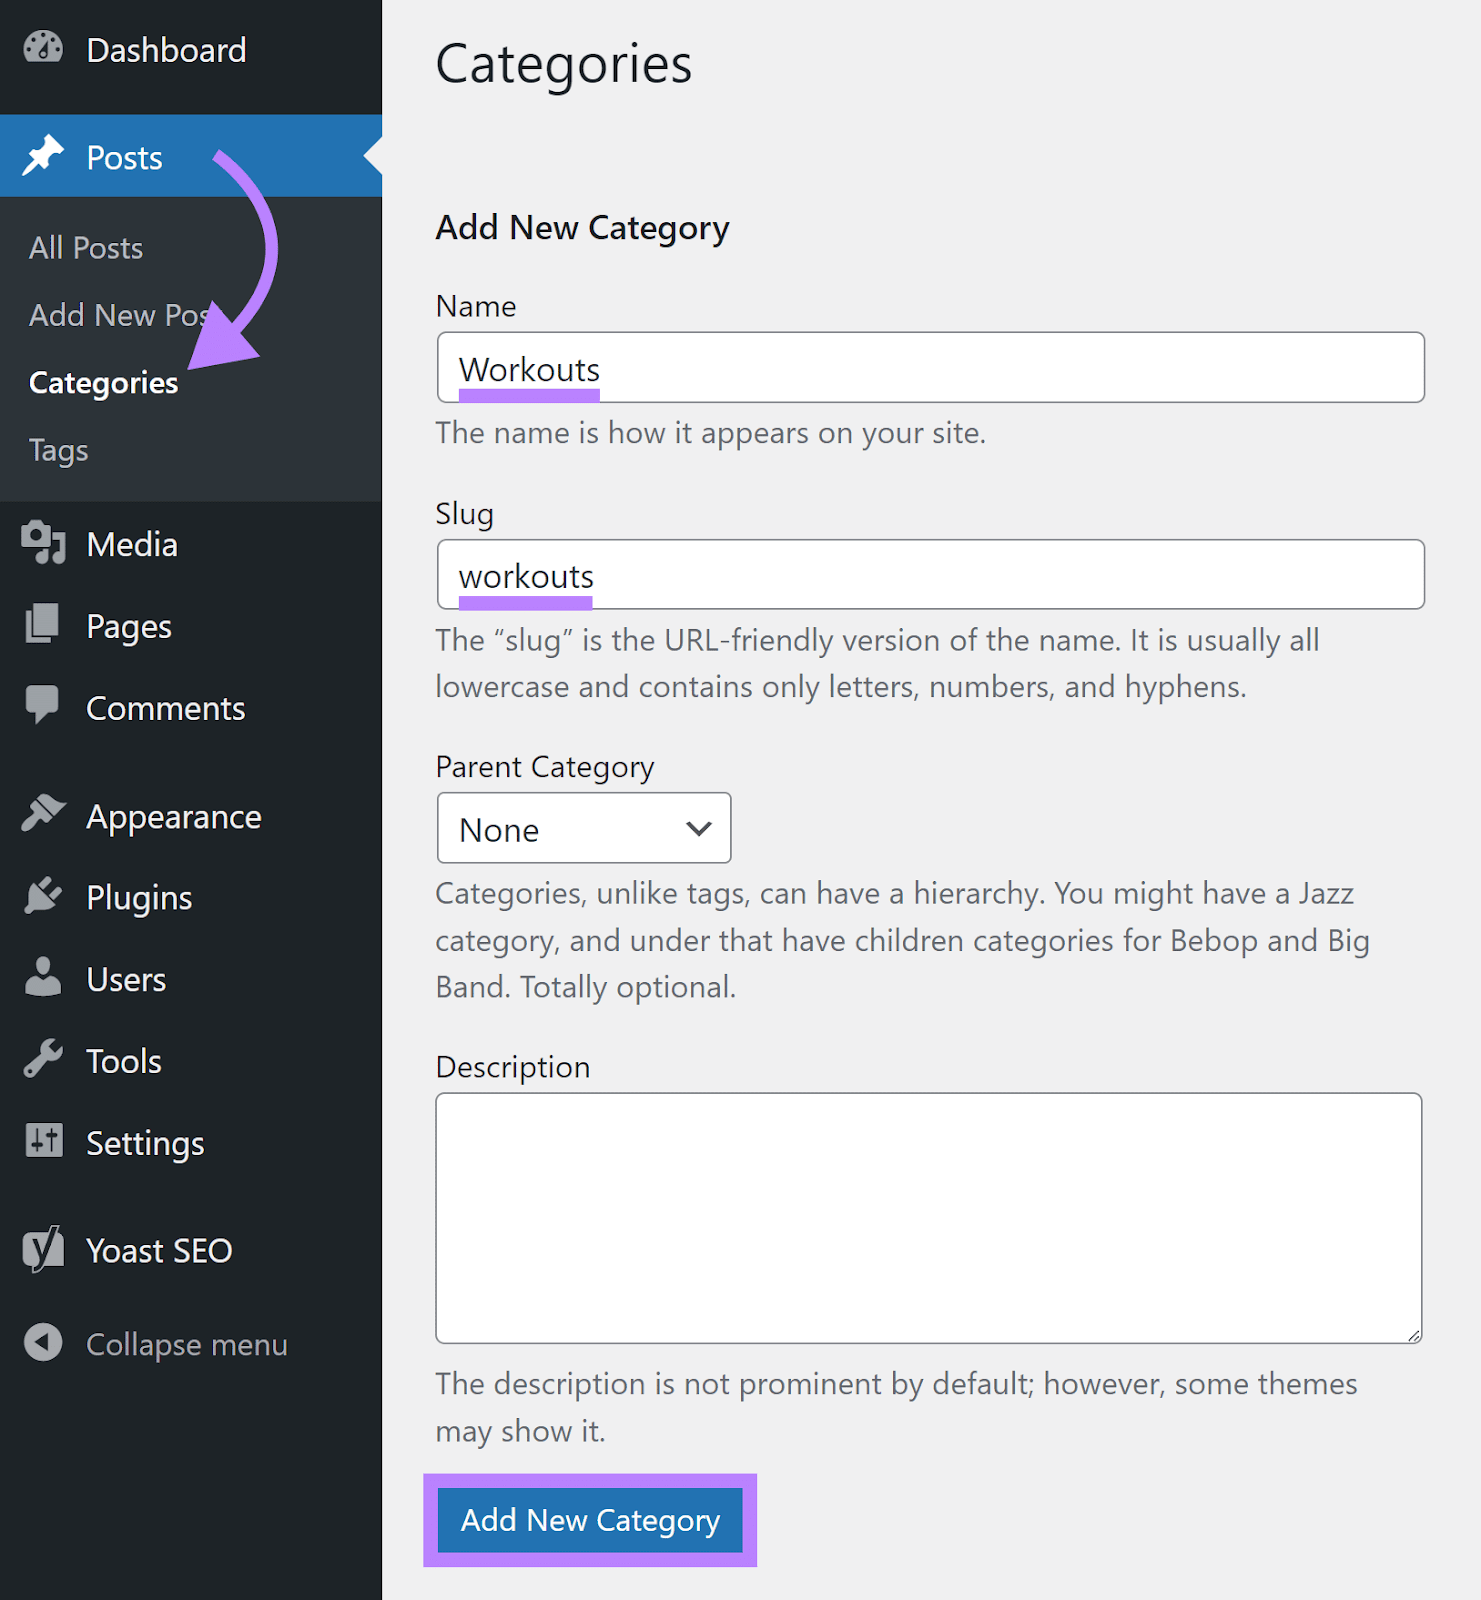
To create a new category in WordPress, go to “Posts” > “Categories.”
Enter a name, URL slug, and description for your category. If you’re creating a subcategory, make sure to also assign a parent category.
Click “Add New Category.”
You can assign a post to a category from the “Categories” drop-down in the WordPress post editor.
Use a Reasonable Number of Categories
While you should assign relevant categories to all your WordPress posts, it’s important not to create too many categories.
Why?
Because having a lot of categories can make it hard for search engines to understand what your website is about. It can also make it more difficult for visitors to find the information they’re looking for on your website.
When deciding which categories to use on your WordPress website, think about what your website’s core topics are. And which topics you specialize in and want to be known for.
Then, create a category for each topic.
For most websites, four to five parent categories will be more than enough. You can further categorize your content using subcategories.
Optimize Category Pages
WordPress creates a dedicated page for each of your categories.
Since these pages are indexable by default, they’ll show up in search engine results. Do the following to give category pages a better chance of ranking well:
Include your target keyword. Aim to rank category pages for specific keywords. And include your target keyword in the category name for added visibility.
Add a description. Include a description for each category that makes it clear what the category is about.
Use an SEO-friendly slug. Add a short, descriptive URL slug for the category. In most cases, this should be the same as the category name for consistency.
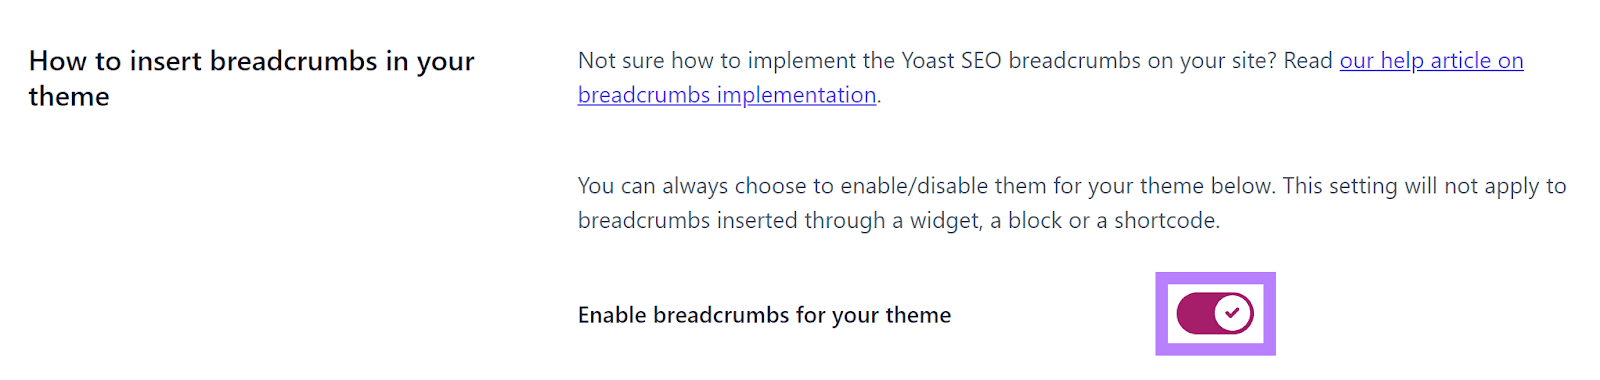
10. Enable Breadcrumbs
Breadcrumbs are navigational elements that make it easy for website visitors to jump to different pages on your website.
They look like this:
Breadcrumbs can speed up navigation. They encourage visitors to explore different parts of your website. And they’re useful for helping search engines understand and crawl your website.
The easiest way to add breadcrumb navigation to your WordPress website is by using a plugin.
If you already use Yoast SEO, you can enable breadcrumbs by going to “Settings” > “Advanced” > “Breadcrumbs.” Scroll down to the “How to insert breadcrumbs in your theme” section and toggle the “Enable breadcrumbs for your theme” option on.
11. Do Keyword Research
Keyword research involves finding the right search terms (or keywords) you should optimize your website content for.
When analyzing keywords, pay attention to:
Search volume: How many searches does the keyword get per month?
Keyword difficulty: How difficult is it going to be to rank for a specific keyword?
Search intent or keyword intent: What’s the reason or purpose behind a keyword search (e.g., are users looking for information, comparing different products, or ready to make a purchase)?
Here are three ways to find relevant keywords for your WordPress website:
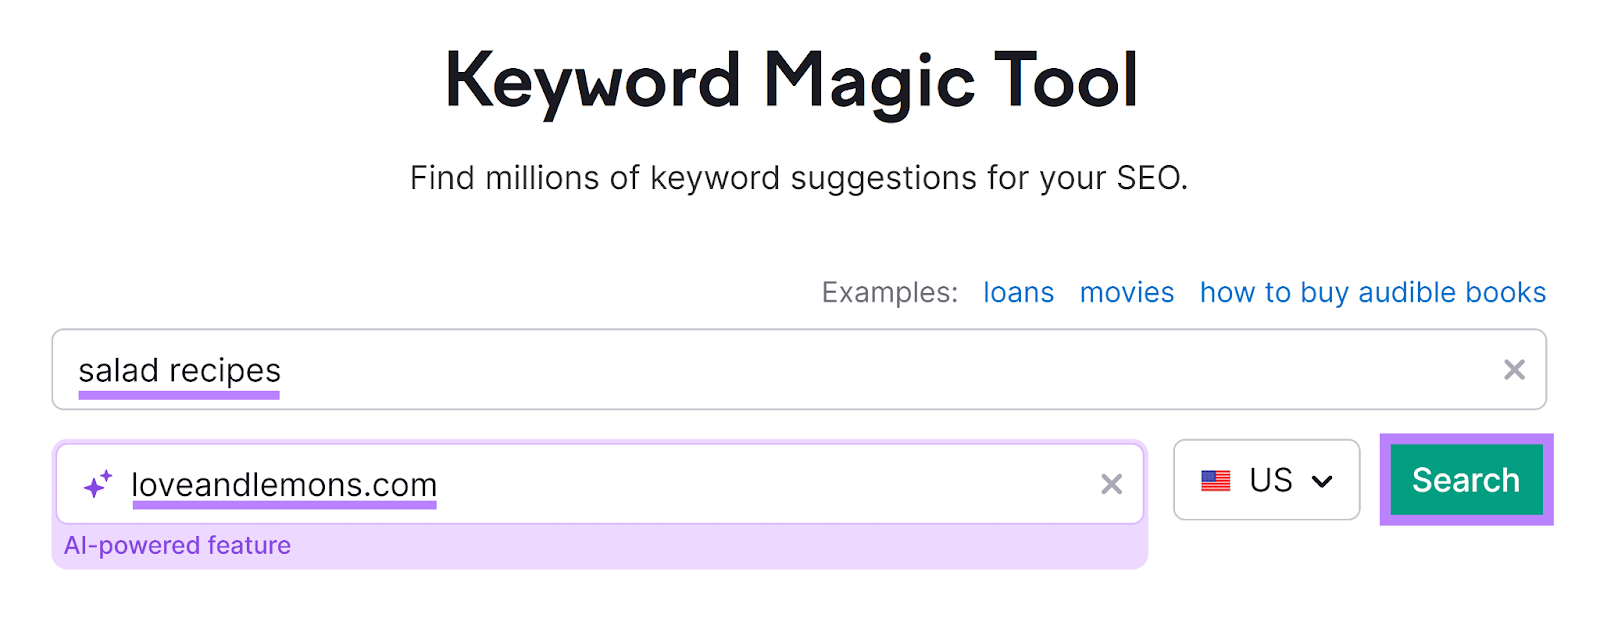
Use the Keyword Magic Tool
Semrush’s Keyword Magic Tool can generate thousands of keyword suggestions based on a single initial keyword.
Here’s how to use it:
Enter a seed keyword. You can also input your domain (for a personalized keyword difficulty score) and your target location. Click “Search.”
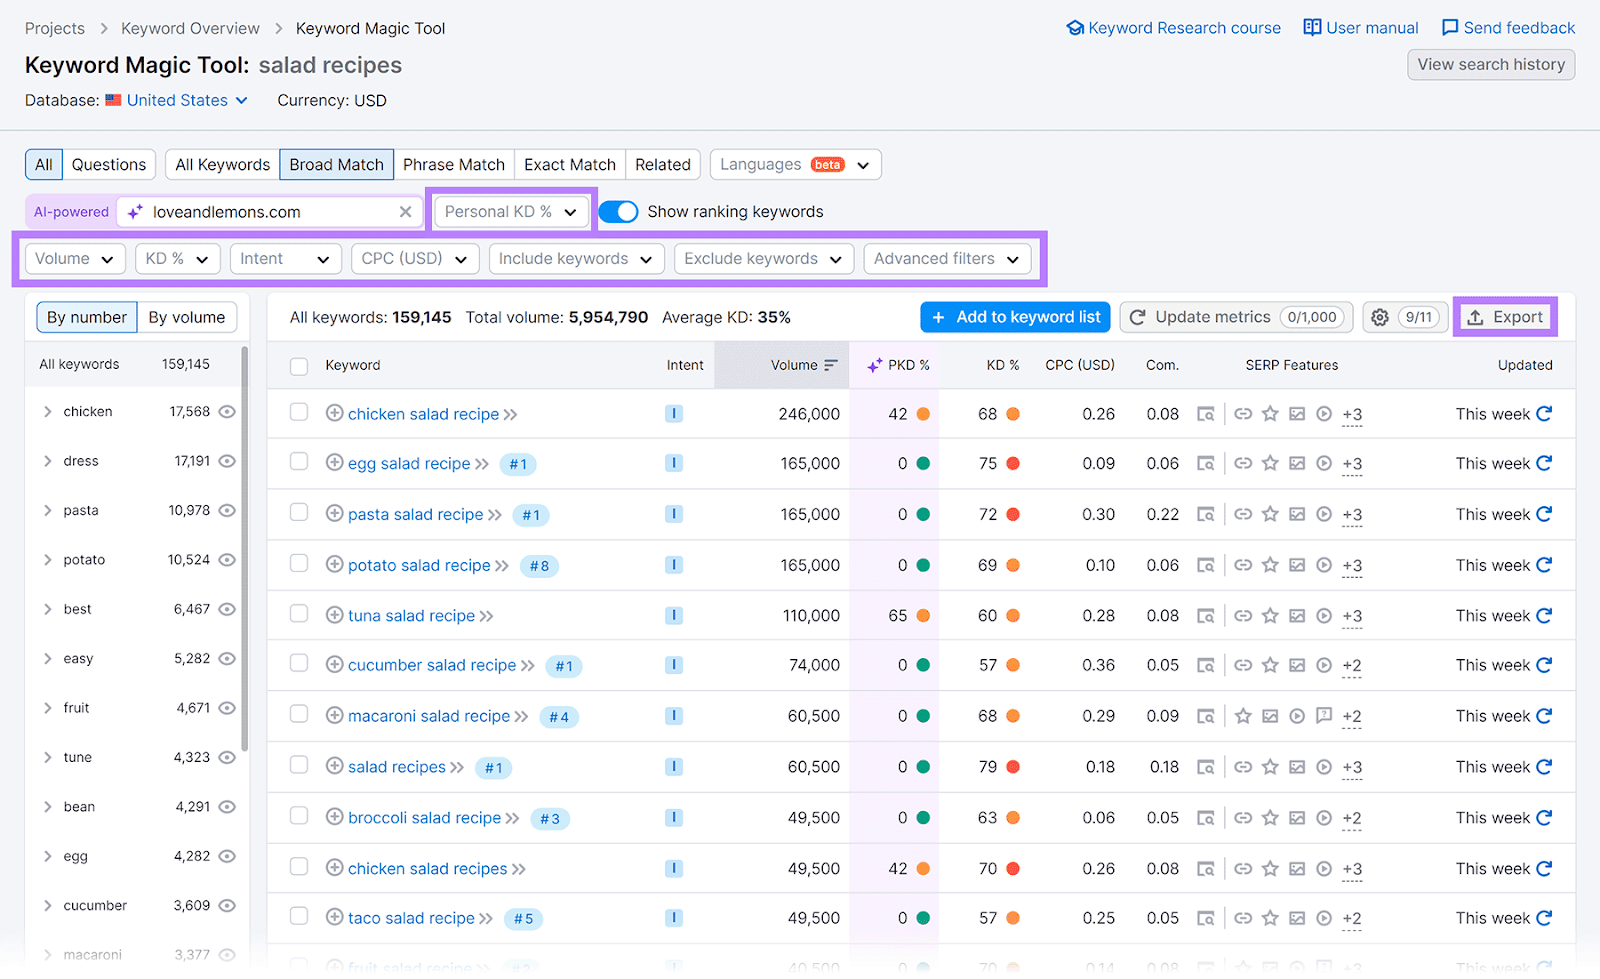
The tool will generate a list of related keywords.
You can filter the keywords by search volume (“Volume”), keyword difficulty (“KD%”), search intent (“Intent”), and more.
There’s also the option to filter keywords based on Personal Keyword Difficulty (“PKD%”)—an AI-powered estimate of how difficult it would be for your website to rank for a specific keyword.
Export your list to an Excel or CSV file by clicking the “Export” button.
Analyze Competitors’ Keywords
Analyzing your competitors’ keyword rankings is another great way to uncover valuable keyword ideas.
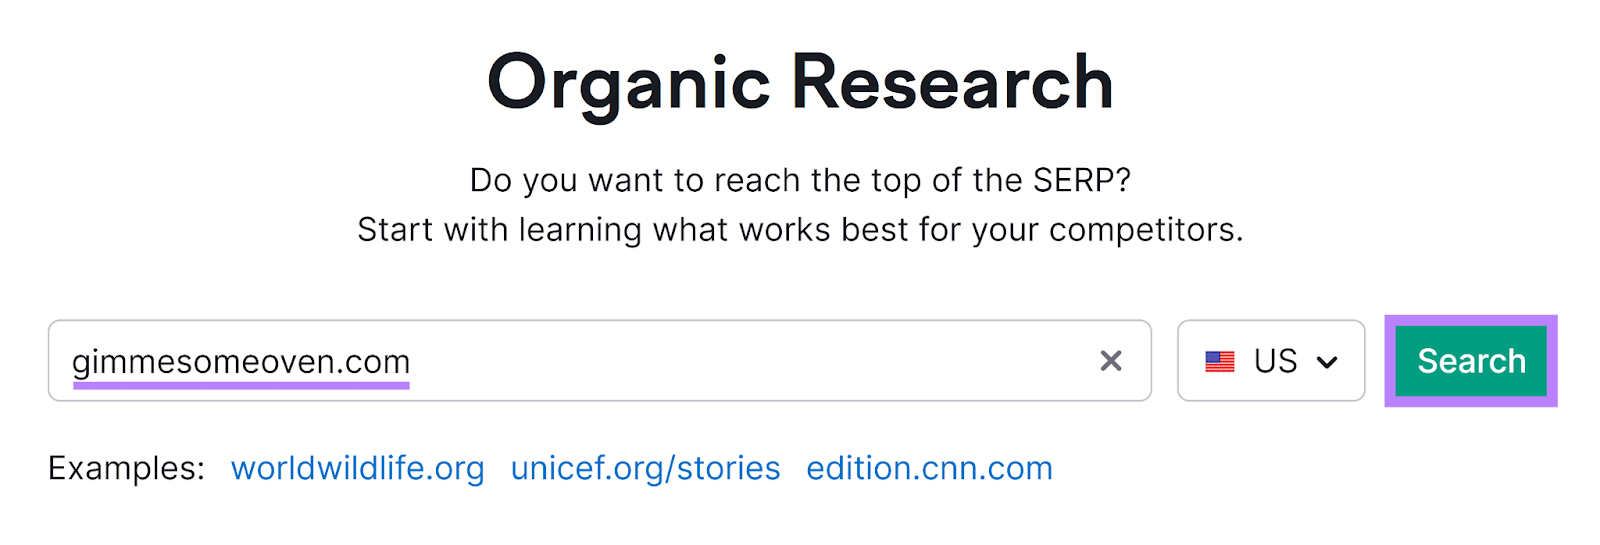
Here’s how to do it with Semrush’s Organic Research tool:
Type in a competitor’s domain, choose your target location, and hit “Search.”
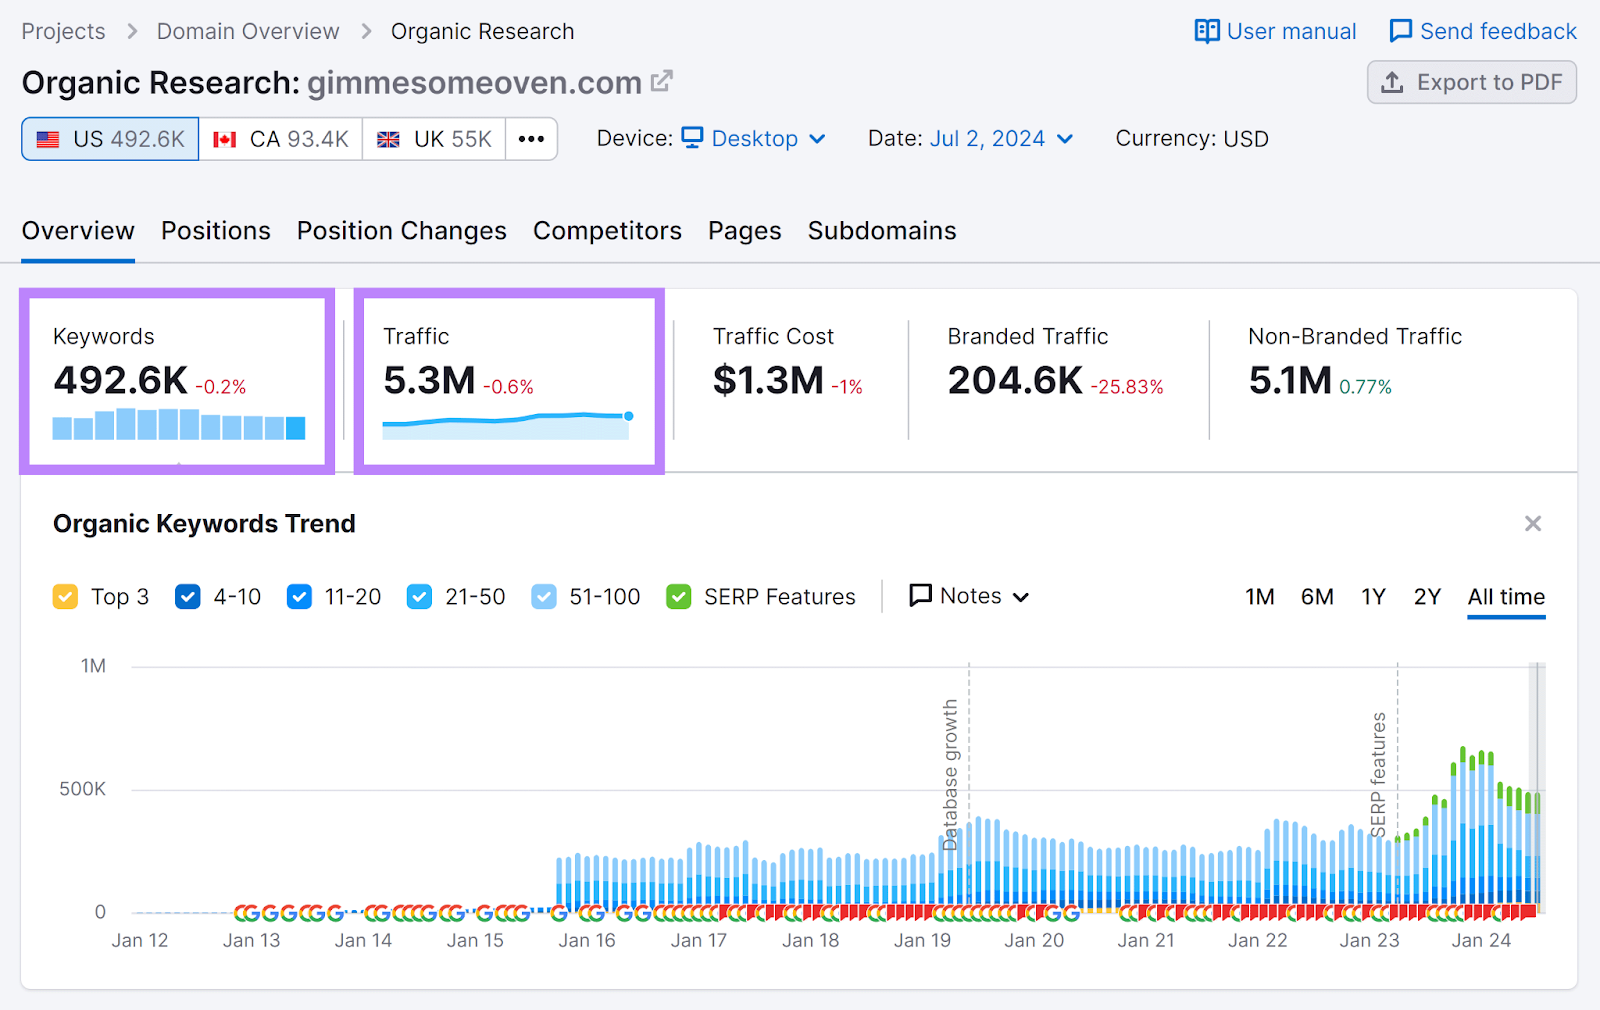
The tool will generate a detailed report on your competitor’s keyword rankings.
In the “Overview” tab, you’ll see the total number of keywords the competing domain ranks for. And the total traffic it generates from organic search.
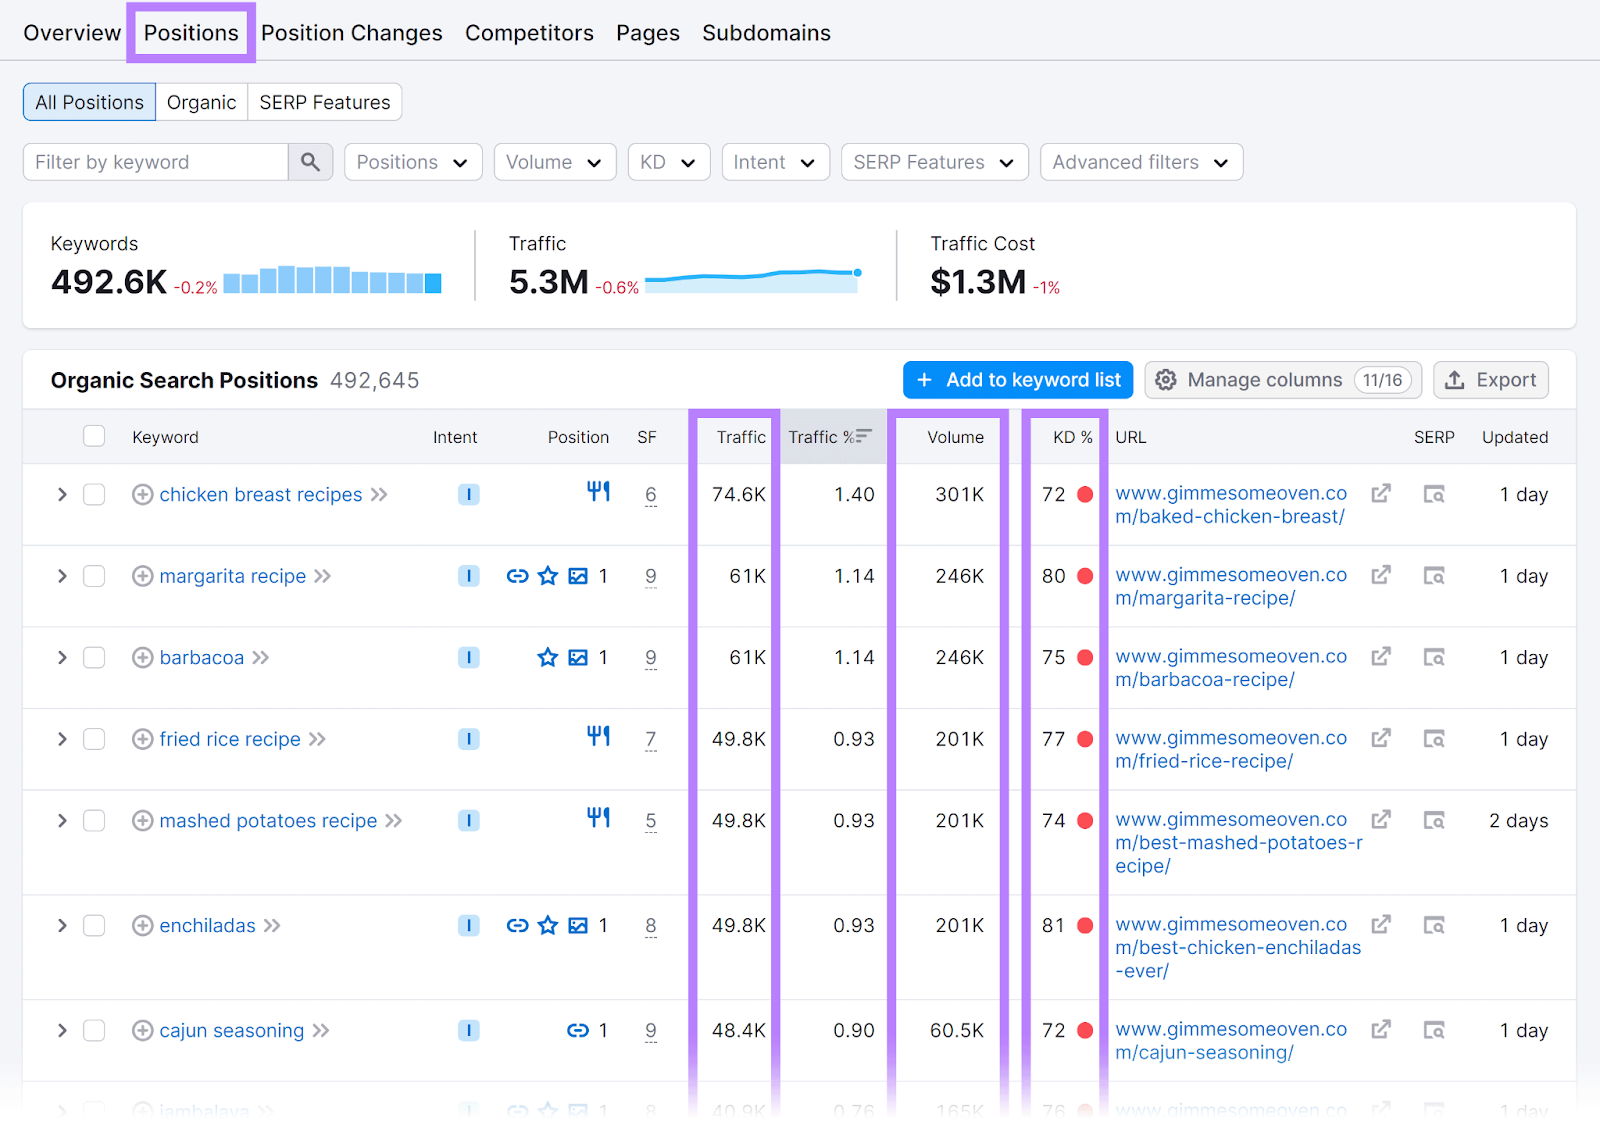
To see a list of all the keywords your market rival ranks for, navigate to the “Positions” tab.
Here you can see all their keyword rankings. Along with the search volume, total amount of traffic generated, and difficulty for each keyword.
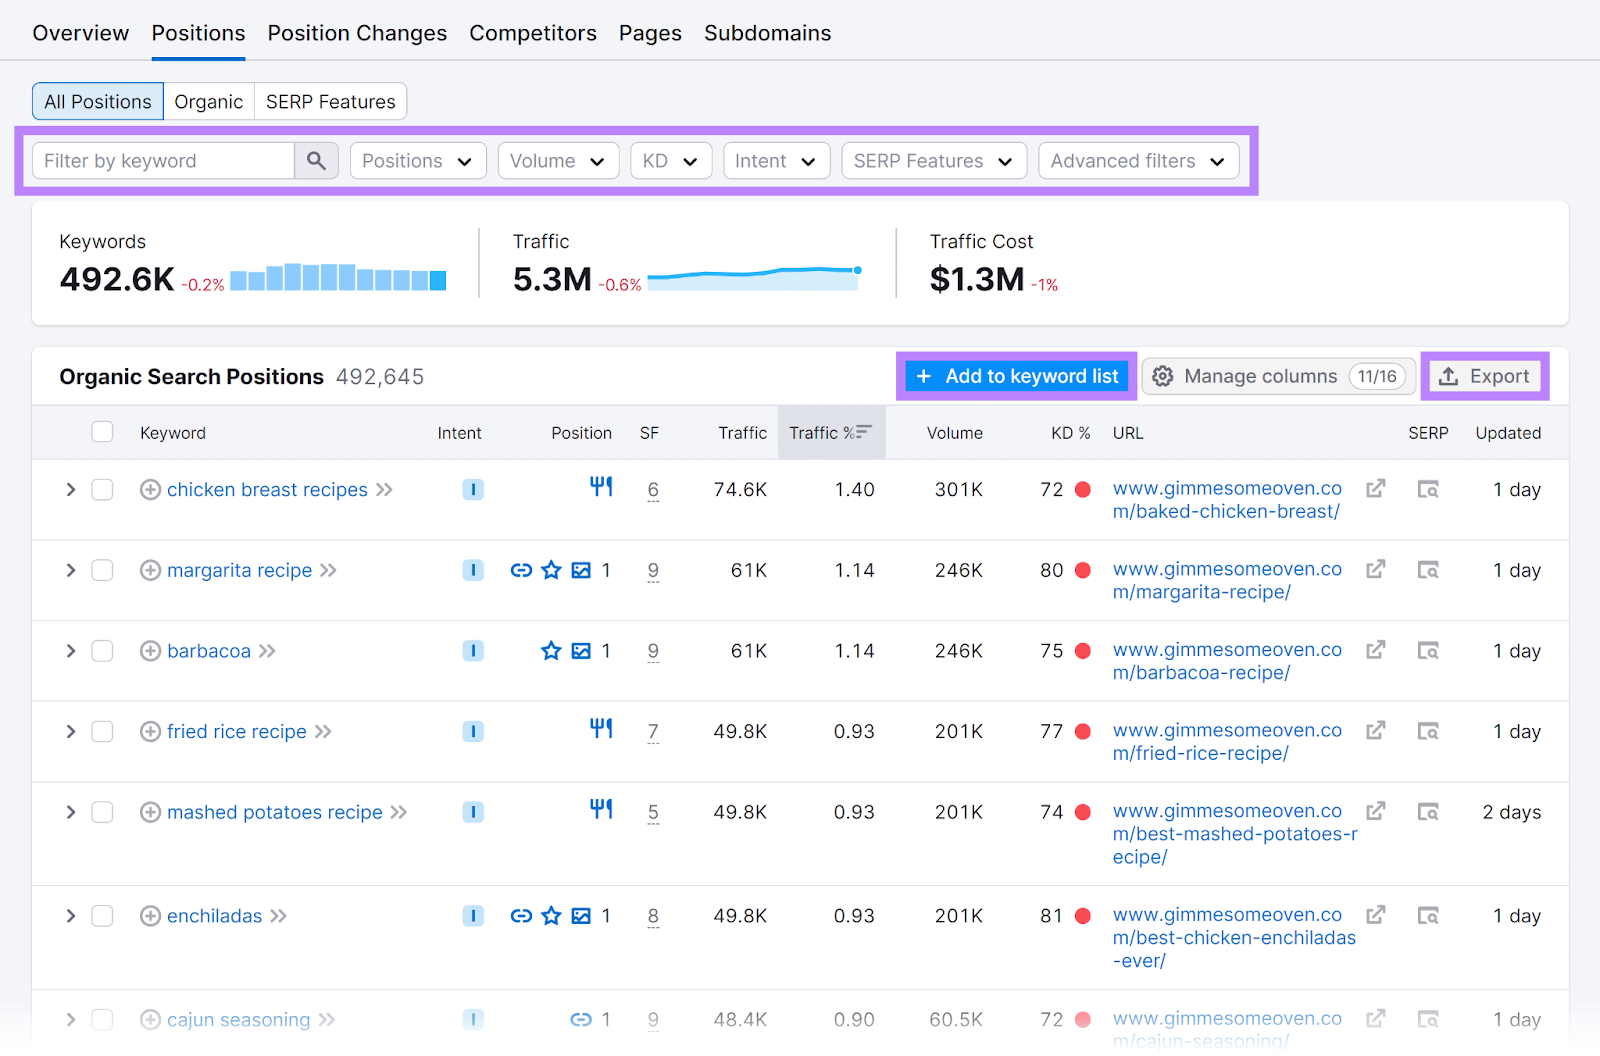
You can filter the keywords by volume, intent, difficulty, and more using the drop-down filters.
Once you’re happy with the list, add the keywords to a list in Semrush using the “+ Add to keyword list” button. Or click “Export” to send them to an Excel or CSV file.
Perform Keyword Gap Analysis
A keyword gap analysis involves analyzing the keyword rankings of competing domains to uncover keywords multiple competitors rank for but you don’t.
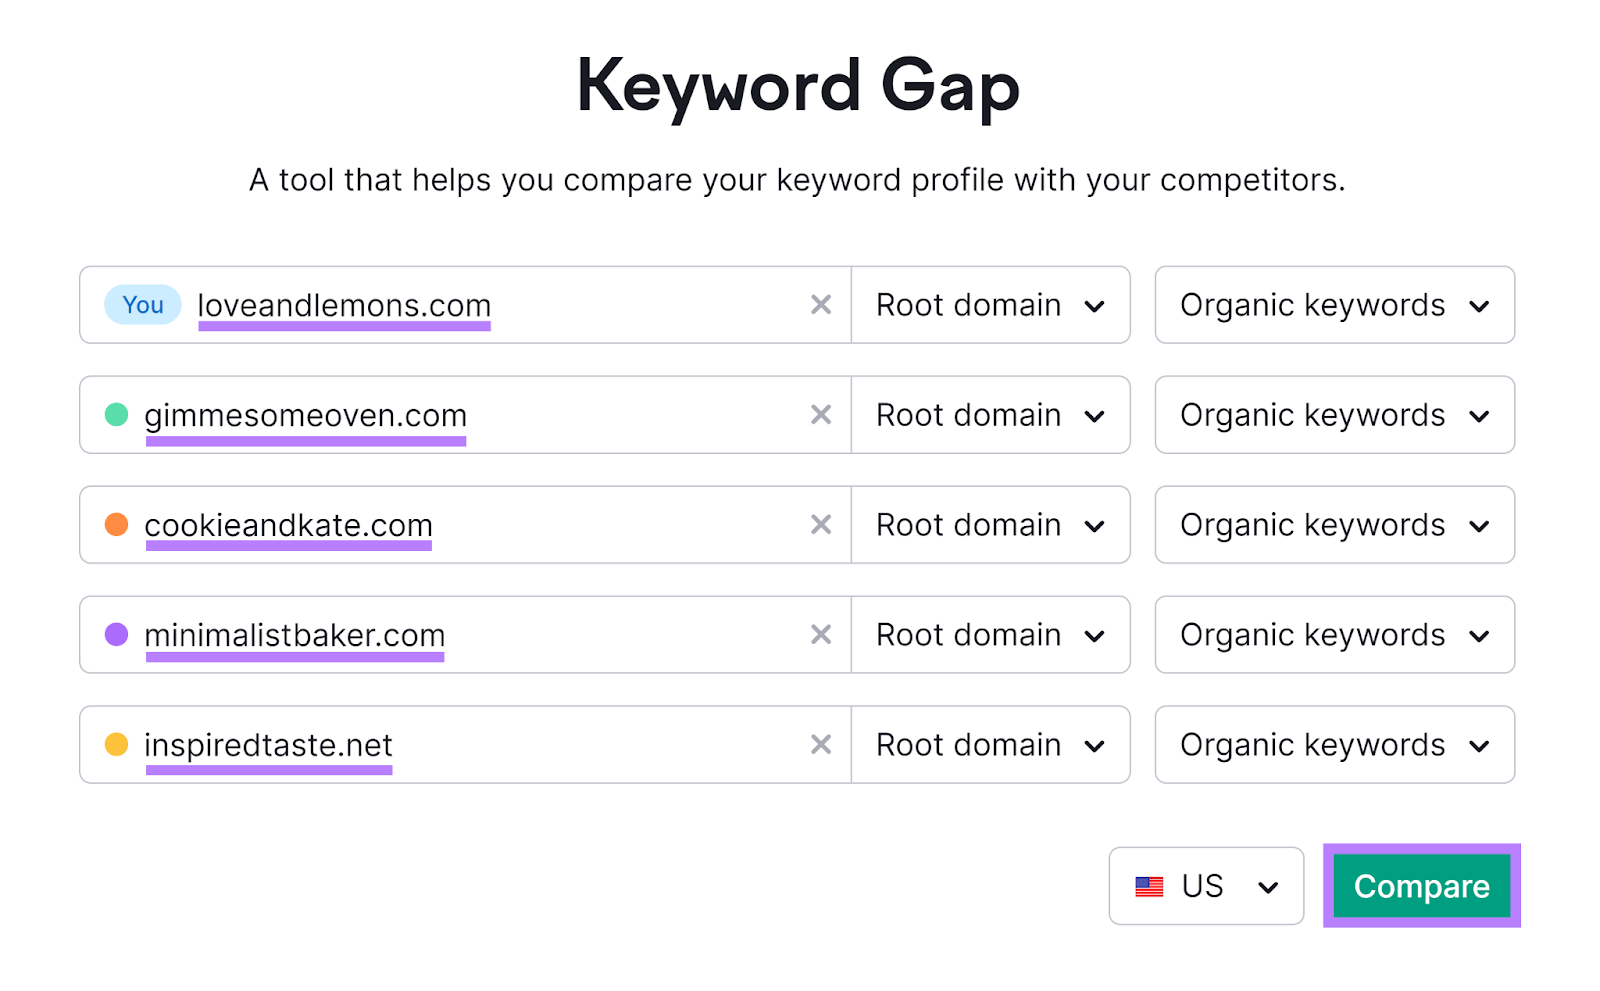
Here’s how to do this competitive analysis using Semrush’s Keyword Gap:
Enter your domain and up to four competing domains. Click “Compare.”
The tool will analyze the keyword rankings of all the domains, presenting you with a report containing the following types of keywords:
Shared: Keywords all the domains have in common
Missing: Keywords all competing domains rank for, but yours doesn’t
Weak: Keywords your domain ranks lower for compared to all competing domains
Strong: Keywords your domain has higher rankings for compared to all competing domains
Untapped: Keywords your domain doesn’t rank for, but at least one competing domain does
Unique: Related keywords that none of the domains (including yours) rank for
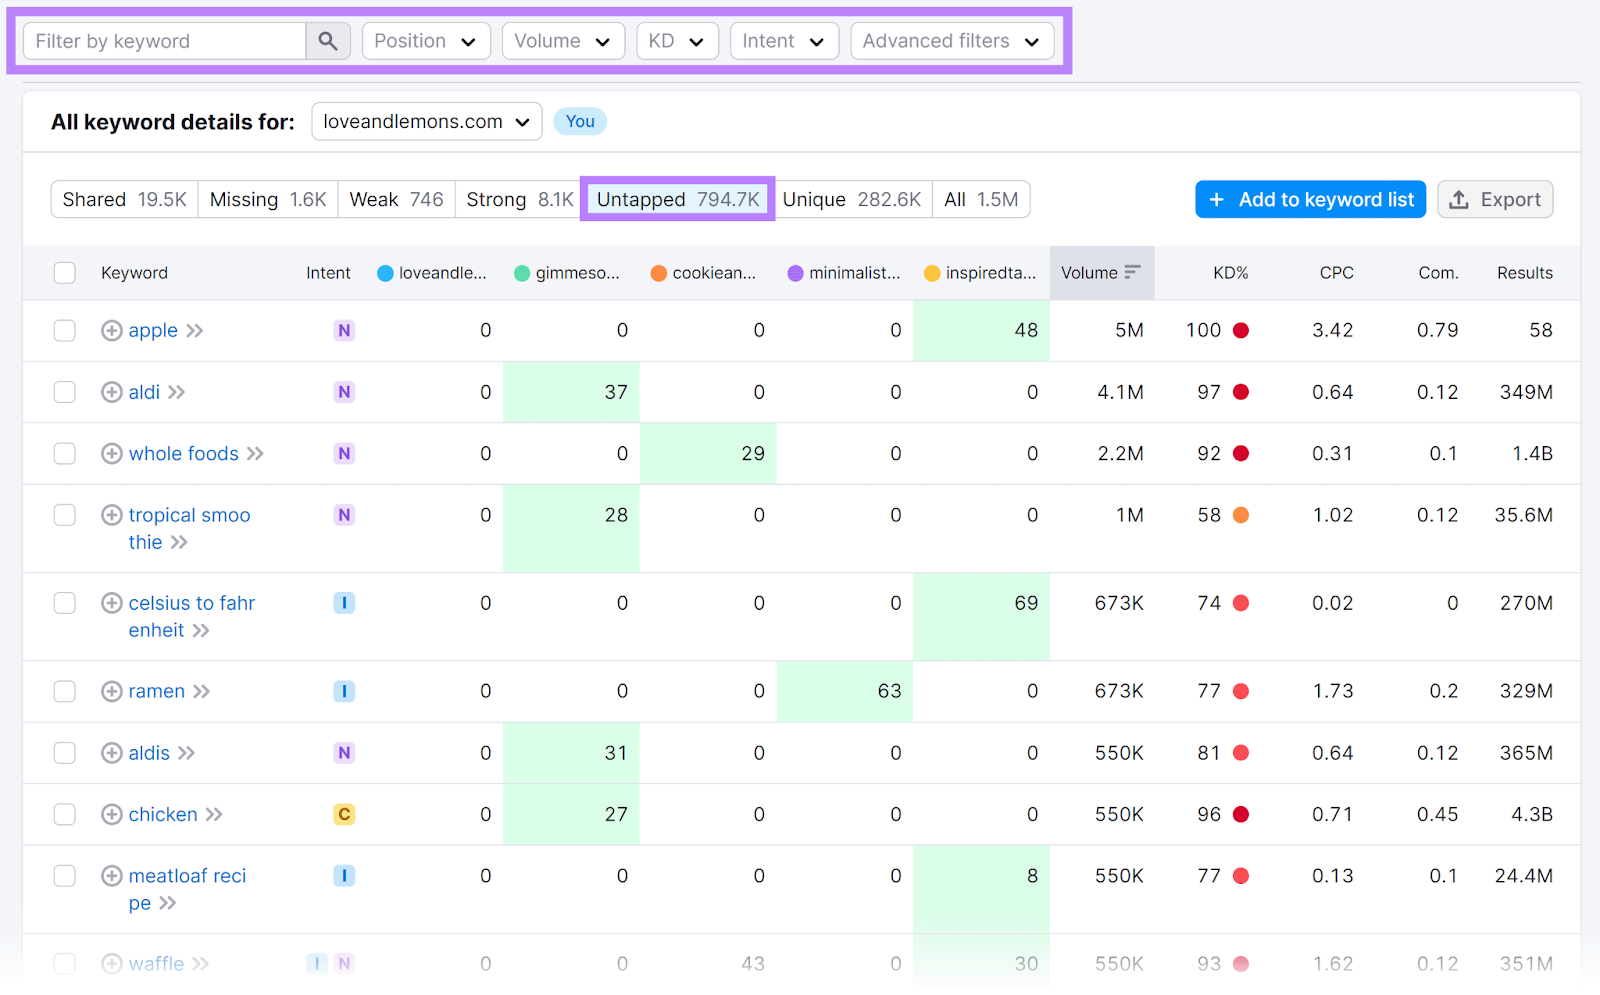
From here, click on the “Untapped” tab. This will provide you with the biggest list of keywords that you should likely aim to rank for.
You can filter the keywords further by position, search volume, intent, keyword difficulty, and more. This way:
When you’ve narrowed down the list to your liking, click “+ Add to keyword list” or the “Export” button.
Once you’ve created a keyword list using any of the above three methods, start creating new posts, pages, and categories targeting specific keywords.
Or add relevant keywords to existing content on your site as secondary keywords.
12. Create Great Content
You can optimize various technical details of your WordPress website, improve navigation, and perform keyword research. But none of this will help you rank if your content is of poor quality to begin with.
Here’s how to ensure that you create quality content for your site:
Meet Search Intent
To rank, the most important thing your content needs to do is answer the searcher’s query. And help them solve the problem they’re dealing with.
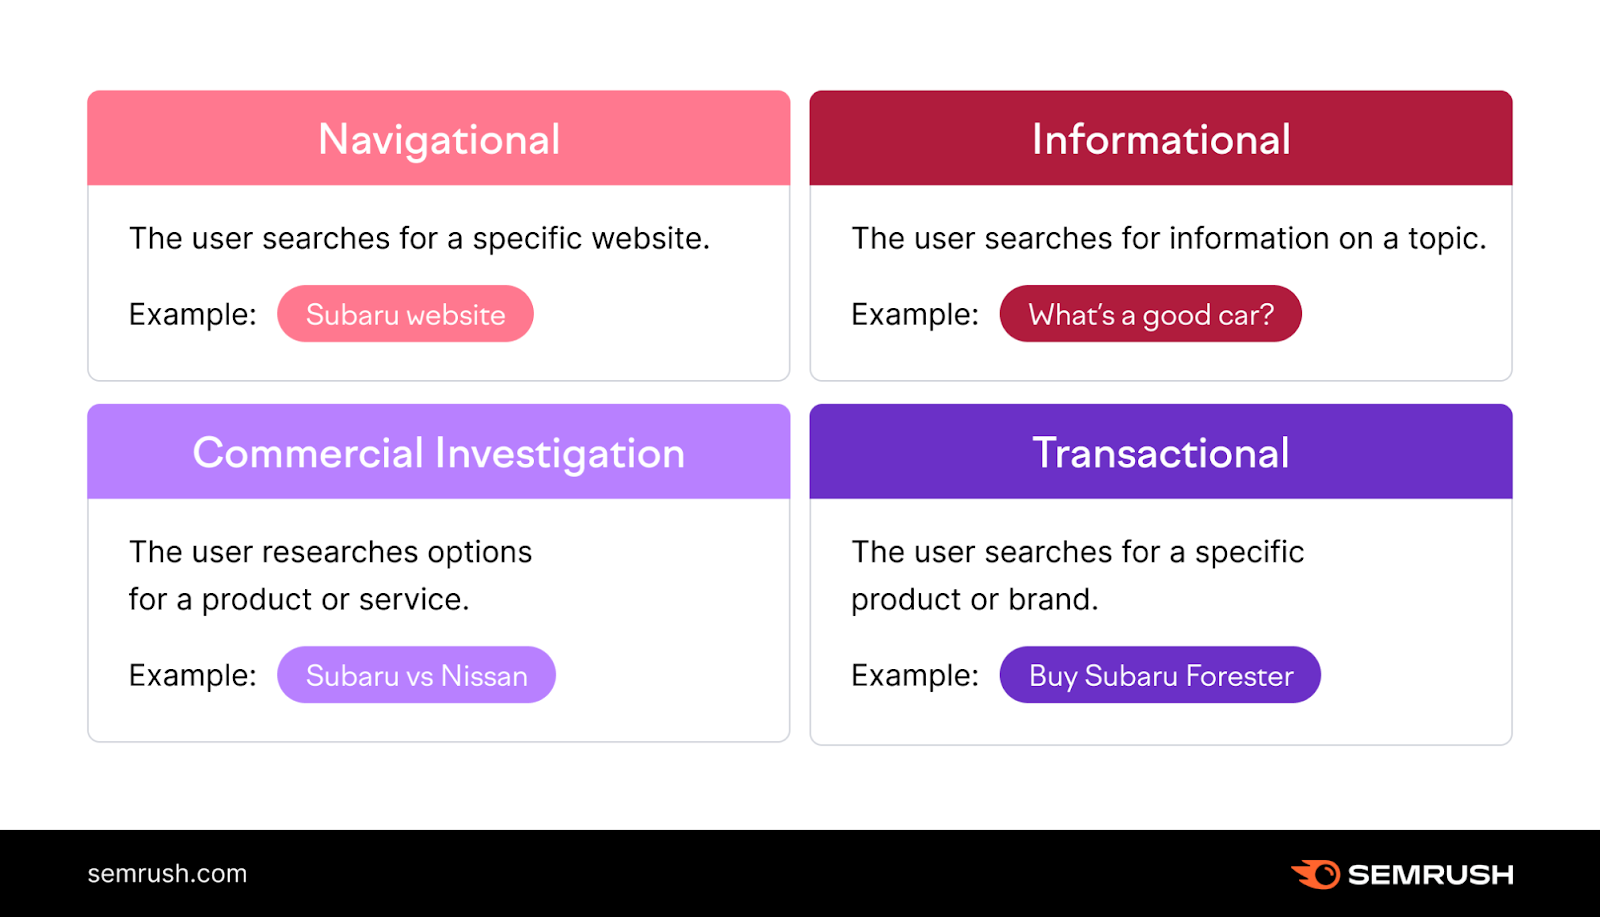
When it comes to online searches, there are four main types of intent:
Navigational: Typed in by searchers looking for a specific website or page
Informational: To find information about a particular topic
Commercial: When researching before buying a product or service
Transactional: Used by searchers who are ready to make a purchase
But how do you recognize the search intent behind a keyword?
Sometimes, as in the examples above, the intent is fairly obvious.
Other times, you’ll need to analyze the top-ranking pages in the search results to understand what search intent they’re optimized for. Google must rank them higher because it likely considers their content to address the user’s search query effectively.
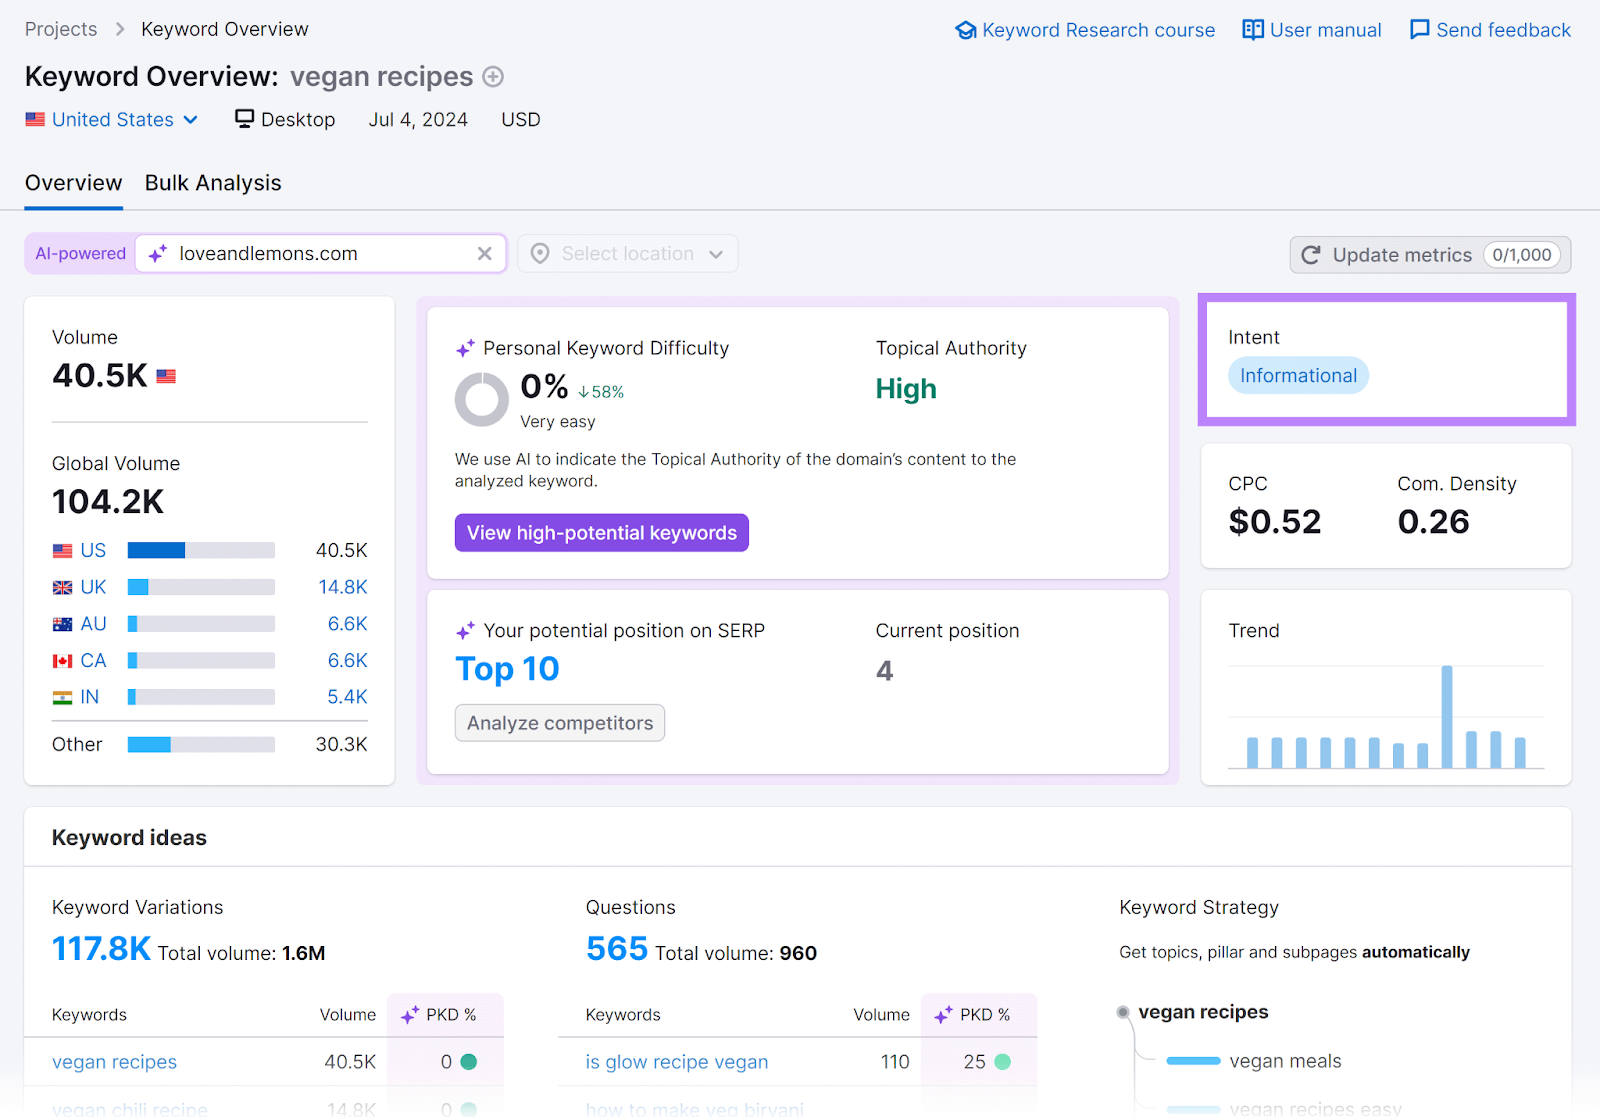
The easiest way to identify search intent is with Semrush’s Keyword Overview.
Type your keyword into the tool and hit “Search.”
The tool will generate a detailed report on your keyword. Showing you its search intent and other useful data.
Provide Reliable Information
Once you understand search intent, your next step is to provide reliable, high-quality information on the topic.
Do extensive research on the topic before you even start writing. Here’s how:
Read through relevant online articles and blog posts
Listen to podcasts related to the topic
Watch videos or online courses
Read what people are saying about the subject on platforms like Reddit and Quora
Reach out to industry experts and ask for their opinion
Compile all your research, extract the most valuable insights, and turn them into an engaging and valuable piece of content.
Back up all your claims with relevant links to reliable research and studies. And remember to cite all your sources.
Finally, make sure all your information is accurate and up to date.
Google wants to reward quality content that shows topical expertise (E-E-A-T content) with higher search rankings.
Optimize for Readers
Optimize content for your audience to provide a great reading experience.
Here are a few ways to achieve this:
Use simple language. Avoid jargon and complex expressions. Instead, write in simple language that everyone can understand.
Make it easy to read. Don’t make your content look like a wall of text. Take advantage of white space. And use lists and tables to break up large chunks of text.
Add plenty of examples. Help readers understand the points you’re trying to make by using many examples—make sure they’re relevant to your audience.
Make it visually appealing. Use images and infographics to demonstrate concepts and enrich your content. Visuals will also make your content easier on the eyes.
13. Write SEO-Friendly URLs
SEO-friendly URLs help both search engines and users understand what a page is about at a glance.
Google offers a helpful resource for understanding how to create SEO-friendly URLs.
In short, here’s what you should do:
Keep your URLs simple, short, and descriptive
Use your target keyword as the URL slug (the last segment of the URL)
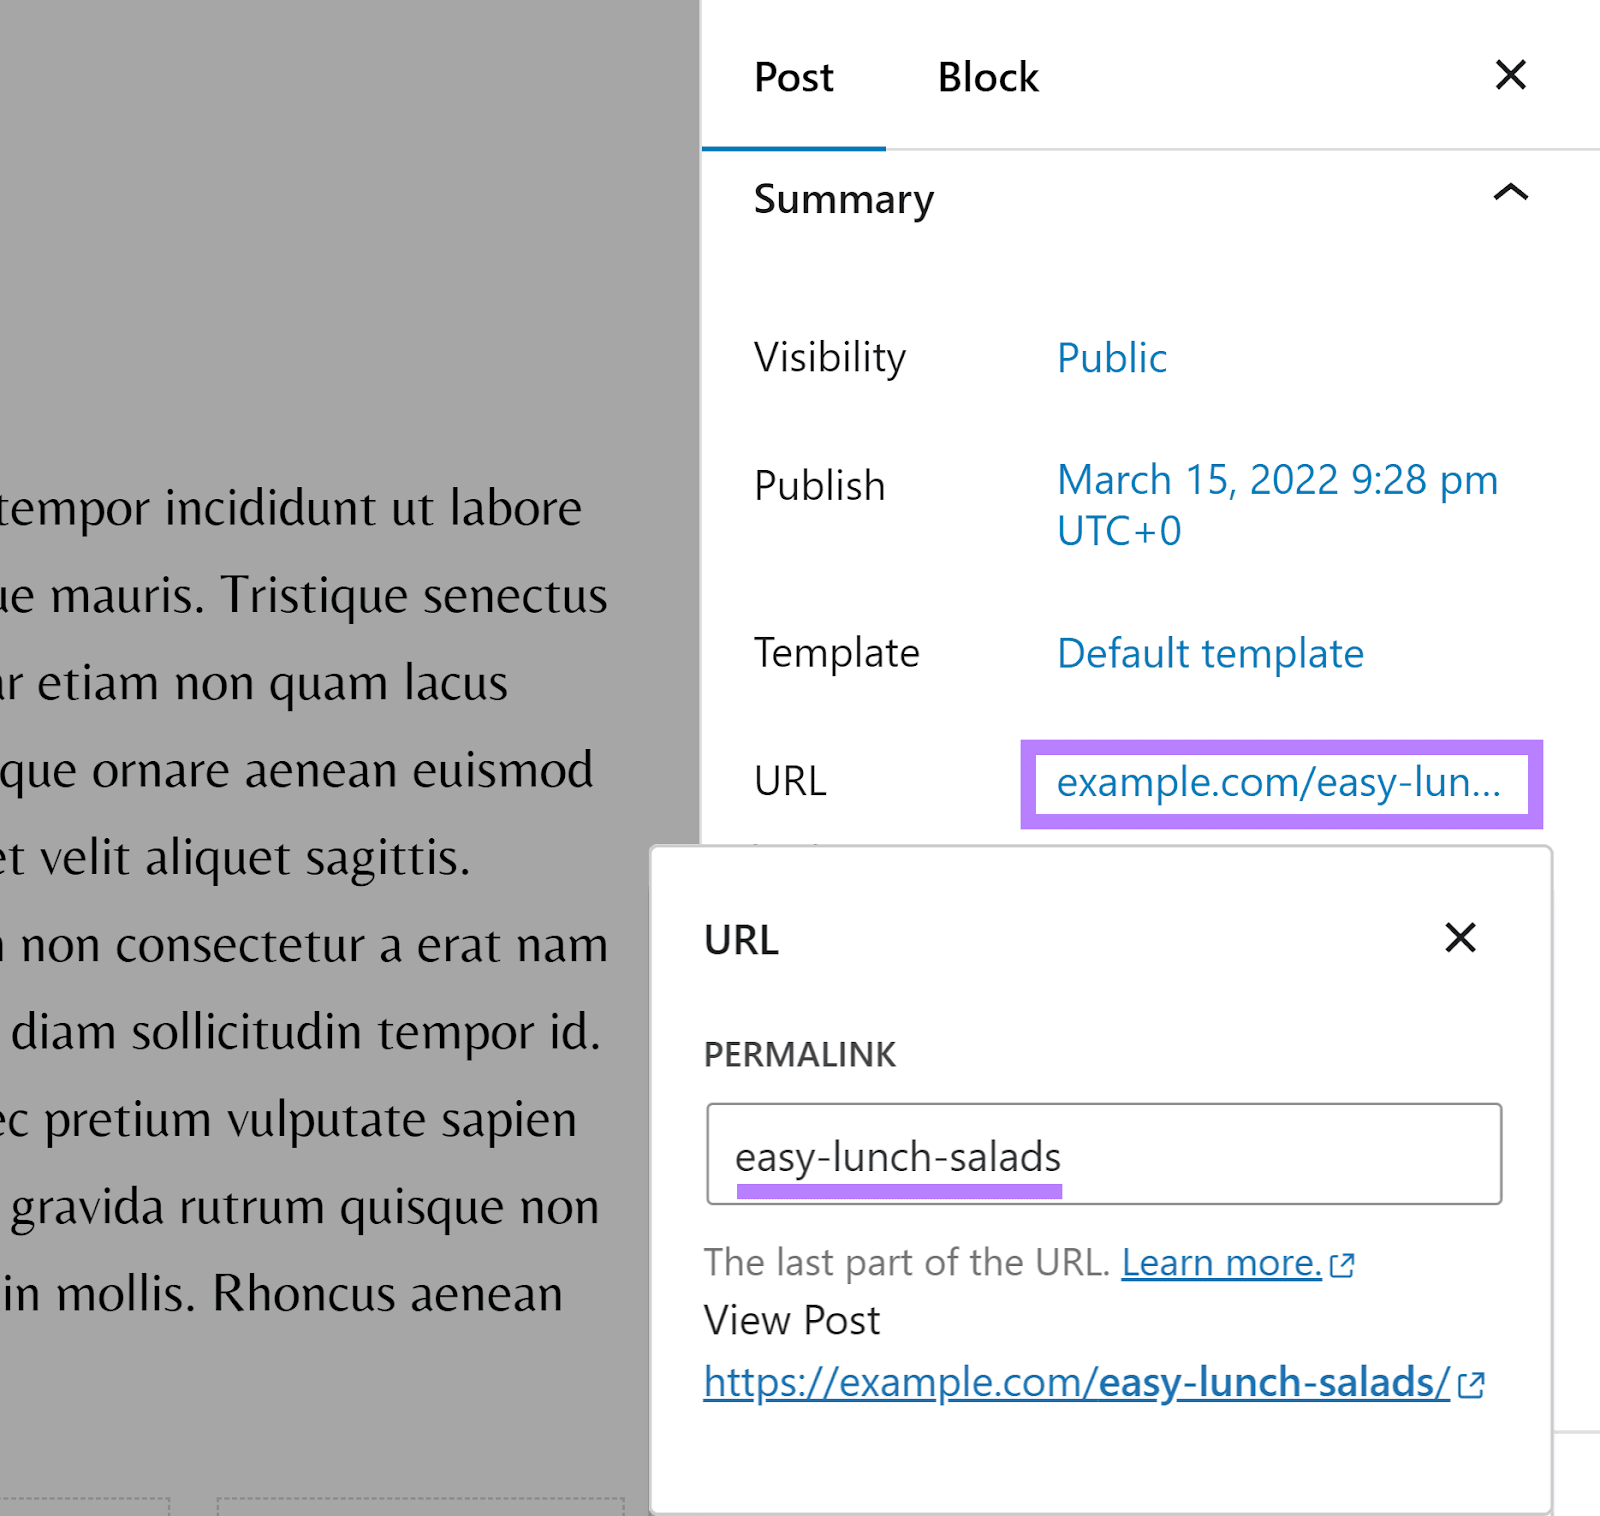
To change a URL slug in WordPress, open the page or post in the built-in editor and click the URL field.
Enter your desired URL slug in the input field and click “x.”
14. Use Headings Correctly
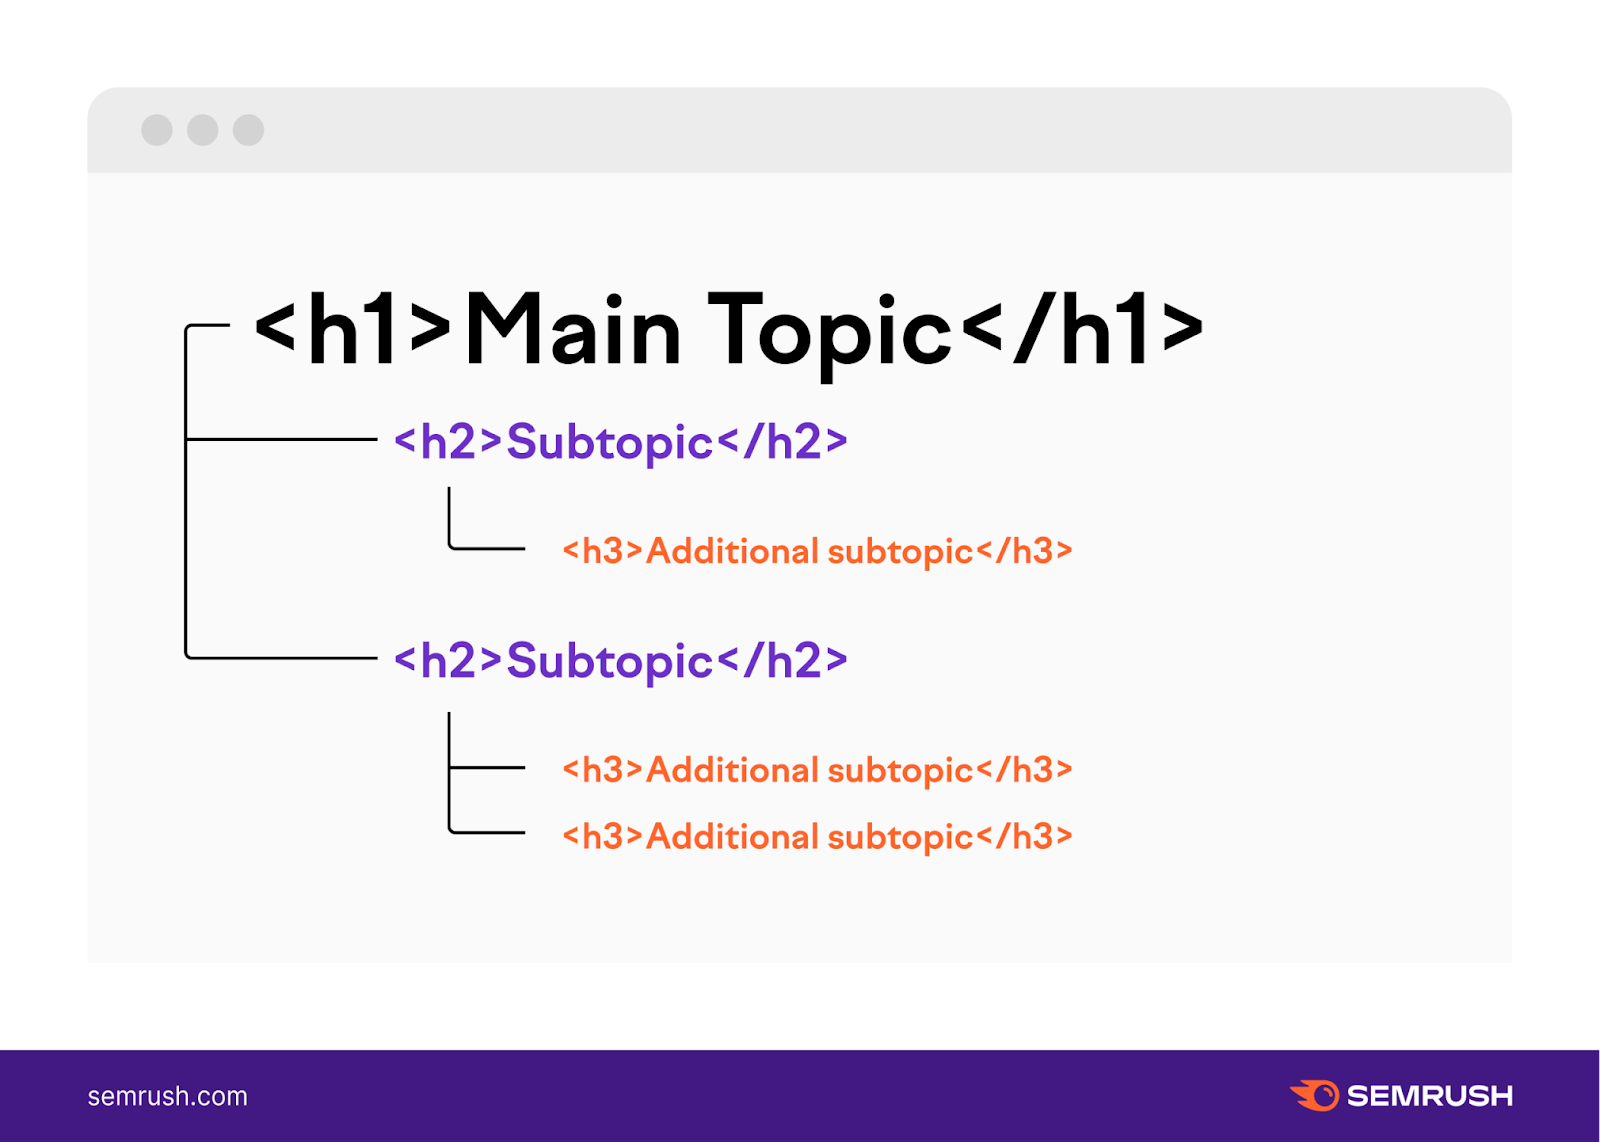
Headings serve to structure your content and make it easier to read and navigate. Like this:
It’s important to add heading tags (HTML tags that indicate headings and subheadings on a page) in a hierarchical order. So your content follows a logical, easy-to-understand structure.
The H1 heading goes first, followed by the H2 heading, then the H3 heading, and so on.
Keep in mind that every page should only have one H1 heading tag. But you can add multiple lower-level ones (H2, H3, H4, etc.).
Aim to include relevant keywords in your heading tags.
For example, make sure to use your primary keyword in the H1 heading. You can also add it to one or more lower-level headings, along with primary keyword variations and secondary keywords.
Don’t overdo it—the point isn’t to stuff keywords in your headings.
Your goal?
Include a few keywords throughout your headings to show search engines and users what your page is about.
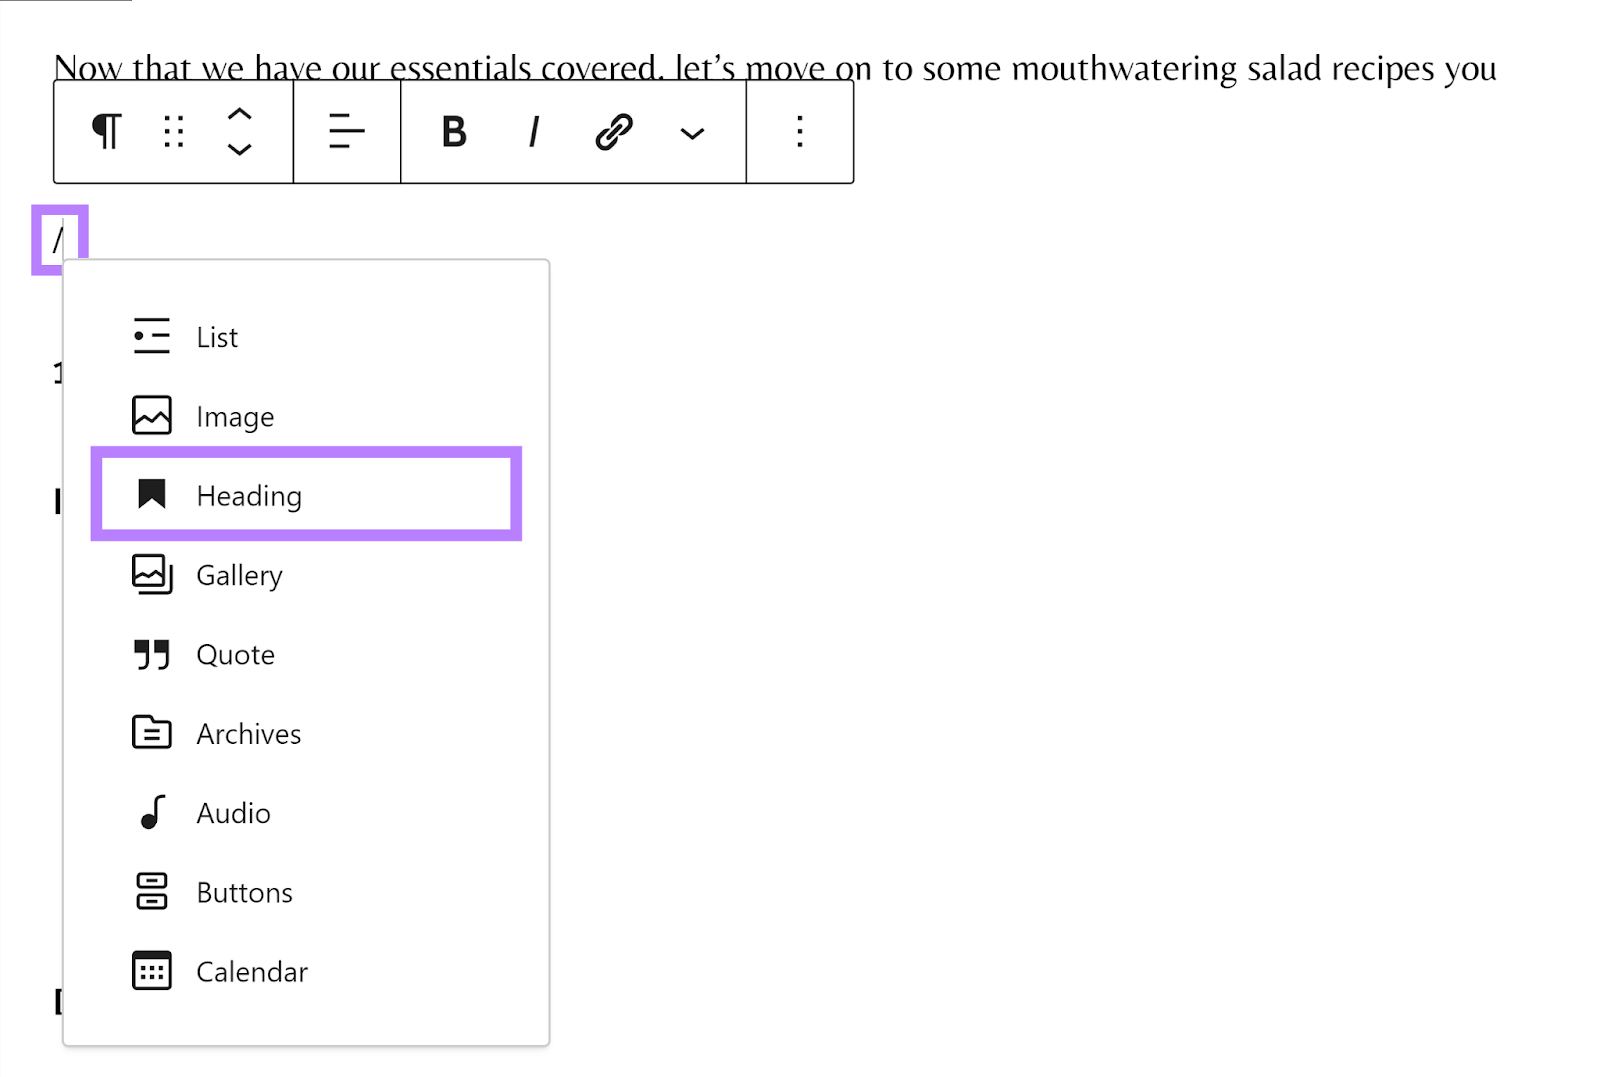
To add headings in WordPress, type “/” in the post editor and select the “Heading” option.
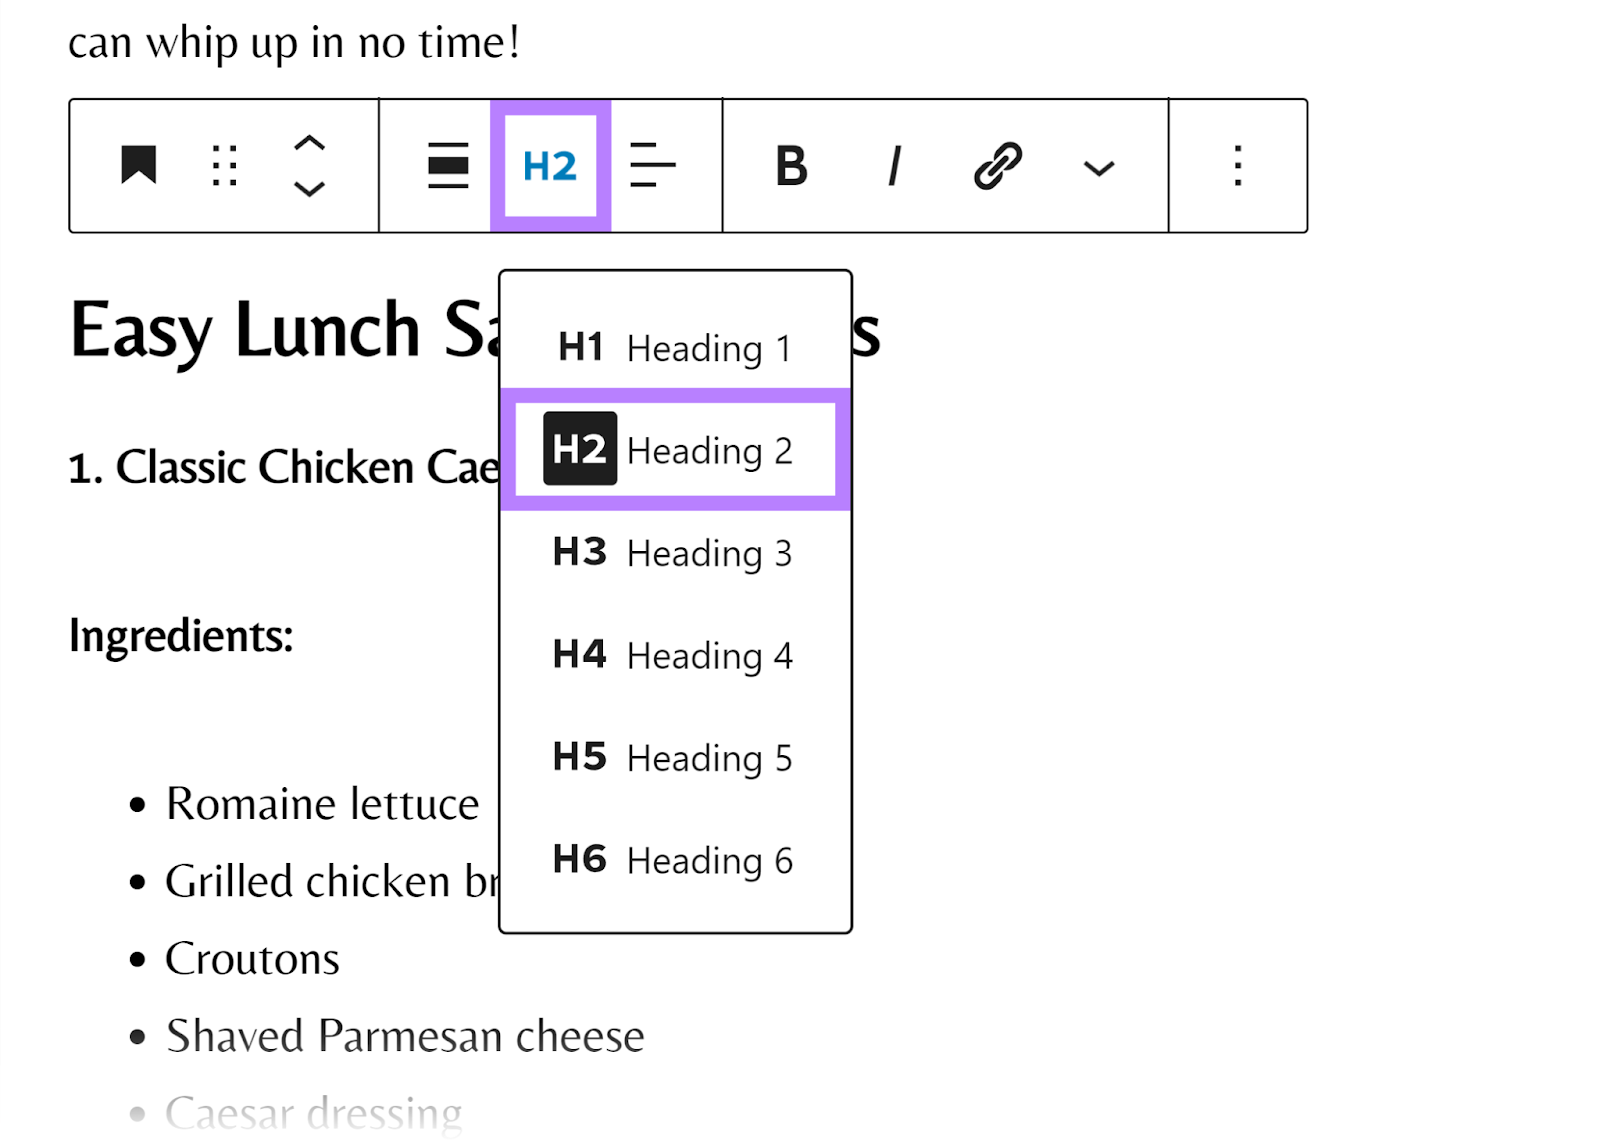
Choose the heading level you need (e.g., H2, H3, etc.) by clicking on the H2 icon.
15. Write Optimized Title Tags
The title tag tells Google how you want your page title to appear in search results.
Title tags are important for two main reasons:
They signal to Google that your page is relevant for a specific query
They’re the first thing users notice about your page in search results, so they have the power to entice users to click (or not)
If you use Yoast SEO, you can change a post’s title tag by scrolling down to the “SEO title” section in the post editor.
By default, Yoast SEO will generate a title tag for your post—using the template outlined in the “SEO title” section under “Settings” > “Content types” > “Posts.”
You can modify this template to your liking. Or modify title tags for individual posts in the WordPress editor.
Follow these tips to create optimized title tags for your pages:
Make it descriptive: Your title tag needs to make it clear what your page is about
Keep it under 70 characters: Title tags that are longer than 70 characters might appear truncated in search results, so make sure to limit your title tags to 70 characters or less
Include your primary keyword: Always include your primary keyword in the title tag, ideally at the very beginning of the tag
16. Craft Unique Meta Descriptions
The meta description can appear below the page title on SERPs and provides information about your page.
While meta descriptions aren’t a Google ranking factor, they can direct users to click on your page in the search results—driving traffic to your site and indirectly boosting your page rankings.
So, put in the effort to write attractive and relevant meta descriptions with your target audience in mind.
Here are a few tips:
Keep it under 160 characters. As with title tags, meta descriptions can also appear truncated in search results. Keep them within the character limit to reduce the chances of this happening.
Use action verbs. Use action verbs like “build,” “discover,” and “achieve” to engage users and encourage them to click your page listing
Add a call to action. Include a call to action (CTA), such as “read our guide to learn more” or “buy now,” to entice users to take action
Yoast SEO makes it easy to modify the meta description for a post or page.
Scroll down to the “Meta description” section in the editor and enter your description. Yoast will warn you if it’s too long.
17. Link Internally
Internal links are links pointing from one page to another on the same website. They’re useful for both search engines and users.
Search engines use internal links to discover new pages and understand the relationships between different pages on your site. Internal links also help pass link authority.
Users find internal links helpful because they can find relevant content on your site more easily.
Follow these tips for effective internal linking:
Focus on your most important pages. While each page should include links to other relevant pages, the focus of your internal linking strategy should be to build internal links to your most important pages. This will likely be your homepage and your top product or service pages.
Use relevant anchor text. The clickable part of a link (or anchor text) should be descriptive and relevant to the page it links to.
Consider the context. Include most of your internal links within the main content of a page (as opposed to the header or footer)—and only where they make sense. Don’t add internal links just for the sake of it—they must be helpful and relevant.
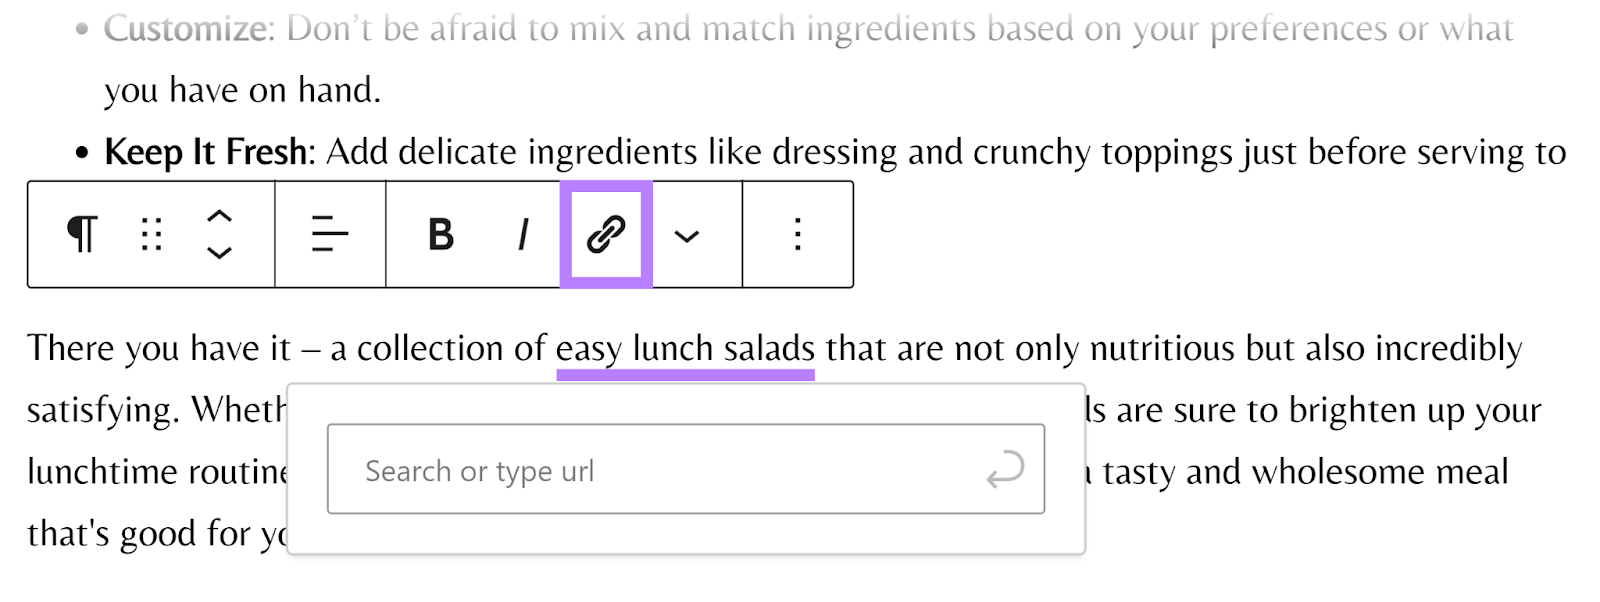
Create Internal Links
To create an internal link in WordPress, highlight a word, phrase, or sentence in the page or post editor, and then click the link icon.
Paste in the URL you’d like to link to in the box that pops up. Hit “Enter.”
Audit Your Internal Links
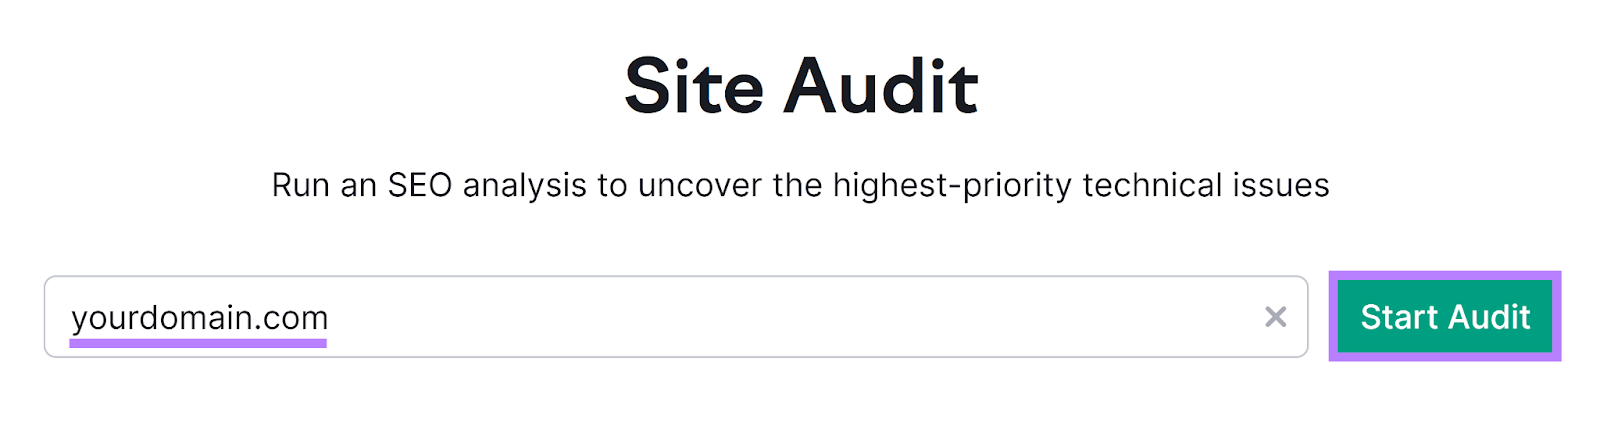
Check your website for broken internal links and other linking issues with Semrush’s Site Audit tool.
Here’s how:
Type in your domain and hit the “Start Audit” button.
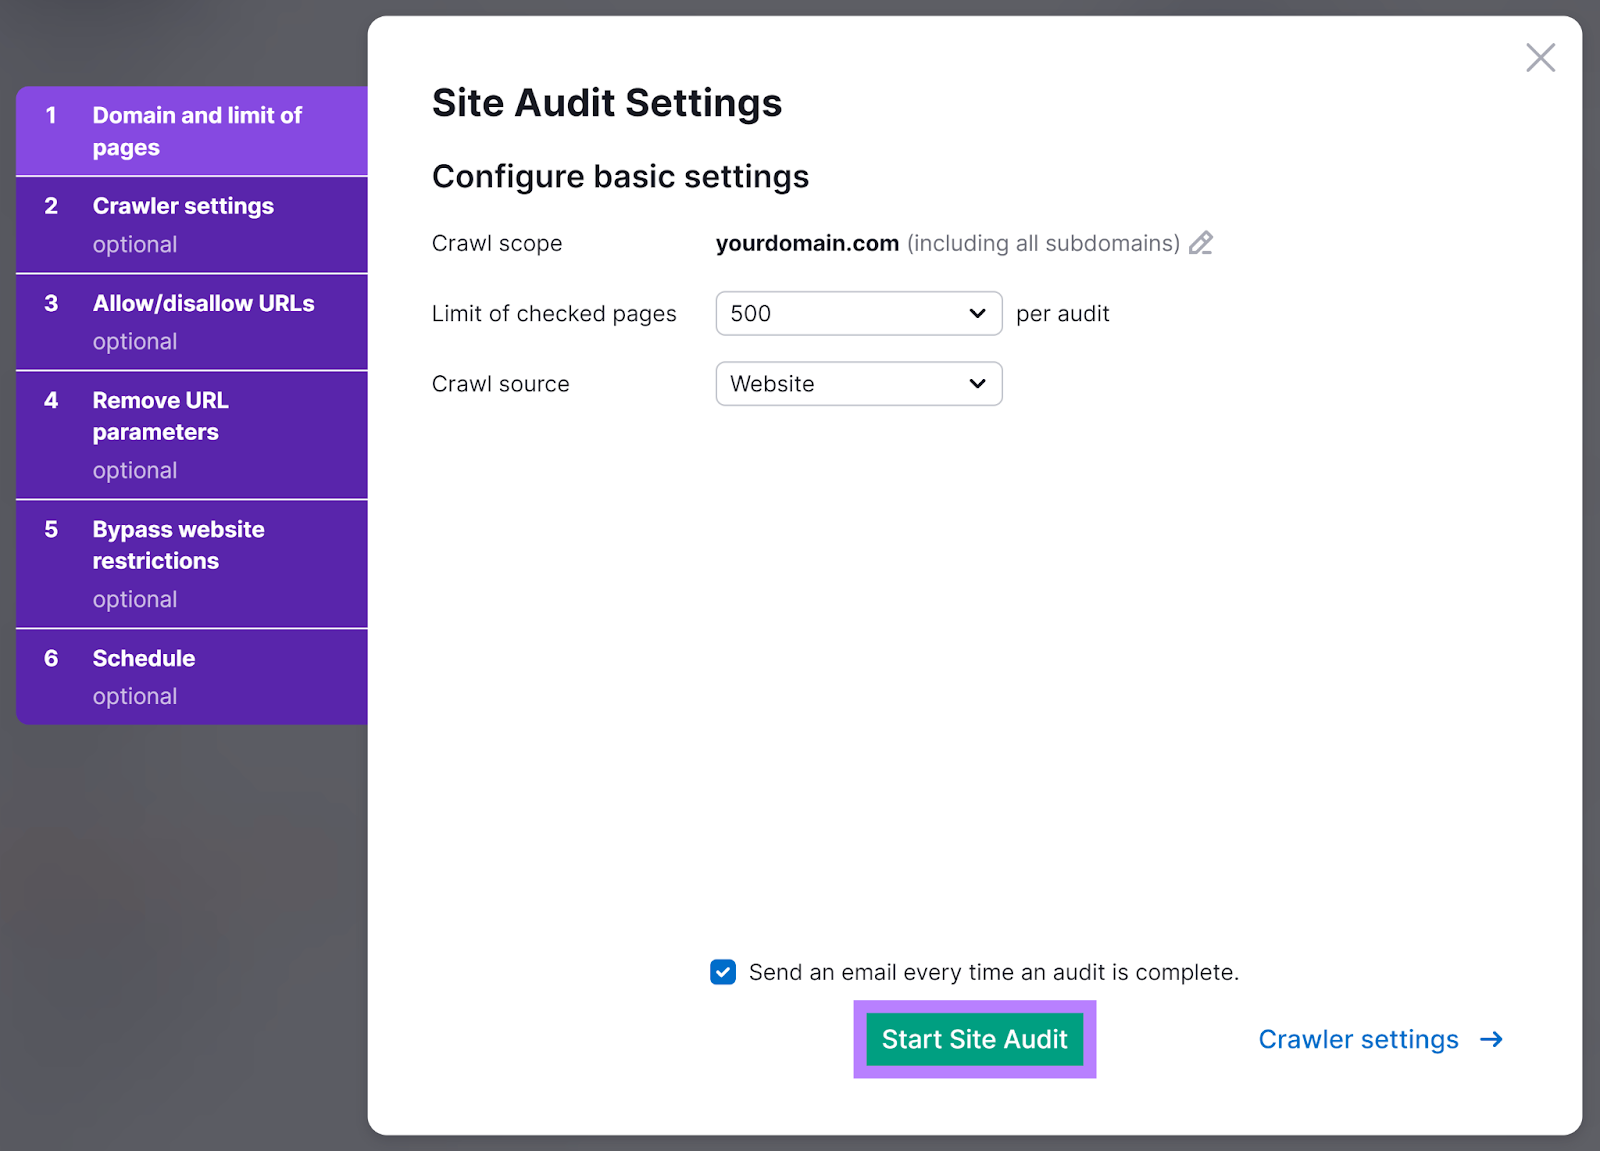
The tool lets you customize a number of settings for the audit. Including how many pages to audit, and which user agent to use when crawling your website.
For our example, we’ll go with the default settings.
Click “Start Site Audit” next.
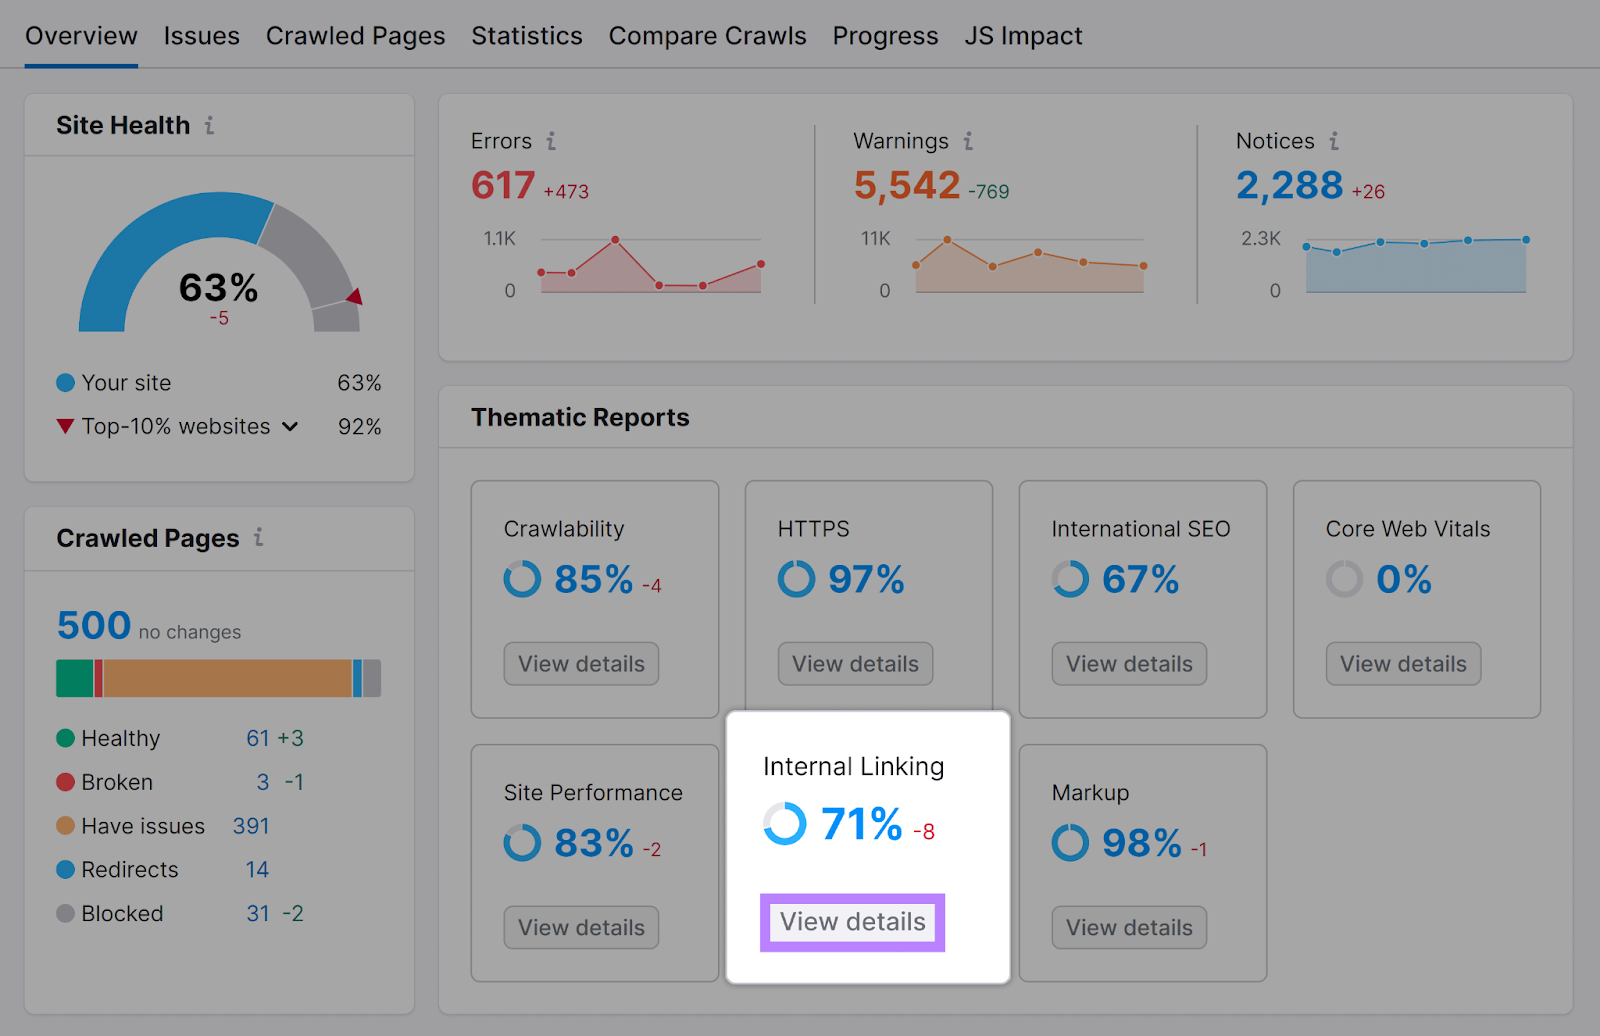
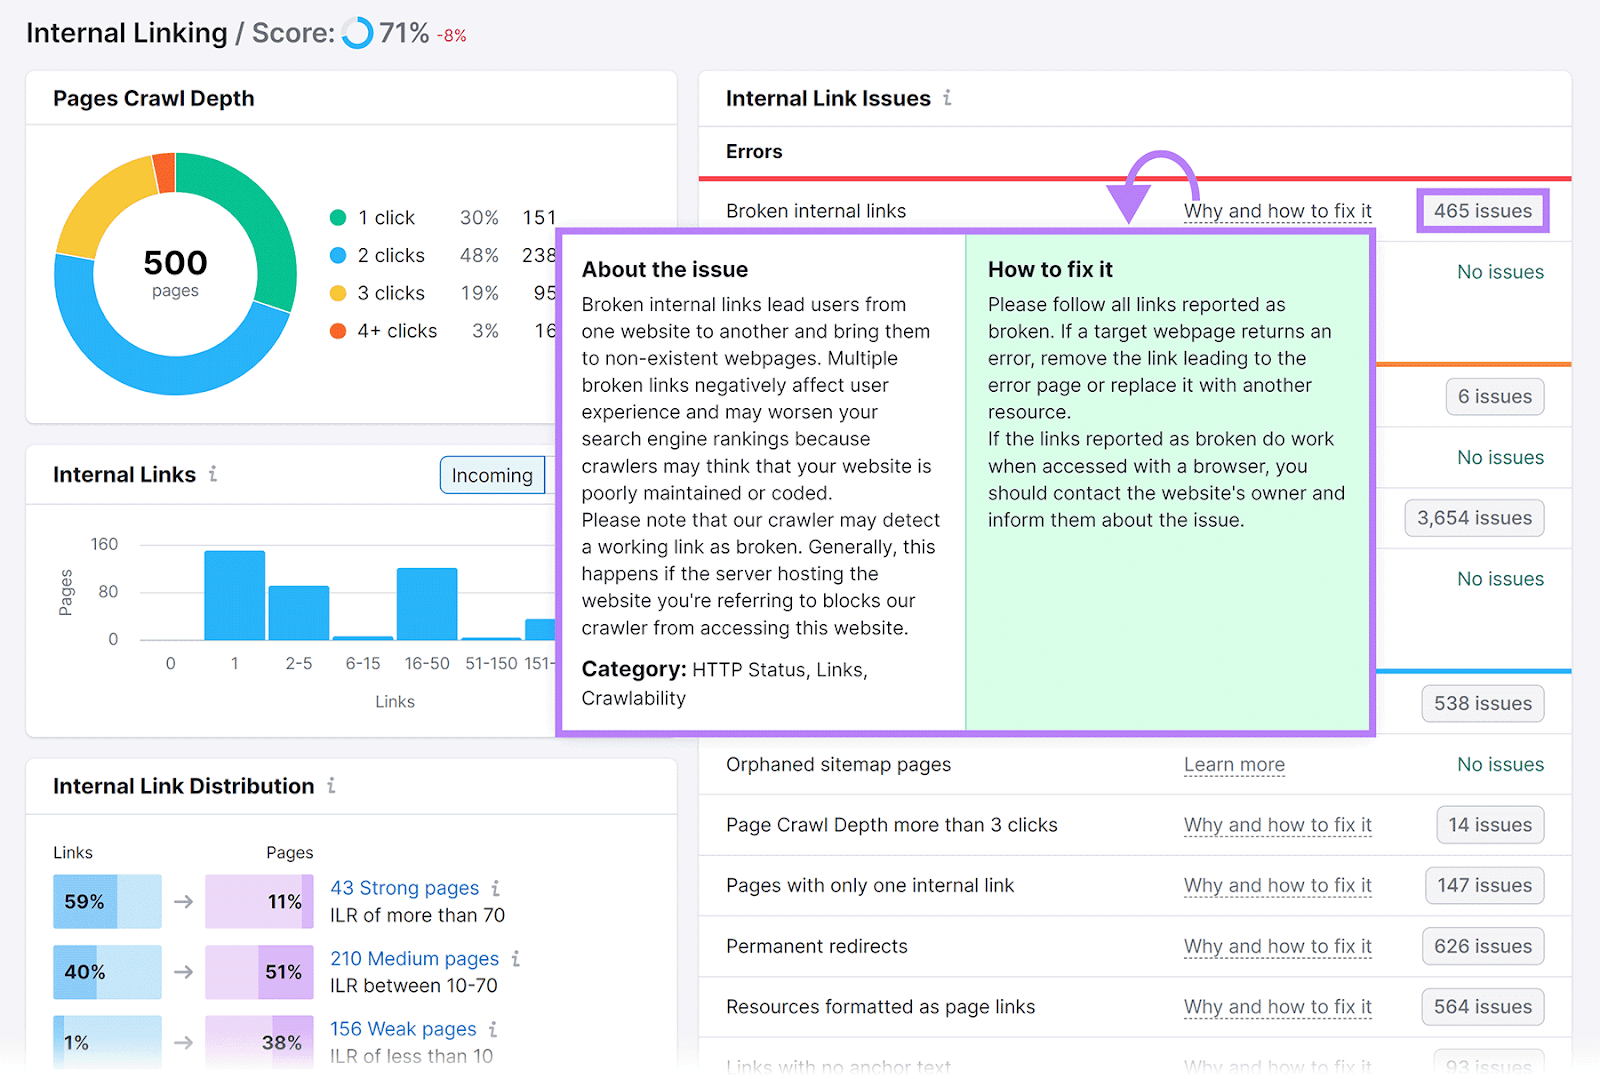
The tool will audit your website and provide a detailed report. Click “View details” under “Internal Linking” in the “Thematic Reports” section.
Here, you’ll be able to see all internal linking issues on your website.
Click the “x issues” button next to a specific issue to see all the pages containing that issue. Or click “Why and how to fix it” to learn more about each issue.
18. Write Descriptive Image Alt Text
Image alt text (or alt tags) helps search engines understand what an image is about.
Screen reader software uses it to guide visually impaired users around desktop and mobile devices.
By adding alt text to images, you help both search engines and users understand what those images contain.
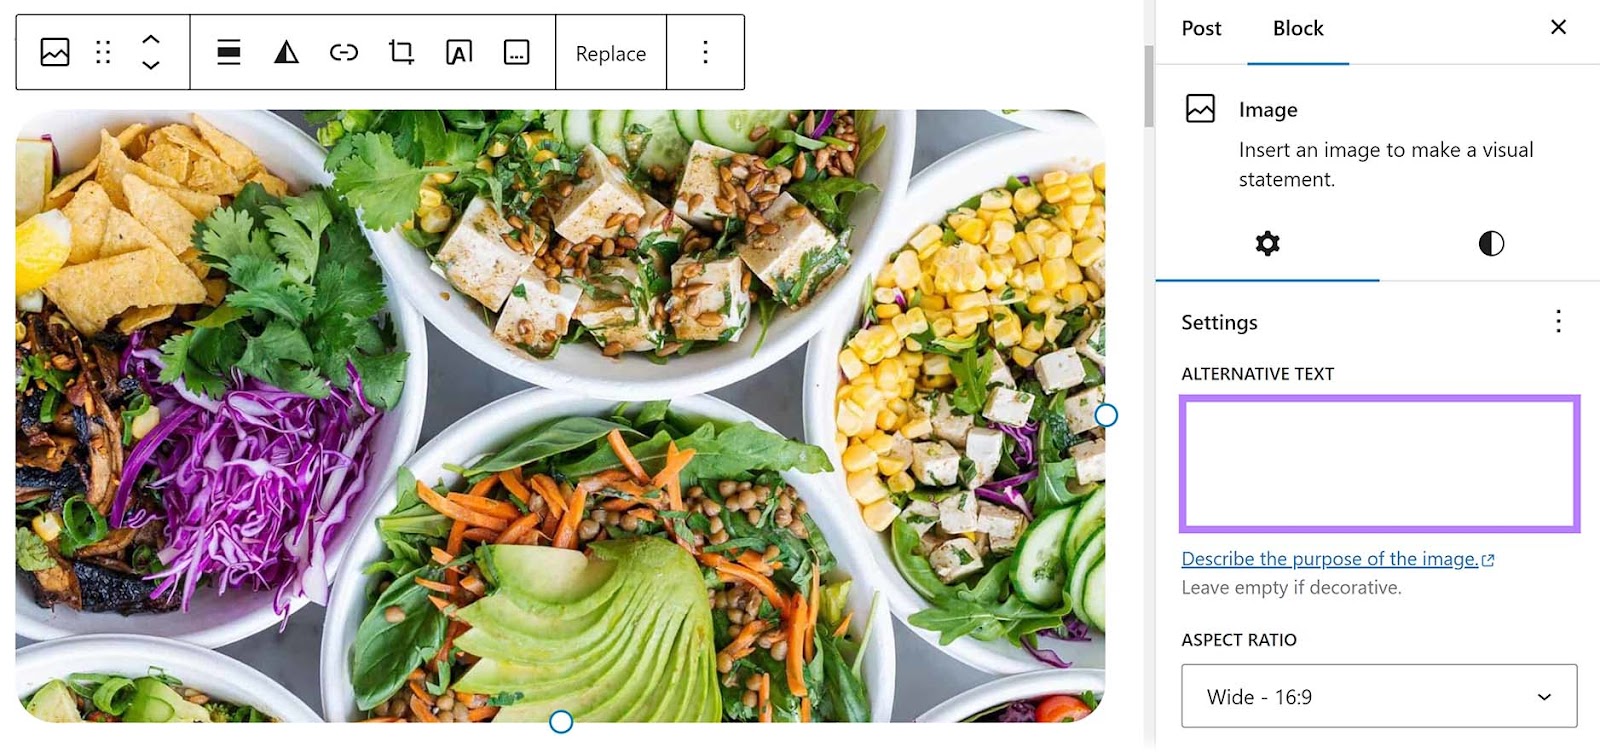
To add alt text to an image in WordPress, select the image in the editor. Type in the alt text into the “Alternative text” box on the right-hand side of the screen.
When writing your alt text, simply describe the image. Only if relevant, include a keyword to increase the chances of your image ranking in Google’s image search results.
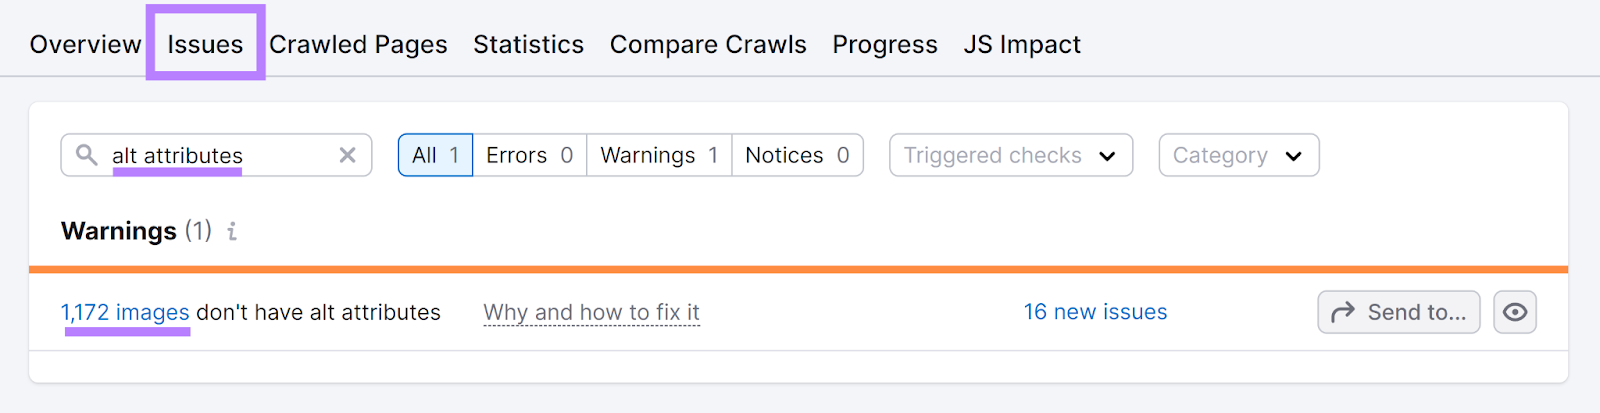
To check your website images for missing alt text, use Site Audit.
Visit the “Issues” tab of the Site Audit report. Type “alt attributes” into the search box.
The tool will then show you how many of your images don’t have alt text.
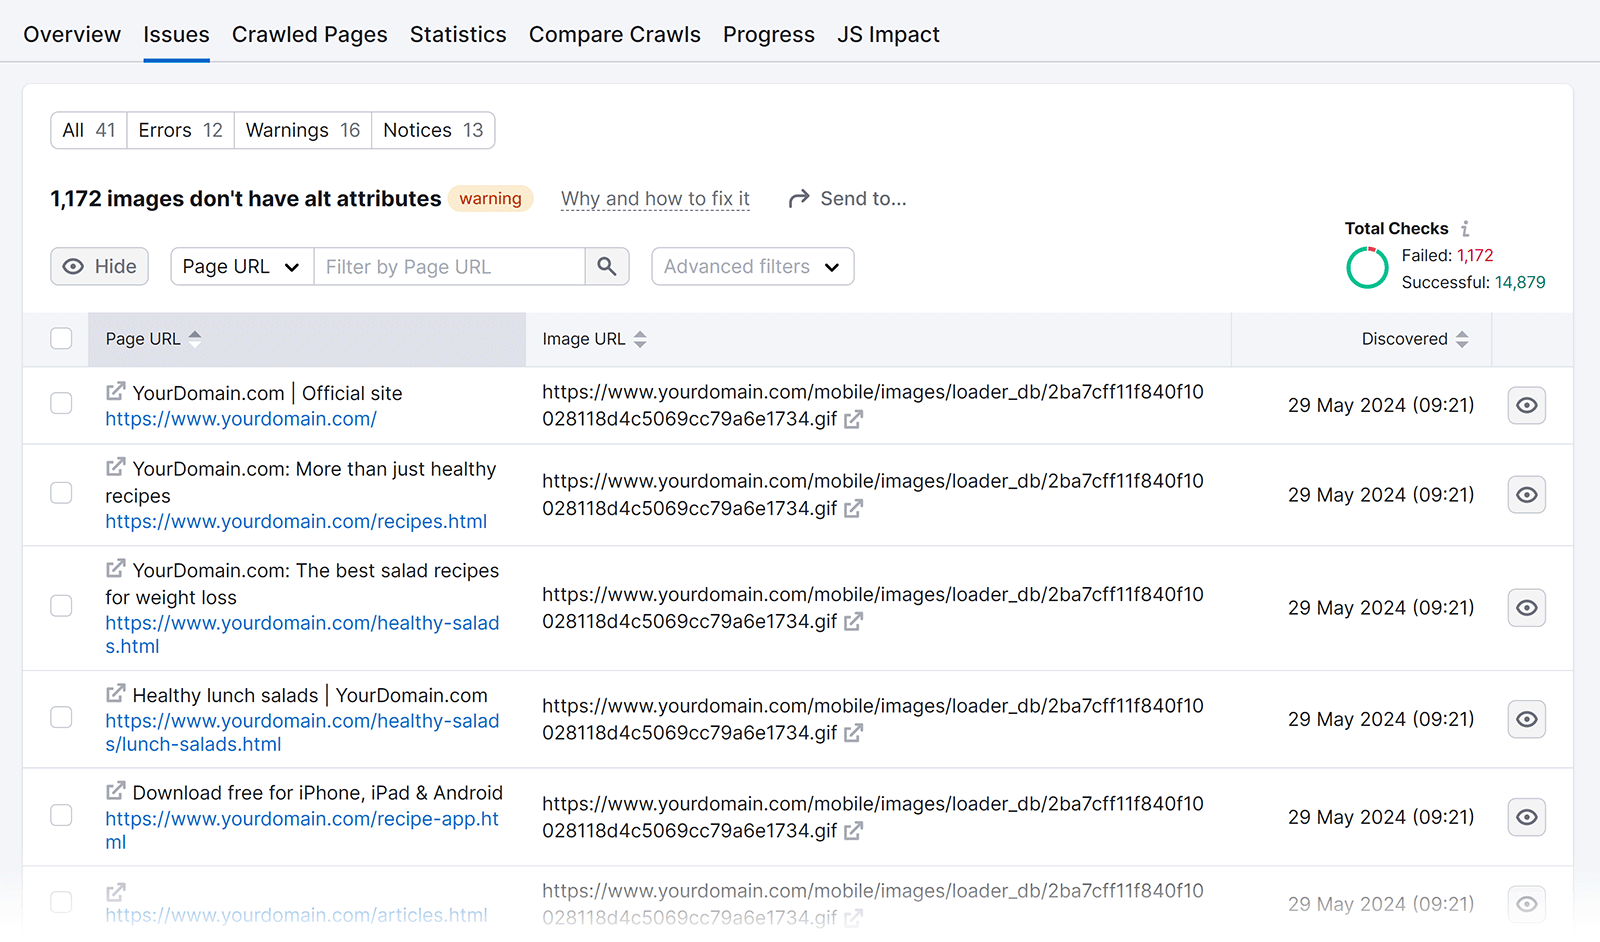
Click the highlighted part of the issue to see a list of pages where you can find these images. Like this one:
Edit these pages in WordPress to add the missing alt text.
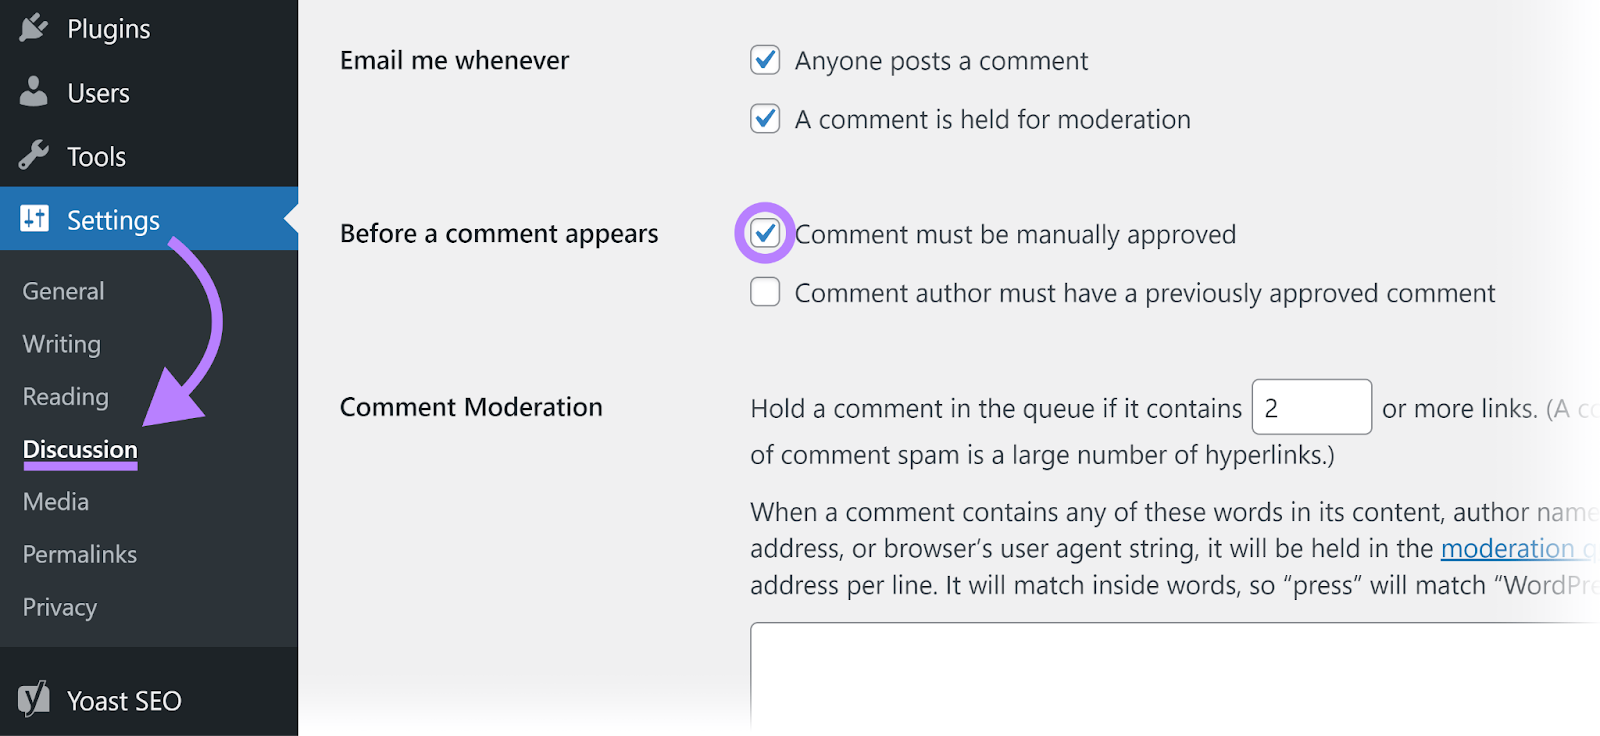
You should approve comments on your WordPress posts manually to avoid getting spammed.
In the early days of SEO, commenting on other people’s blogs was a popular way to build links. Which led to the creation of software to automate the process.
Unfortunately, this resulted in spam comments overtaking the comment sections of most blogs.
In an attempt to address the issue, WordPress made all links in comments “nofollow” by default—which means these links no longer carry any link equity. That makes them much less valuable for SEO purposes.
However, some people still use software that automates blog commenting. Which puts your WordPress website at risk of comment spam.
To prevent getting overwhelmed with spam comments, enable WP’s “Comment must be manually approved” option under “Settings” > “Discussion.”
Fast websites provide a better user experience and allow you to find the information you’re looking for faster.
Follow these tips to speed up your WordPress website.
Upgrade Your Web Hosting
The web hosting provider you use and the hosting plan you choose have a big impact on your website’s page speed.
Make sure to go for a reputable web hosting provider. Ideally, it should either offer a dedicated WordPress hosting plan or specialize in hosting WordPress websites.
When it comes to your hosting plan, try to avoid shared hosting—where the same server hosts multiple websites. And you can’t really choose which other websites will be on the server alongside yours.
The main issue with shared hosting is you might end up on a server with resource-intensive websites. Which can result in reduced performance for your site.
If your budget allows for it, opt for dedicated hosting. Your website will get its own dedicated server for optimal performance.
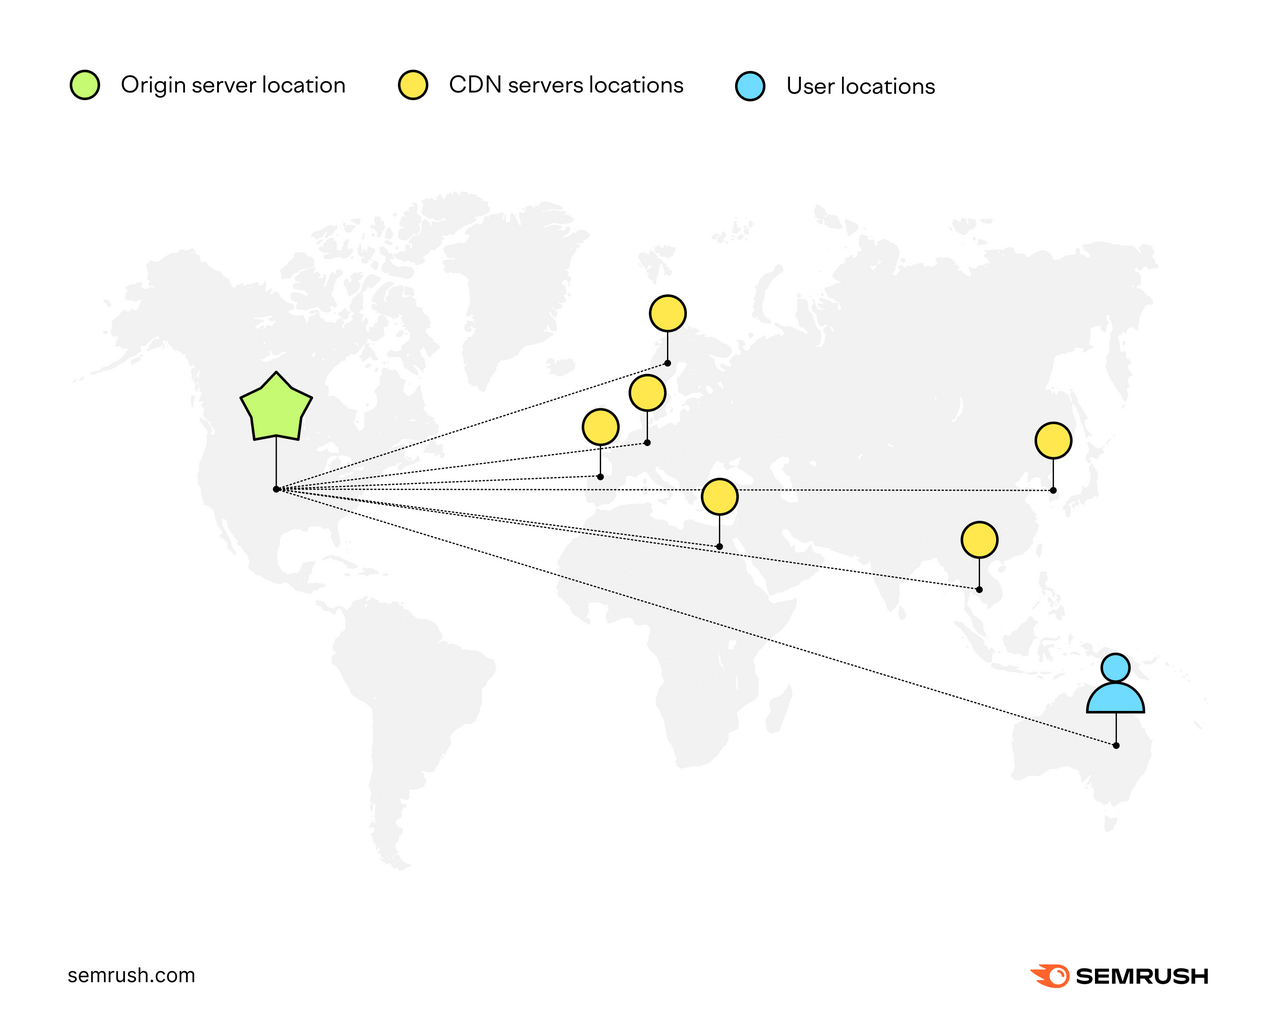
Use a CDN
A content delivery network (CDN) can speed up your website by serving your website content from servers that are physically the closest to a visitor’s location.
Which can result in a significant improvement in page load speed.
Having a lot of high-definition images can slow down your website considerably. While you shouldn’t avoid using images on your website, you should optimize them for performance.
Here are a few things you can do:
Compress images. Images can contain unnecessary bits of data you can remove to reduce file size with no negative impact on quality. You can compress images using online platforms like Kraken.io or WP plugins like Smush.
Opt for web-friendly formats. While JPEG and PNG are very popular image formats, consider switching to more performance-friendly formats like WebP. These offer superior compression with minimal loss in image quality.
Use lazy loading. You can improve page load speed further by using lazy loading—a technique that involves delaying image loading until it’s absolutely needed.
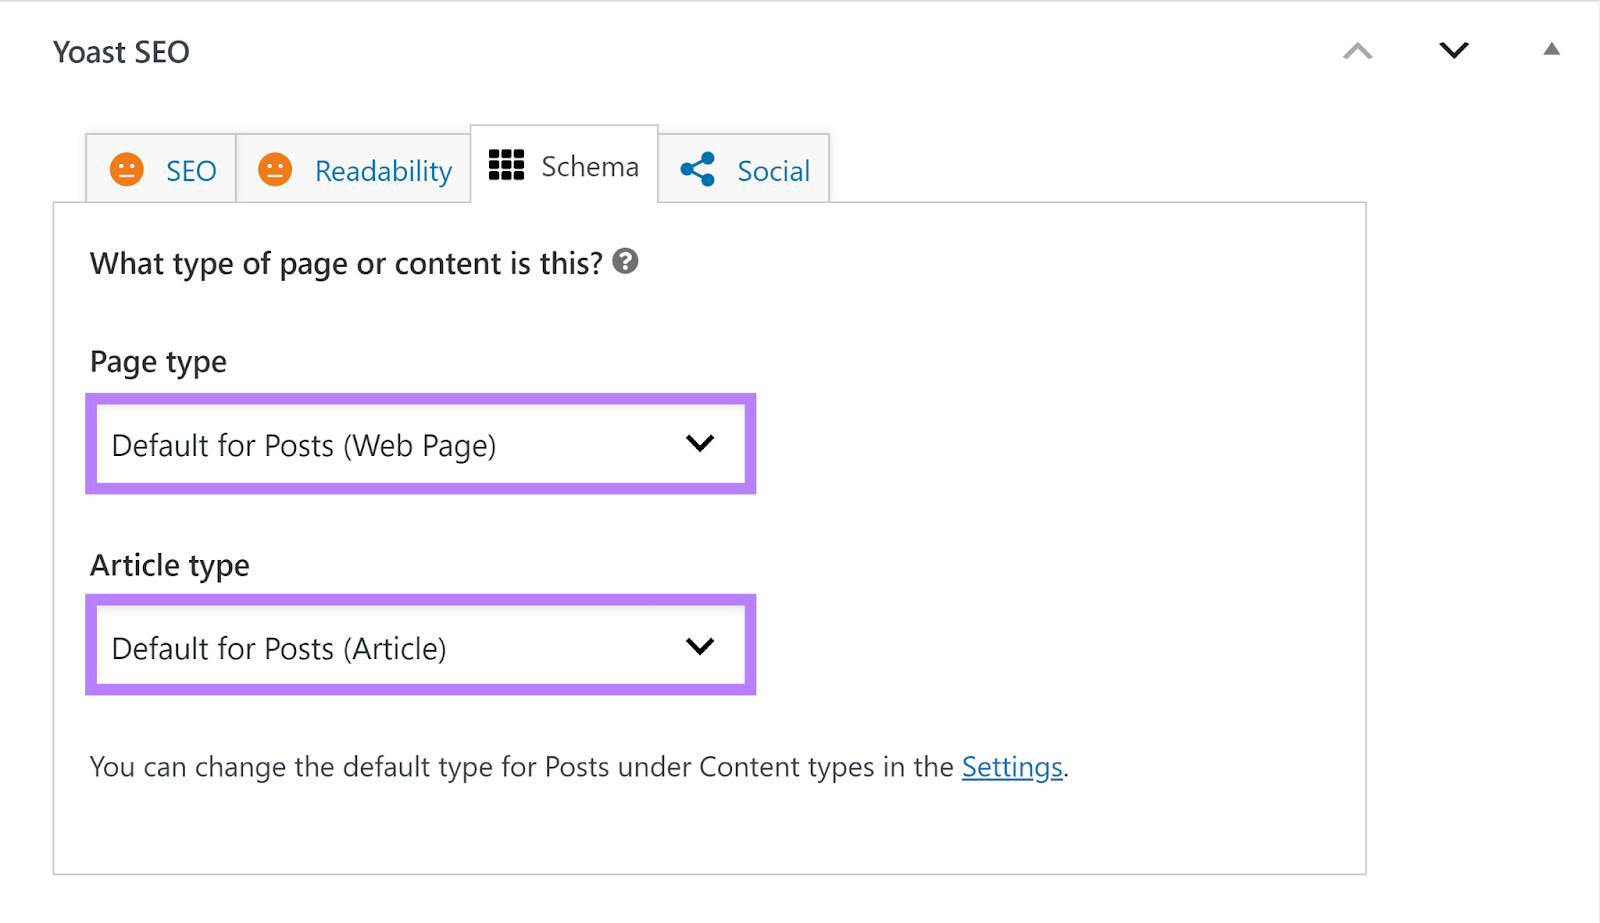
21. Mark Up Your Pages with Schema
Schema markup (or structured data) is a type of code that helps search engines understand the content on a webpage.
Adding schema markup to your WordPress website will make it eligible for “rich results.”
The easiest way to add schema markup in WordPress is through a plugin like Yoast SEO. It will automatically add structured data to your website, but you can change the schema type on individual pages or posts in the WP editor.
Click on the “Schema” tab, then use the “Page type” and “Article type” drop-downs to select the right schema type.
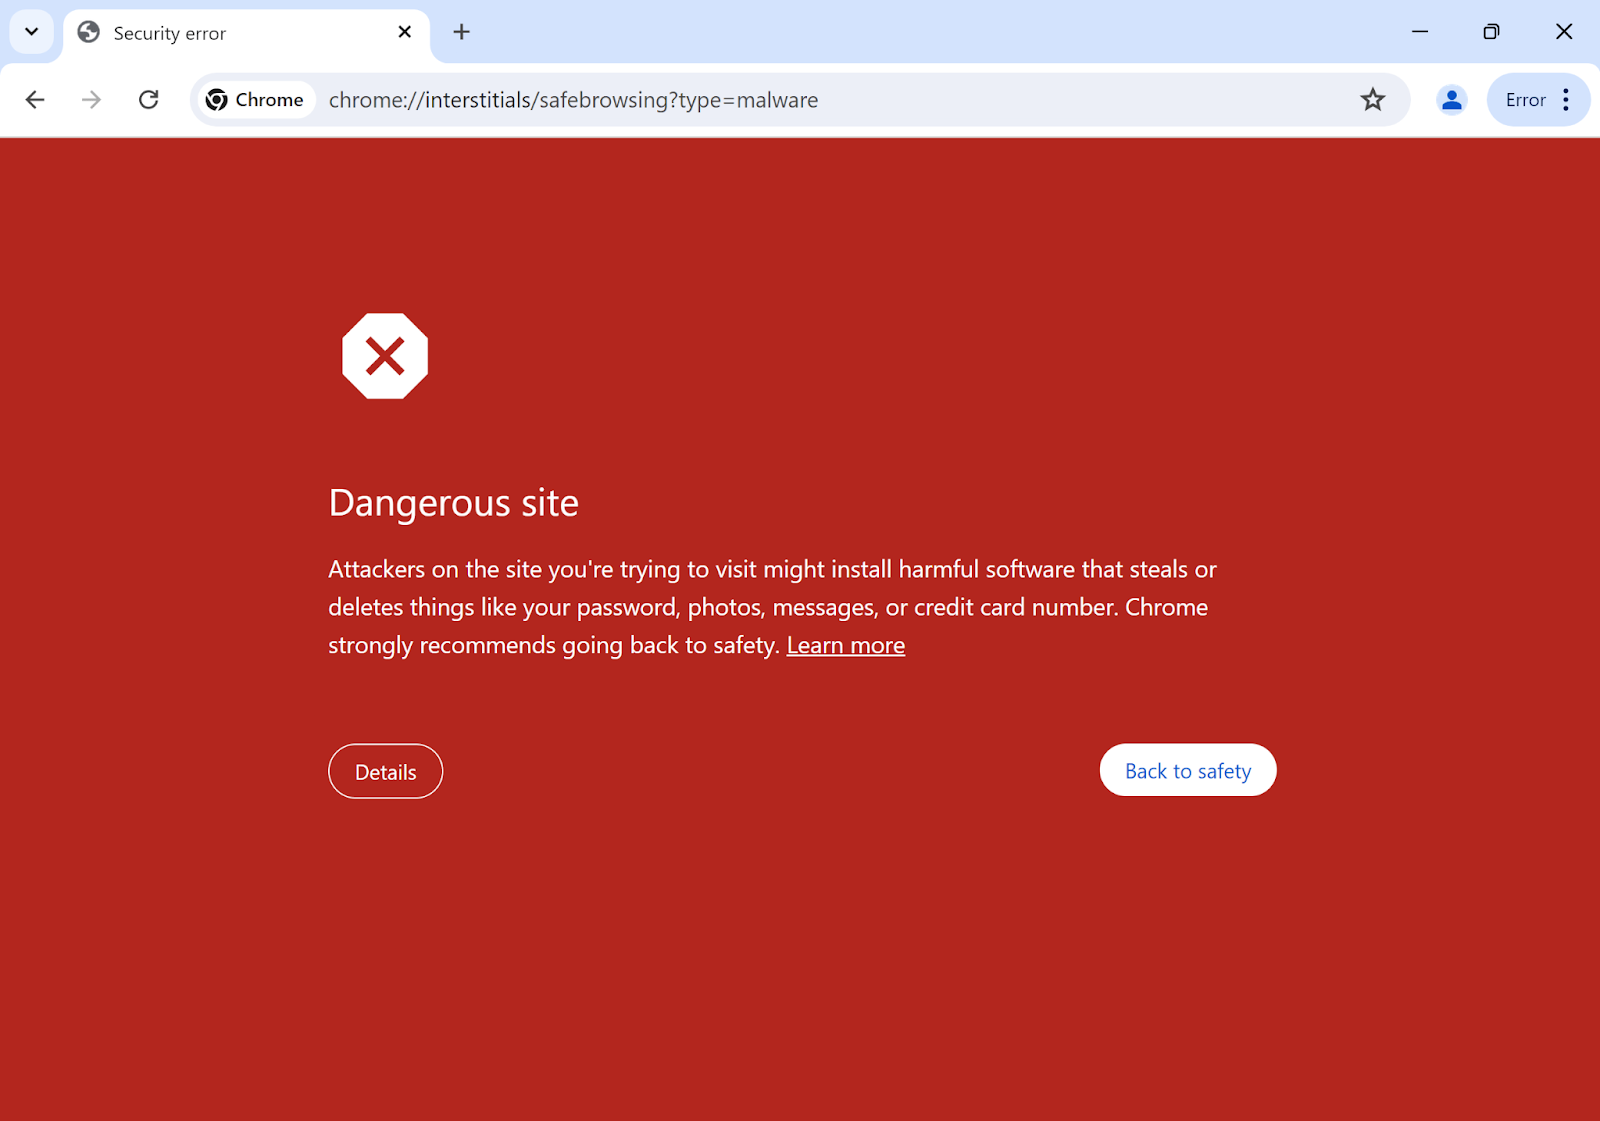
22. Secure Your WordPress Website
Not securing your WordPress website properly can make it susceptible to cyber attacks. And result in your website hosting various types of malware.
Search engines and web browsers may in turn flag it as a dangerous and spammy website.
This will obviously negatively impact your website’s ability to rank in search results. And even if it does rank, users will be wary of visiting it after seeing a warning like this:
Here’s what you can do to protect your website.
Use a Security Plugin
There are a number of WordPress security plugins you can use to make your website less vulnerable to security threats. They include features like:
Security requirements for user credentials: Prevent users from creating accounts using weak, easy-to-guess passwords
Two-factor authentication: A security process that requires users to verify their identity using two factors (e.g., a password and an SMS code)
Brute force protection: Prevents malicious actors from hacking your website using brute force attacks—a hacking method that relies on trial-and-error to guess passwords or encryption keys
Automatic vulnerability scans: Scanning your website for vulnerabilities and malware at predefined intervals (e.g., daily, weekly, or monthly)
Another way to protect your website is to only install plugins from the official WordPress plugin directory.
For any plugin you install, make sure it has a high rating and many positive reviews. And that it’s compatible with your version of WordPress.
Avoid plugins that haven’t received updates in a long time. Outdated plugins can have security vulnerabilities. Or even break your site.
Update Regularly
WordPress frequently releases updates. Sometimes, these updates fix security threats.
So, it’s important to update WordPress regularly. Both the core WordPress CMS and your WordPress theme and plugins.
WordPress makes it easy to stay on top of updates by visiting “Dashboard” > “Updates.” Where you get a list of all available updates.
From here, it takes a single click to initiate an update.
Use a Backup Plugin
In case your site breaks or gets compromised for any reason, have a backup you can use to restore it.
There are a number of dedicated backup plugins for WordPress that offer features like automated backups, backing up your website to the cloud, and more.
Once you update a blog post in WordPress, add a “Last updated” date to show both search engines and users that the content update is recent.
You can do this by manually changing the publication date in the WordPress post editor. Simply hit the “Publish” field in the right-hand menu to choose a date and time.
You can also install a plugin like WP Last Modified Info, which will automatically add a “Last modified” date to your posts.
Is WordPress Good for SEO?
Yes, WordPress is good for SEO. Out of the box, the platform offers a nice set of SEO-friendly features, including:
Custom titles and meta descriptions
Custom URL structure
Image alt text
And, as already mentioned throughout this guide, there are plenty of plugins you can use to enhance WordPress’s SEO capabilities even further.
Yoast SEO, Smush, and Autoptimize can help you implement schema markup, add breadcrumb navigation, optimize your images and coding scripts, and more.
Improve Your WordPress SEO
Use the above 23 tips when doing SEO for WordPress to give your site the best chance of ranking among the top search engine results listings.
And take advantage of Semrush tools like Site Audit to regularly check your website for SEO issues that might be holding you back from hitting higher SERP rankings.
Denial of responsibility! Search Engine Codex is an automatic aggregator of the all world’s media. In each content, the hyperlink to the primary source is specified. All trademarks belong to their rightful owners, all materials to their authors. If you are the owner of the content and do not want us to publish your materials, please contact us by email – [email protected]. The content will be deleted within 24 hours.